10 Secrets to Fluffy Gluten-Free Pancakes
Let me tell you about the morning I almost gave up on gluten-free pancakes. There I was, staring at yet another batch of dense, gummy discs that looked more like hockey pucks than breakfast – and my kids were not impressed. That’s when I started playing mad scientist in my kitchen, determined to crack the code for fluffy gluten-free pancakes that actually rise. The secret? A simple but magical combo of the right flour blend and a trick I learned from my grandma about when to flip. Now these golden, cloud-soft pancakes are our Sunday morning tradition – so light they practically float off the plate, with just enough sweetness to make syrup optional. Trust me, nobody will guess they’re gluten-free!
Why You’ll Love These Fluffy Gluten-Free Pancakes
These pancakes are my breakfast game-changer, and here’s why they’ll become yours too:
- Light as a cloud: That first bite of tender, airy perfection will make you forget they’re gluten-free
- Ready in 15 minutes: From bowl to plate faster than you can brew coffee (I’ve timed it!)
- No fancy techniques: Just simple mixing – my 8-year-old could make these (and sometimes does)
- Crazy adaptable: Works with any milk you’ve got – dairy, almond, even oat milk from that half-empty cartin in your fridge
- Leftover magic: They reheat beautifully for rushed weekday mornings (unlike most GF baked goods)
The best part? Watching gluten-eaters take a skeptical bite… then immediately ask for seconds.
Ingredients for Fluffy Gluten-Free Pancakes
Here’s everything you’ll need to create pancake magic – and yes, I’ve tested every possible variation of these ingredients to get them just right:
- 1 cup gluten-free flour blend (lightly spooned, not packed!) – My secret? Bob’s Red Mill 1-to-1 works best, but any good blend with xanthan gum will do
- 2 tbsp sugar – Just enough sweetness without turning breakfast into dessert
- 1 tsp baking powder – The real MVP for that perfect rise (check it’s fresh!)
- 1/2 tsp baking soda – Our little chemical leavening helper
- 1/4 tsp salt – Trust me, it makes all the flavors pop
- 1 cup milk (any kind!) – I’ve used everything from whole dairy to almond milk with great results
- 1 large egg (room temperature) – Cold eggs can make the batter seize up – learned that the hard way!
- 2 tbsp melted butter or oil – Butter adds richness, but avocado oil works great too
- 1 tsp vanilla extract – The flavor booster that makes them taste bakery-quality
See that “lightly spooned” note on the flour? That’s crucial – packing it down leads to dense pancakes (ask me how I know). And if you’re dairy-free, just swap the butter for coconut oil and use your favorite plant milk. Easy peasy!
Equipment You’ll Need
Listen, I’m not one for fancy gadgets – these pancakes come together with just the basics you probably already have in your kitchen. Here’s what you’ll be grabbing:
- 2 mixing bowls (one for dry, one for wet – keep ‘em separate until the magic moment)
- A trusty whisk (or fork in a pinch, but I always lose track of forks when I need them)
- Non-stick skillet or griddle (my cast-iron works great too if you’re patient with the heat)
- Measuring cups and spoons (eyeballing leads to pancake disasters – again, ask me how I know)
- Spatula (the thin, flexible kind so you can sneak under those golden edges perfectly)
- Ladle or 1/4 cup measure (for those Instagram-worthy uniform rounds)
That’s it! No stand mixers, no special tools – just good old-fashioned pancake-making gear. Though I will confess, my ancient plastic ladle with the chipped edge is basically my kitchen security blanket at this point.
How to Make Fluffy Gluten-Free Pancakes
Okay, time for the fun part! I’ve made these pancakes so many times I could probably do it in my sleep (and honestly, some Saturday mornings I practically do). Follow these steps, and you’ll have a stack of golden, fluffy perfection in no time.
Step 1: Mix Dry Ingredients
First things first – grab that medium bowl and let’s get our dry team assembled. Whisk together:
- The gluten-free flour (remember – spoon it in lightly!)
- Sugar (that sweet little flavor boost)
- Baking powder (our rising superstar)
- Baking soda (its trusty sidekick)
- Salt (the unsung flavor hero)
Here’s my pro tip: whisk for a good 30 seconds to really distribute those leaveners evenly. I learned this the hard way when I got lazy once and ended up with pancakes that had weird bitter spots (yuck!). The mixture should look uniform – no little baking powder mountains lurking in the flour.
Step 2: Combine Wet Ingredients
Now for the wet team in our second bowl. This is where the magic starts to happen:
- Milk (whatever kind you’re using)
- Egg (that room temp beauty)
- Melted butter or oil (hello, richness!)
- Vanilla extract (the flavor fairy dust)
Whisk them together like you’re trying to wake them up – about 30 vigorous seconds should do it. You’re looking for that perfect smooth blend where the egg is fully incorporated and there’s no weird butter clumps floating around. If your butter seizes up when it hits cold ingredients (been there!), just whisk a little longer – it’ll come together.
Step 3: Cook to Perfection
Okay, here’s where many gluten-free pancakes go wrong, but we’ve got this! Pour the wet ingredients into the dry and – here’s the crucial part – stir just until combined. I mean it! A few lumps are FINE. Overmixing is the enemy of fluffy pancakes – it makes them tough and sad.
While the batter rests for a minute (this helps the flour hydrate), heat your pan or griddle over medium heat. Test the heat by flicking a few drops of water – they should dance before evaporating. Lightly grease the surface (I use a paper towel with a smidge of butter).
Now, pour about 1/4 cup batter per pancake. Watch for bubbles forming on the surface and the edges looking set – usually about 2-3 minutes. This is your cue to flip! Don’t peek too early – let them do their thing. The second side cooks faster, just about 1-2 minutes until golden brown.
Pro tip: If your pancakes are browning too fast, lower the heat slightly. And resist the urge to press them down with the spatula – we want them fluffy, not flat!
Tips for the Best Fluffy Gluten-Free Pancakes
After burning more pancakes than I’d like to admit (and eating them anyway because, well, pancakes), I’ve picked up some foolproof tricks that’ll guarantee perfect results every time:
Let the batter rest – Walk away for 5 minutes after mixing! This gives the gluten-free flour time to absorb liquid properly. You’ll see the batter thicken slightly – that’s exactly what we want for maximum fluffiness.
Temperature matters – If your pan’s too hot, the bottoms will burn before the middle cooks. Too cold, and they’ll spread into sad, flat discs. Medium heat is your sweet spot – adjust as needed between batches.
The bubble rule never lies – Wait until bubbles form across the entire pancake surface AND pop before flipping. Early flippers get dense pancakes (my husband’s specialty).
Use a measuring cup – That 1/4 cup measure isn’t just for ingredients! Pouring equal amounts means even cooking time for every pancake in the batch.
Keep ’em cozy – Slide cooked pancakes onto a baking sheet in a 200°F oven while you finish the batch. They’ll stay warm without getting soggy.
Sweetness tweak – For picky eaters, bump the sugar to 3 tbsp. For a savory twist, reduce to 1 tbsp and add herbs – my kids love these with chives and cheddar!
The lump rule – Repeat after me: lumps are friends! Overmixed batter = rubbery pancakes. Stir until just combined, then walk away.
Butter wisely – Grease the pan lightly between batches. Too much butter makes the pancakes fry instead of bake – tasty but greasy.
Remember: the first pancake is always the test run (mine usually goes to the dog). Don’t panic if it’s not perfect – adjust heat and keep going!
Fluffy Gluten-Free Pancakes Variations
Now that you’ve mastered the basic recipe, let’s get creative! One of my favorite things about these pancakes is how easily they transform with simple add-ins. Here are all the delicious variations I’ve tested (and devoured) over countless Saturday mornings:
Sweet Twists
For those days when you want breakfast to feel like dessert (no judgment here!):
- Blueberry Bliss: Gently fold in 1/2 cup fresh or frozen blueberries right before cooking. The berries burst with juicy goodness – just wait until you see those purple swirls!
- Chocolate Chip Heaven: A handful of mini chocolate chips makes every bite magical. Pro tip: sprinkle some on top right after pouring the batter for picture-perfect melted pools.
- Cinnamon Roll Vibes: Add 1 tsp cinnamon to the dry ingredients and swirl in a mix of 2 tbsp melted butter + 2 tbsp brown sugar before flipping. Drizzle with cream cheese glaze if you’re feeling fancy.
- Banana Walnut: Mash 1 ripe banana into the wet ingredients and fold in 1/4 cup chopped walnuts. Tastes like banana bread in pancake form!
Savory Surprises
Who says pancakes can’t be dinner? These savory versions have saved me on many “what’s for dinner?” nights:
- Cheesy Herb: Reduce sugar to 1 tbsp and mix in 1/2 cup shredded cheddar + 2 tbsp chopped fresh chives. Serve with sour cream – trust me on this one.
- Everything Bagel: Stir in 2 tbsp everything bagel seasoning and top with smoked salmon and cream cheese. My husband’s brunch obsession!
- Corn & Jalapeño: Add 1/3 cup corn kernels (fresh or frozen) + 1 diced jalapeño (seeds removed if you’re spice-shy). Amazing with avocado slices.
Flour Alternatives
Ran out of your usual GF blend? Here’s what else works (with slight adjustments):
- Almond Flour: Replace 1/4 cup GF blend with almond flour for extra protein (add 1 extra tbsp milk as it absorbs more liquid).
- Oat Flour: Use certified GF oat flour for 1/3 of the blend – gives a lovely hearty texture (let batter rest 10 minutes).
- Coconut Flour: Only substitute 2 tbsp max – this thirsty flour needs extra liquid (I add 1 extra egg white).
The beauty of this recipe? It’s like your favorite little black dress – perfect as is, but so easy to accessorize! My kids love making “pancake lab” weekends where we test new combos. Last week’s pumpkin spice version with pecans might just be our new fall favorite.
Serving Suggestions
Now for the best part – dressing up these golden beauties! Here’s how we love to serve our fluffy gluten-free pancakes (though honestly, they’re delicious naked too – no shame in finger-snatching bites straight from the stack!).
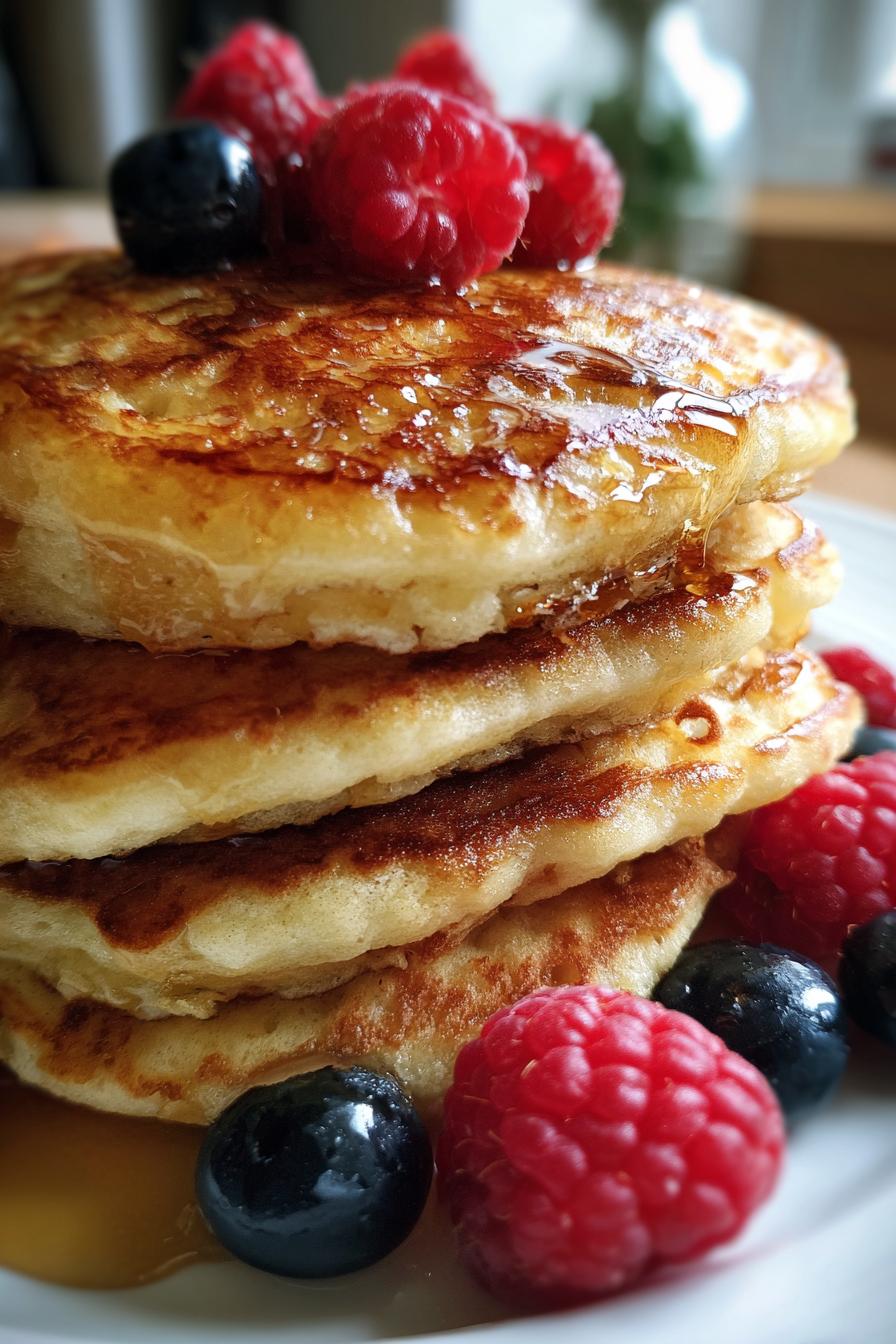
The Classic: Warm maple syrup cascading down the sides with a pat of butter melting into golden pools. My kids call this “pancake waterfalls” and it’s pure breakfast magic.
Fruit Fiesta: Pile on fresh berries, sliced bananas, or sautéed apples with cinnamon. In summer, I love tossing peaches on the griddle for a minute before serving – the caramelized edges are incredible.
Nut Butter Boost: Swirl almond or peanut butter between layers like edible glue, then drizzle with honey. My protein-packed secret for keeping the kids full till lunch!
Whipped Cream Wonderland: A dollop of homemade whipped cream (I add a splash of vanilla) turns breakfast into dessert. Pro tip: sprinkle with lemon zest for brightness.
Savory Stack: Top with crispy bacon or sausage patties and a fried egg for the ultimate sweet-salty combo. My husband’s Saturday morning special!
The beauty is in the simplicity – these pancakes shine with just about anything. Even my “I’m not hungry” teenager can’t resist when I slide a plate of warm pancakes with whatever toppings we’ve got on hand across the counter. Breakfast victory!
Storing and Reheating Fluffy Gluten-Free Pancakes
Here’s the beautiful truth about these pancakes – they actually keep their texture when stored! Unlike most gluten-free baked goods that turn into cardboard by lunchtime, these stay delicious for days. Here’s exactly how I keep them fresh (because let’s be real, I always make a double batch – pancake math says extras disappear faster than the first round!).
Fridge Storage: Cool pancakes completely first (hot pancakes = soggy mess). Stack them with parchment paper between each one (I reuse the paper from my butter wrappers – waste not!), then pop them in an airtight container. They’ll stay perfect for 3-4 days. My kids grab these cold from the fridge as after-school snacks – they swear they taste like “pancake cookies!”
Freezer Magic: For longer storage, freeze pancakes flat on a baking sheet first (about 1 hour), then transfer to freezer bags with parchment dividers. They’ll keep for 2 months – though ours never last that long! Label the bag with the date because freezer amnesia is real (“Are these pancakes or…?”).
Reheating Like a Pro:
- Toaster Method: My weekday go-to! Pop frozen pancakes straight into the toaster on medium setting. They come out crispy-edged and warm inside – just like fresh.
- Oven Revival: For a bigger batch, arrange pancakes on a baking sheet and warm at 350°F for 5-8 minutes (no need to thaw first). Cover loosely with foil if they’re browning too fast.
- Microwave Hack: Place 1-2 pancakes on a microwave-safe plate with a damp paper towel on top. Heat for 20-30 seconds – the steam keeps them from drying out.
Pro tip: If you’re reheating syrup too, warm it separately – cold syrup on hot pancakes makes them soggy. And if your pancakes seem a bit dry after storage, a quick brush of melted butter brings them right back to life!
Nutritional Information
Let’s talk numbers – because I know some of you (like me) like to keep an eye on what’s fueling those pancake-fueled mornings! Based on using whole milk and butter, here’s the nutritional breakdown for two fluffy gluten-free pancakes (because let’s be honest, who stops at one?):
- Calories: 220 (perfect for that morning energy boost)
- Carbohydrates: 32g (includes 2g fiber to keep you satisfied)
- Sugar: 8g (mostly from that touch of sugar we added – the rest comes naturally from the milk)
- Protein: 5g (thank you, egg and milk!)
- Fat: 7g (that’s where the rich flavor comes from)
- Saturated Fat: 3.5g (could be less if you use oil instead of butter)
- Sodium: 320mg (about 14% of your daily limit – not bad for a treat!)
- Cholesterol: 55mg (all from that beautiful egg yolk)
Important note: These numbers can change based on your specific ingredients! Using almond milk instead of dairy? That’ll knock off about 30 calories and reduce the saturated fat. Going with coconut oil instead of butter? The fat profile shifts. Even different GF flour blends can vary slightly in fiber and protein content.
The beauty is this recipe is flexible – whether you’re counting macros or just enjoying every fluffy bite, these pancakes fit beautifully into a balanced breakfast. I like pairing mine with Greek yogurt and berries for extra protein to keep me full till lunch!
FAQs About Fluffy Gluten-Free Pancakes
After making these pancakes for everyone from my gluten-free niece to my skeptical father-in-law (“They’re really gluten-free?!”), I’ve heard every question imaginable. Here are the ones that come up most often – with all my hard-won pancake wisdom baked right in!
“Can I make these pancakes vegan?”
Absolutely! Swap the egg for a flax egg (1 tbsp ground flax + 3 tbsp water, let sit 5 minutes) and use your favorite plant milk. For the butter, coconut oil works beautifully. The texture will be slightly different – a bit more delicate – but still delicious. My vegan sister adds 1/2 mashed banana for extra binding power.
“Why did my pancakes turn out dense?”
Oh honey, I’ve been there! Usually it’s one of three things: overmixed batter (those lumps are GOOD!), old baking powder (check the date!), or packing the flour into the cup. Next time, spoon the flour lightly into the measuring cup and level it off – no packing! And remember – stir until just combined, then walk away.
“Can I make the batter ahead?”
You can, but with a catch. Mix the dry and wet ingredients separately the night before, then combine in the morning. The baking powder starts working as soon as it hits liquid, so pre-mixed batter won’t rise as well. If you must store mixed batter, give it a gentle stir before cooking and expect slightly flatter results.
“My pancakes keep sticking – help!”
First, check your pan heat – too low and they’ll stick like glue. Medium heat is key. Also, make sure your pan is properly seasoned if using cast iron, or use a quality non-stick. And that light buttering between batches? Non-negotiable! Pro tip: Wait until you see bubbles before attempting to flip – premature flipping leads to pancake casualties.
“Can I freeze the cooked pancakes?”
Yes, and it’s a game-changer! Cool them completely first, then stack with parchment between each pancake in a freezer bag. They’ll keep for 2 months. Reheat straight from frozen in the toaster (my favorite) or oven at 350°F for about 10 minutes. My kids call these “instant breakfast” – perfect for rushed school mornings!
Now grab that whisk and get flipping! I want to hear all about your pancake adventures – tag me with your tallest stacks and tastiest topping creations!
Print10 Secrets to Fluffy Gluten-Free Pancakes
Light and fluffy gluten-free pancakes perfect for breakfast or brunch.
- Prep Time: 5 minutes
- Cook Time: 10 minutes
- Total Time: 15 minutes
- Yield: 8 pancakes 1x
- Category: Breakfast
- Method: Stovetop
- Cuisine: American
- Diet: Gluten Free
Ingredients
- 1 cup gluten-free flour blend
- 2 tbsp sugar
- 1 tsp baking powder
- 1/2 tsp baking soda
- 1/4 tsp salt
- 1 cup milk (or dairy-free alternative)
- 1 large egg
- 2 tbsp melted butter (or oil)
- 1 tsp vanilla extract
Instructions
- Mix dry ingredients in a bowl.
- Whisk wet ingredients in another bowl.
- Combine wet and dry ingredients until just mixed.
- Heat a non-stick pan over medium heat.
- Pour 1/4 cup batter for each pancake.
- Cook until bubbles form, then flip.
- Cook until golden brown on both sides.
Notes
- Do not overmix the batter.
- Adjust heat to prevent burning.
- Use a measuring cup for even-sized pancakes.
Nutrition
- Serving Size: 2 pancakes
- Calories: 220
- Sugar: 8g
- Sodium: 320mg
- Fat: 7g
- Saturated Fat: 3.5g
- Unsaturated Fat: 3g
- Trans Fat: 0g
- Carbohydrates: 32g
- Fiber: 2g
- Protein: 5g
- Cholesterol: 55mg