Magical Coconut Snowflake Cake: Fluffy 12-Slice Wonder
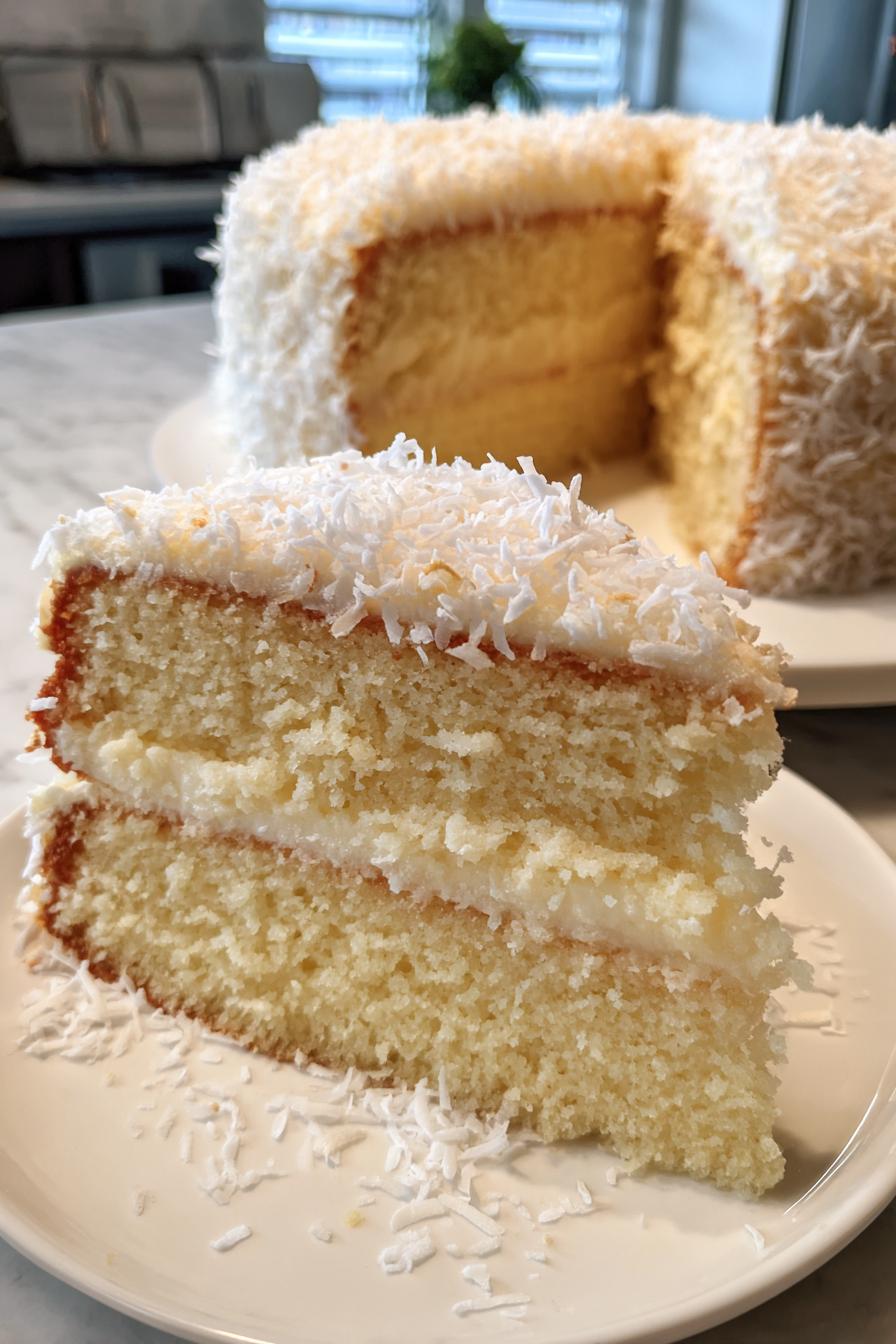
There’s something magical about cutting into a Coconut Snowflake Cake and seeing those delicate crumbs that practically float off your fork. I first made this cake for my niece’s birthday years ago, and now it’s the dessert everyone begs me to bring to family gatherings. It’s not just the taste – though the sweet coconut flavor is divine – it’s that cloud-like texture that makes each bite feel like a celebration.
What I love most is how simple it is to make something so special. Just basic pantry ingredients transform into this showstopper that looks as beautiful as it tastes. The secret? The perfect balance of coconut milk and shredded coconut gives it that melt-in-your-mouth quality. One bite and you’ll understand why this cake earned its snowflake name!
Why You’ll Love This Coconut Snowflake Cake
This cake isn’t just delicious—it’s downright irresistible. Here’s why:
- That fluffy, snowflake-like texture makes every bite feel like a little celebration
- Comes together with simple ingredients – no fancy techniques required
- The coconut flavor is sweet but not overpowering, with just the right tropical touch
- Looks gorgeous on any dessert table (but tastes even better than it looks!)
- Perfect for birthdays, holidays, or just because you deserve something special
Ingredients for Coconut Snowflake Cake
Gathering the right ingredients is the first step to cake magic – and trust me, every single one of these matters! Here’s what you’ll need for that perfect snowy texture and dreamy coconut flavor:
- 2 cups all-purpose flour – spooned and leveled (don’t pack it down!)
- 1 cup granulated sugar – the exact amount for that delicate sweetness
- 1 teaspoon baking powder – fresh is best, check that expiration date
- ½ teaspoon salt – just enough to balance all the flavors
- ½ cup coconut milk – full-fat for richness (shake the can well!)
- ¼ cup vegetable oil – keeps the crumb so tender
- 2 large eggs – room temperature, please – they mix in better
- 1 teaspoon pure vanilla extract – the good stuff makes a difference
- 1 cup shredded coconut – unsweetened, and I always toast half for extra flavor
See? Nothing weird or hard to find – just simple ingredients that transform into something extraordinary. Pro tip: measure everything before you start mixing. It makes the whole process smoother, and you won’t realize halfway through that you’re out of vanilla (been there!).
Equipment You’ll Need
You don’t need fancy gadgets for this cake – just a few trusty kitchen basics. Here’s what I grab every time I make my Coconut Snowflake Cake:
- 2 mixing bowls – one for dry ingredients, one for wet (medium size works great)
- Whisk – my favorite tool for getting that batter silky smooth
- Rubber spatula – perfect for folding in that coconut without overmixing
- 9-inch round cake pan – the ideal size for that perfect height
- Cooling rack – non-negotiable unless you like soggy bottoms!
- Measuring cups and spoons – because eyeballing never works for baking
That’s it! No stand mixer needed (though you can use one if you prefer). I’ve made this cake in my tiny apartment kitchen with just these tools, and it turns out perfect every time. The simpler the setup, the more fun the baking!
How to Make Coconut Snowflake Cake
Ready to create some baking magic? This cake comes together so easily – just follow these simple steps, and you’ll have that dreamy, snowflake texture in no time. I’ve made this dozens of times, and these are the exact techniques that give me perfect results every single time.
Step 1: Prep and Mix Dry Ingredients
First things first – preheat that oven to 350°F (175°C). Trust me, you want it nice and hot before the batter goes in. Now grab your biggest mixing bowl – the flour tends to fly everywhere otherwise!
I whisk together the flour, sugar, baking powder, and salt until they’re completely combined. No need to sift unless your flour is super lumpy (been there!). Just make sure there are no little pockets of baking powder hiding in there – I run my whisk through it a few extra times to be safe.
Step 2: Blend Wet Ingredients
In my other bowl, I pour the coconut milk (give the can a good shake first!), vegetable oil, eggs, and vanilla. Now here’s my secret – I beat the eggs slightly before adding the other liquids. It helps everything incorporate more smoothly.
Whisk it all together until it’s completely smooth and gorgeous. You’ll see little bubbles forming on the surface when it’s ready – that’s how you know the eggs are perfectly blended in. The mixture should look like liquid sunshine!
Step 3: Fold in Coconut and Bake
Now the fun part! Pour the wet ingredients into the dry and stir gently – just until you don’t see any more flour streaks. Overmixing is the enemy of fluffy cakes, so be kind to your batter.
Add the shredded coconut last, folding it in with a rubber spatula. I like to reserve about 2 tablespoons to sprinkle on top before baking – makes the cake look extra pretty!
Pour into your greased pan (I use coconut oil for extra flavor) and bake for 30-35 minutes. The top should be golden, and a toothpick should come out with just a few moist crumbs – not wet batter. Pro tip: rotate the pan halfway through for even browning!
Let it cool in the pan for 10 minutes before transferring to a rack. I know it’s tempting to dig right in, but patience rewards you with that perfect snowflake texture. The wait is worth it!
Tips for the Perfect Coconut Snowflake Cake
After making this cake more times than I can count, I’ve picked up some foolproof tricks to guarantee that dreamy texture every time. Here are my can’t-live-without tips:
- Use full-fat coconut milk – that rich creaminess makes all the difference in texture and flavor
- Toast half the shredded coconut – just 5 minutes in a dry pan adds incredible depth
- Room temperature eggs blend better – take them out 30 minutes before baking
- Don’t overmix the batter – a few flour streaks are better than a tough cake
- Cool completely before slicing – I know it’s hard to wait, but it prevents crumbling
- Dust with powdered sugar right before serving for that perfect snowy finish
My biggest secret? I always make this cake the day before serving – the flavors meld beautifully overnight. Just wrap it well at room temperature, and it’ll taste even more magical the next day!
Variations and Substitutions
One of the best things about this Coconut Snowflake Cake is how adaptable it is! Here are my favorite ways to mix it up when I’m feeling creative or need to work with what’s in my pantry:
- Gluten-free? Swap the all-purpose flour for your favorite 1:1 gluten-free blend – I’ve had great results with Bob’s Red Mill
- Extra coconutty: Replace half the vanilla extract with coconut extract for an even more tropical flavor
- Nutty twist: Fold in ½ cup chopped macadamias or almonds with the shredded coconut
- Dairy-free: The recipe’s already dairy-free as written – just check your vanilla extract label
- Sugar adjustment: Reduce sugar to ¾ cup if you prefer less sweetness – the coconut flavor still shines
The key is keeping the wet-to-dry ratios about the same. I’ve made probably a dozen versions of this cake, and they’ve all turned out delicious – just slightly different personalities! What variations will you try first?
Serving and Storing Coconut Snowflake Cake
Oh, the moment we’ve all been waiting for – serving this beauty! I like to keep things simple and let that amazing coconut flavor shine. A light dusting of powdered sugar right before serving gives it that perfect snowy look (just like its name promises). But if you’re feeling fancy, a dollop of whipped cream with toasted coconut flakes on top takes it to another level!
Now, here’s my storing trick – this cake stays incredibly moist if you do it right. At room temperature, just pop it into an airtight container (I use my grandma’s old cake keeper) and it’ll stay fresh for up to 3 days. No fridge needed – that actually dries it out!
If you need to keep it longer (though let’s be honest, it rarely lasts that long in my house), wrap individual slices tightly in plastic wrap and freeze for up to a month. When that craving hits, just thaw at room temperature for about an hour. Want it warm? A quick 10-second zap in the microwave makes it taste freshly baked again – just be careful not to overdo it.
Pro tip from my many cake experiments: The flavor actually gets better after a day as the coconut mellows and the texture becomes even more tender. So if you can resist, bake it a day ahead – your patience will be rewarded!
Nutritional Information
Now, I’m no nutritionist, but I know some folks like to keep track of what they’re eating (especially after that second slice!). Here’s the general picture for my Coconut Snowflake Cake:
Nutritional values are estimates and vary based on ingredients used. Each generous slice comes in around 280 calories – not bad for such a decadent-tasting treat! You’re getting mostly carbs from the flour and sugar (about 38g per slice), with 12g of fat from that luscious coconut milk and oil.
The shredded coconut adds about 2g of fiber per serving – bonus! And since we’re using real ingredients, there’s no weird artificial stuff hiding in there. Just honest-to-goodness coconut goodness.
Remember, these numbers can change based on your specific brands and measurements. I always say – if you’re worried about calories, just share with friends! More people means smaller slices… though in my experience, nobody ever wants just a small piece of this cake.
Frequently Asked Questions
After years of baking this cake and answering questions from friends, here are the things everyone wants to know:
Can I use canned coconut milk?
Absolutely! That’s actually what I use – just shake the can well before measuring. The full-fat version gives the richest flavor and texture.
How do I prevent dryness?
Two secrets: don’t overbake (check at 30 minutes!) and use room temperature ingredients. Also, letting it cool completely before slicing keeps all that moisture locked in.
Can I make cupcakes instead?
Yes! Fill liners 2/3 full and bake 18-22 minutes. They’re adorable with a sprinkle of toasted coconut on top – perfect for parties!
Why did my cake sink in the middle?
Usually means it needed 2-3 more minutes in the oven. Also, check your baking powder isn’t expired – fresh leavener makes all the difference.
Can I freeze this cake?
You bet! Wrap cooled slices tightly in plastic, then foil. Thaw at room temperature when that coconut craving hits – tastes just as good!
Final Thoughts
And there you have it – my absolute favorite Coconut Snowflake Cake recipe that never fails to impress! I can’t tell you how many times I’ve made this for birthdays, potlucks, or just because (sometimes a Tuesday deserves cake too). Every time I pull it out of the oven, that golden top and heavenly coconut aroma make me smile.
What I love most is how this cake brings people together. Whether it’s my niece’s birthday or just an ordinary weekend treat, it always sparks conversations and happy memories. That first bite of fluffy, coconutty goodness? Pure magic.
Now it’s your turn to create some baking magic! I’d love to hear how your Coconut Snowflake Cake turns out. Did you add any special twists? What did your family think? Bake, enjoy, and don’t forget to tag us on social – I can’t wait to see your beautiful creations!
PrintMagical Coconut Snowflake Cake: Fluffy 12-Slice Wonder
A light and fluffy coconut cake with a snowflake-like texture, perfect for any occasion.
- Prep Time: 15 mins
- Cook Time: 35 mins
- Total Time: 50 mins
- Yield: 8 servings 1x
- Category: Dessert
- Method: Baking
- Cuisine: American
- Diet: Vegetarian
Ingredients
- 2 cups all-purpose flour
- 1 cup sugar
- 1 tsp baking powder
- 1/2 tsp salt
- 1/2 cup coconut milk
- 1/4 cup vegetable oil
- 2 eggs
- 1 tsp vanilla extract
- 1 cup shredded coconut
Instructions
- Preheat oven to 350°F (175°C).
- Mix flour, sugar, baking powder, and salt in a bowl.
- Add coconut milk, oil, eggs, and vanilla. Stir until smooth.
- Fold in shredded coconut.
- Pour batter into a greased cake pan.
- Bake for 30-35 minutes until golden.
- Let cool before serving.
Notes
- Use fresh coconut for best results.
- Store in an airtight container.
Nutrition
- Serving Size: 1 slice
- Calories: 280
- Sugar: 18g
- Sodium: 150mg
- Fat: 12g
- Saturated Fat: 8g
- Unsaturated Fat: 3g
- Trans Fat: 0g
- Carbohydrates: 38g
- Fiber: 2g
- Protein: 4g
- Cholesterol: 45mg