30-Minute Lemon Butter Chicken Thighs That Taste Heavenly
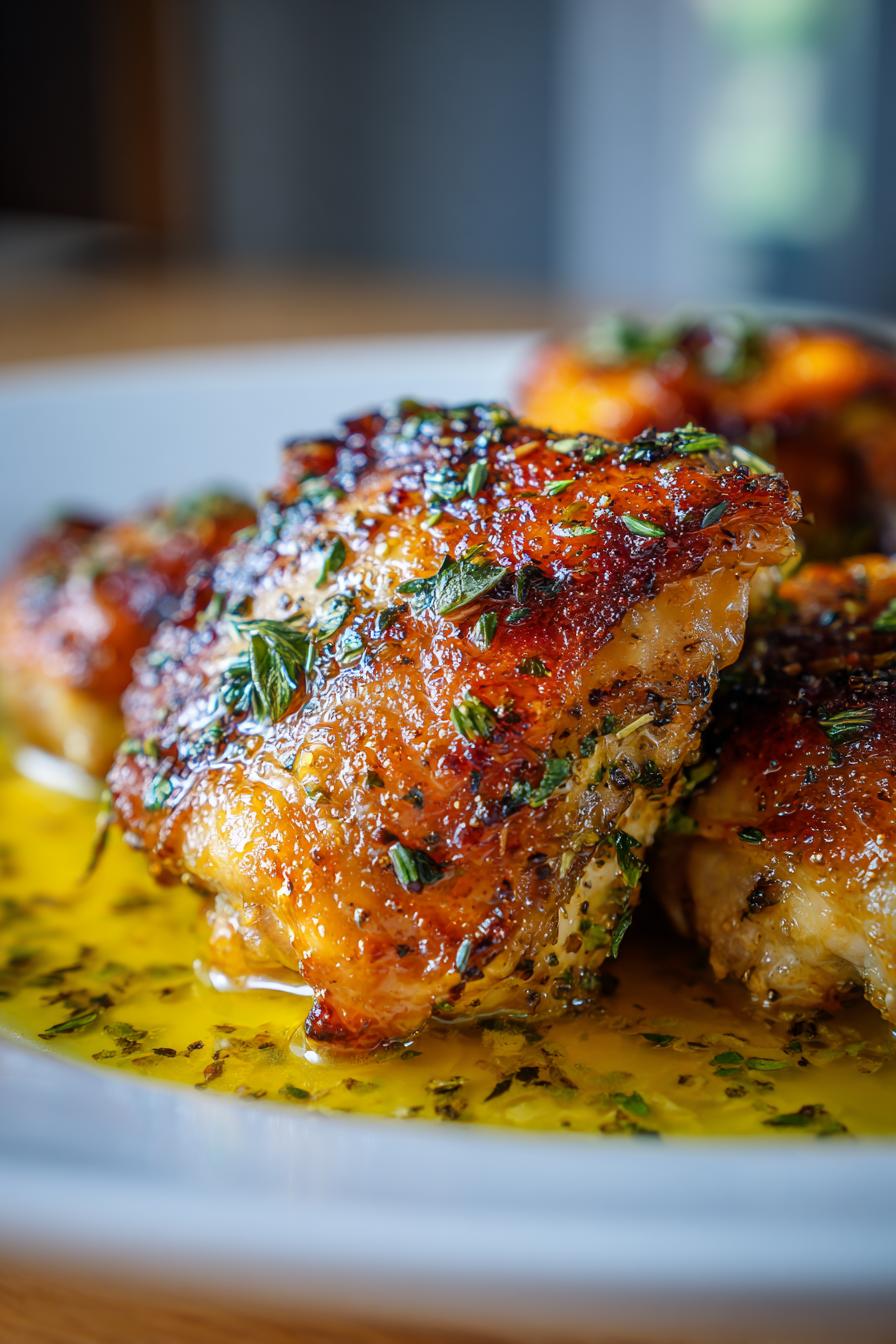
Let me tell you about my absolute go-to weeknight dinner – these tangy, buttery Lemon Butter Chicken Thighs that I’ve perfected over dozens of test batches. The first time I made this dish, I knew I’d stumbled onto something special. That golden, crispy skin soaking up the bright lemon butter sauce? Wow. What I love most is how effortlessly fancy it feels despite being ready in 30 minutes flat. After tweaking the lemon-to-butter ratio more times than I can count (my family got very tired of being taste-testers!), I landed on this perfect balance of rich and zesty. Trust me, once that garlic hits the hot butter and lemon, your kitchen will smell like a restaurant – and the taste? Even better.
Ingredients for Lemon Butter Chicken Thighs
Gathering the right ingredients is half the battle when making this dish sing. I learned early on that skimping on quality here makes a world of difference in flavor. Here’s everything you’ll need to make those chicken thighs shine:
- 4 chicken thighs – bone-in and skin-on (trust me, that crispy skin is worth it!)
- 2 tbsp butter – real, unsalted butter only (Grandma would haunt me if I suggested margarine)
- 1 tbsp olive oil – helps get that perfect sear without smoking
- 1 lemon – you’ll use both the juice and zest (freshly squeezed makes all the difference)
- 2 garlic cloves, minced – don’t even think about the jarred stuff
- 1 tsp salt – I use kosher for even seasoning
- 1/2 tsp black pepper – freshly cracked if you can
- 1/2 tsp dried thyme – or fresh if you’ve got it (just double the amount)
The magic happens when these simple ingredients come together – especially that bright lemon zest dancing with rich butter. Pro tip: set everything out before you start cooking. There’s nothing worse than scrambling for the garlic while your chicken threatens to burn!
How to Make Lemon Butter Chicken Thighs
Now for the fun part – transforming these simple ingredients into something magical! I’ll walk you through each step just like I would if we were cooking together in my kitchen. The key here is patience (especially with that crispy skin) and timing the sauce perfectly. Follow these steps, and you’ll have restaurant-quality chicken thighs ready faster than takeout.
Seasoning and Searing
Let’s start with the chicken – the star of our show. I like to pat the thighs dry with paper towels first (wet chicken won’t brown properly). Then, I sprinkle both sides generously with the salt, pepper, and thyme, really working it into every nook and cranny. That skin? I give it an extra pinch of seasoning because it’s going to be the best part!
Heat your olive oil in a heavy skillet over medium-high heat until it shimmers (about 1-2 minutes). Carefully place the thighs skin-side down – listen for that glorious sizzle! Now here’s where most people go wrong – they try to move the chicken too soon. Resist the urge! Let them cook undisturbed for a full 6 minutes to develop that perfect golden crust. (I set a timer because I’m impatient.) When you finally flip them, you should see that beautiful, crispy skin that makes your mouth water.
Making the Lemon Butter Sauce
After flipping the chicken, cook for another 6 minutes until the underside is golden too. Now for the magic moment – reduce the heat to medium and add the butter. As soon as it melts, toss in the minced garlic (stand back – it might splatter a bit!). Stir constantly for about 30 seconds until fragrant but not browned – burnt garlic ruins everything!
This is when I squeeze in the fresh lemon juice and sprinkle the zest right into that buttery goodness. Oh, the aroma! Immediately start spooning the sauce over the chicken, letting it cascade down those crispy skin crevices. Keep basting for about 2 minutes – this is what builds flavor in every bite. The sauce will slightly thicken and turn the most beautiful pale yellow color.
Resting and Serving
Here’s where many home cooks mess up – they cut right into the chicken! Don’t do it! Transfer the thighs to a plate and let them rest for at least 5 minutes. This allows the juices to redistribute, ensuring every bite stays moist. (I use this time to quickly wipe down counters because I’m my mother’s daughter.)
When you’re ready to serve, arrange the chicken on plates and drizzle with any remaining sauce from the pan. That lemon butter glaze clinging to each piece? That’s liquid gold. Your first bite will reward you with crispy skin giving way to juicy meat infused with bright, buttery flavor – pure heaven!
Why You’ll Love These Lemon Butter Chicken Thighs
Listen, I know you’ve got a million chicken recipes out there, but this one? It’s special. Here’s why it’s become my family’s most-requested weeknight dinner (and probably will be yours too!):
- Faster than takeout – From fridge to table in 30 minutes flat! I’ve made this after soccer practice, before book club, even when I’ve had one of those “I forgot to plan dinner” panic moments. The simple steps and short cook time make it a lifesaver.
- Flavor that punches way above its weight – That golden, crispy skin soaking up the tangy lemon butter sauce? It tastes like something from a fancy bistro, but it’s just humble ingredients doing magical things together. The first time my husband tried it, he said, “You’re making this again tomorrow,” with sauce still on his chin.
- Dress it up or keep it simple – These thighs play well with others! Serve them over mashed potatoes for comfort food night, with a crisp salad for something lighter, or even chop the meat for next-level sandwiches. Leftovers (if you’re lucky enough to have any) make killer tacos the next day.
Honestly, the hardest part about this recipe is not eating all the crispy skin straight from the pan while you’re cooking. Not that I’ve ever done that… okay, maybe once. Or twice.
Expert Tips for Perfect Lemon Butter Chicken Thighs
After burning more chicken thighs than I’d care to admit (and nearly smoking out my kitchen a few times), I’ve picked up some game-changing tricks that’ll make your lemon butter chicken thighs foolproof every single time. These aren’t just tips – they’re the difference between “good” and “oh-my-goodness-what-is-this-sorcery” chicken!
The thermometer trick for perfect doneness
Here’s my confession – I used to be that cook who cut into chicken to check if it was done, sending all those precious juices running out. Then I discovered the magic of instant-read thermometers! Slide it into the thickest part of the thigh (without touching bone) – at 165°F, you’ve got perfectly cooked chicken. I keep mine clipped to my apron now like the cooking nerd I’ve become. No more dry chicken or frantic guessing games!
Adjusting lemon like a pro
That lemon butter sauce is glorious, but we all have different tang preferences. My sister likes hers so tart it makes your lips pucker, while my neighbor prefers just a whisper of citrus. Here’s how I handle it: Start with half the lemon juice, then taste the sauce before adding more. The zest always goes in full force though – that’s where the bright, sunny flavor lives! Pro tip: Meyer lemons make a sweeter, floral version if regular lemons are too intense for you.
Why your skillet matters more than you think
Through trial and error (and one tragically stuck chicken thigh incident), I learned not all skillets are created equal. Cast iron gives that unbeatable sear, but stainless steel works great too – just make sure it’s heavy-bottomed. Nonstick? Fine in a pinch, but you won’t get those glorious browned bits that make the sauce so flavorful. Whatever you use, heat it properly before adding chicken – I test by flicking a few water drops in. If they dance and evaporate immediately, you’re ready for those thighs!
One last nugget of wisdom: Don’t crowd the pan! Giving each thigh its personal space means crispy skin all around. If you need to cook in batches, keep the first batch warm in a 200°F oven. Your patience will be rewarded with chicken so good, you might just hide the leftovers from your family. Not that I’ve ever done that…
Serving Suggestions for Lemon Butter Chicken Thighs
Now that you’ve got these gorgeous lemon butter chicken thighs ready, let’s talk about what to serve with them! I’ve tried this dish with practically every side imaginable (my family jokes that I use them as guinea pigs), and these are the pairings that make the flavors sing every time.
Creamy mashed potatoes are my absolute favorite – that silky texture soaks up the lemony butter sauce like a dream. I make mine with plenty of butter and a splash of the chicken cooking liquid for extra flavor. If I’m feeling fancy, I’ll swirl in some roasted garlic or fresh herbs right at the end.
For lighter days, steamed greens like asparagus or broccoli work beautifully. The slight bitterness balances the rich sauce perfectly. I’ll often toss them right in the pan after removing the chicken to soak up any remaining sauce – zero waste and maximum flavor!
When I want something heartier, buttery rice or couscous becomes the perfect canvas. The grains catch every drop of that glorious sauce. My kids go wild when I sprinkle extra lemon zest on top right before serving – it makes the whole dish pop!
Don’t overlook simple crusty bread either. There’s something magical about tearing off a piece and dragging it through that golden sauce at the bottom of the plate. It’s my husband’s favorite way to “clean” his plate – not that any sauce ever survives that long in our house!
The beauty of these chicken thighs is how versatile they are. Whether you’re craving comfort food or something light and fresh, there’s a perfect pairing waiting to make your meal complete. Just be sure to have extra napkins ready – things might get deliciously messy!
Storing and Reheating Lemon Butter Chicken Thighs
Let me share my hard-earned wisdom about keeping these lemon butter chicken thighs tasting just as amazing the next day (because let’s be honest – leftovers are half the joy of cooking!). I’ve learned some tricks the hard way – like how that beautiful crispy skin goes limp if you store it wrong. Trust me, nothing’s sadder than opening your fridge to find your perfect chicken turned into a soggy mess.
Refrigerator storage done right
First rule: Let the chicken cool slightly before storing – but not too long! I aim for about 15-20 minutes after cooking. Any longer at room temperature, and you’re flirting with food safety issues. Transfer the thighs to an airtight container (I swear by glass ones) and pour any remaining sauce over them. The sauce acts like a protective blanket, keeping the meat moist. They’ll stay delicious in the fridge for 3-4 days – though in my house, they never last past day two!
Freezing for future cravings
Here’s my freezer hack: Wrap each thigh individually in aluminum foil first, then pop them in a freezer bag. This way, you can grab just one or two when the craving hits. The foil prevents freezer burn better than plastic wrap alone. They’ll keep beautifully for up to 3 months – just thaw overnight in the fridge when you’re ready. Pro tip: Write the date on the bag because freezer amnesia is real (“Wait, did I freeze these last week or last month?”).
Reheating without losing that magic
Now for the important part – bringing your chicken back to life! The microwave is the enemy of crispy skin, so I always use the oven. Here’s my method: Place thighs on a wire rack over a baking sheet (this lets heat circulate) and warm at 350°F for about 15 minutes. If the skin needs crisping, broil for the last minute – but watch like a hawk! For that luscious sauce, I gently reheat it separately in a saucepan, adding a splash of chicken broth if it’s thickened too much.
If you’re in a rush, the skillet method works too – medium heat with a tiny bit of oil or butter, covered for the first few minutes to heat through, then uncovered to crisp the skin. Whatever you do, don’t skip the final squeeze of fresh lemon juice – it wakes up all those flavors like magic!
Lemon Butter Chicken Thighs Variations
One of the best things about this recipe is how easily you can tweak it to match your mood or what’s in your pantry. I’ve played around with dozens of variations over the years – some became keepers, others… well, let’s just say my dog got some interesting treats! Here are my favorite twists that still honor the spirit of the original:
Herb swaps for different flavor profiles
While thyme is classic, don’t be afraid to mix it up! Rosemary gives a wonderful earthy depth (just use half the amount since it’s stronger). For Mediterranean vibes, I love oregano with a pinch of red pepper flakes. When my garden’s overflowing, I’ll use fresh tarragon – its slight licorice note plays surprisingly well with the lemon. And in summer? Basil all the way! Just add it at the very end so it keeps its bright flavor.
Capers or olives for briny punch
Here’s my secret for when I want to impress guests: toss in a tablespoon of drained capers when you add the garlic. They burst with salty, tangy goodness that cuts through the rich butter. Kalamata olives work similarly – I chop about 5-6 and scatter them in during the last minute of cooking. Both additions transform the dish into something you’d pay big bucks for at an Italian trattoria!
Boneless thighs or breasts when you’re in a pinch
While bone-in, skin-on thighs will always be my first love, I’ve successfully adapted this for boneless cuts too. For thighs: reduce cooking time by about 2 minutes per side. Chicken breasts? Pound them to even thickness first, then cook just 4-5 minutes per side. The sauce makes even leaner cuts juicy, though I’ll sometimes add an extra pat of butter to compensate. Pro tip: If using skinless, sprinkle with a bit of paprika before searing for that golden color we eat with our eyes first!
The beauty of cooking is making recipes your own. Whether you stick to the classic or try one of these twists, that lemon butter magic will shine through. Just promise me one thing – whatever variation you try, don’t skip the fresh lemon zest at the end. That’s the golden rule in my kitchen!
Nutritional Information
Okay, let’s talk numbers – but remember, these are just estimates since your actual ingredients might vary (especially depending on your chicken’s size or butter brand!). Here’s the breakdown per serving (that’s one glorious thigh with sauce):
- Calories: 320 – mostly from that beautiful golden skin and butter (worth every bite!)
- Fat: 24g (8g saturated) – hey, flavor comes from fat, and we’re not skimping here
- Protein: 26g – chicken thighs pack more protein than you’d think
- Carbs: Just 2g – basically negligible unless you’re counting
- Sodium: 620mg – mostly from the salt we lovingly rubbed into that crispy skin
A quick disclaimer from my kitchen to yours: These numbers can swing based on exact ingredients. Used more butter? Your fat content goes up. Bigger thighs? More protein. That’s why I don’t stress over precise counts – I focus on quality ingredients and enjoying every flavorful bite. After all, Grandma never measured her nutrients, and she lived to 92!
Questions About Lemon Butter Chicken Thighs
I’ve gotten so many great questions about this recipe from friends and readers over the years – let me tackle the ones that come up most often! These are the little details that can make or break your lemon butter chicken experience.
Can I use boneless chicken thighs instead?
Absolutely! I do this all the time when I’m in a hurry. Just reduce the cooking time by about 2 minutes per side since they cook faster without bones. You’ll miss some of that crispy skin magic, but the flavor will still be fantastic. Pro tip: If using skinless, pat them extra dry and don’t move them for the first 4 minutes to get the best sear possible.
How can I thicken the lemon butter sauce?
If your sauce seems too thin (maybe your lemons were extra juicy), here’s my trick: Remove the chicken and whisk in a teaspoon of flour or cornstarch mixed with a tablespoon of cold water. Simmer for 1-2 minutes until it coats the back of a spoon. Or, if you’re feeling indulgent, swirl in another pat of butter off heat – it’ll thicken as it cools slightly. Both methods work like a charm!
What are the absolute best side dishes?
Oh, let me count the ways! My top three are: 1) Garlic mashed potatoes (that sauce belongs on potatoes, period), 2) Roasted asparagus (the charred bits love the lemony butter), and 3) Crusty bread (for sopping up every last drop). But honestly? These thighs are so flavorful they’ll make even plain rice taste amazing. Don’t overthink it!
Now that you’ve got all my secrets, it’s your turn to make magic happen! Whip up a batch of these lemon butter chicken thighs and tell me how they turned out. Did you stick to the classic or try one of the fun variations? Either way, I bet your kitchen smells incredible right now!
Print30-Minute Lemon Butter Chicken Thighs That Taste Heavenly

A simple and flavorful dish featuring tender chicken thighs cooked in a rich lemon butter sauce.
- Prep Time: 10 minutes
- Cook Time: 20 minutes
- Total Time: 30 minutes
- Yield: 4 servings 1x
- Category: Main Dish
- Method: Pan-Frying
- Cuisine: American
- Diet: Low Carb
Ingredients
- 4 chicken thighs, bone-in and skin-on
- 2 tbsp butter
- 1 tbsp olive oil
- 1 lemon, juiced and zested
- 2 garlic cloves, minced
- 1 tsp salt
- 1/2 tsp black pepper
- 1/2 tsp dried thyme
Instructions
- Season chicken thighs with salt, pepper, and thyme.
- Heat olive oil in a skillet over medium-high heat.
- Sear chicken thighs skin-side down for 6 minutes until golden brown.
- Flip chicken and cook for another 6 minutes.
- Add butter, garlic, lemon juice, and zest to the skillet.
- Baste chicken with the sauce for 2 minutes.
- Remove from heat and let rest for 5 minutes before serving.
Notes
- Use a meat thermometer to ensure chicken reaches 165°F.
- Adjust lemon to taste for more or less tanginess.
- Serve with mashed potatoes or steamed vegetables.
Nutrition
- Serving Size: 1 thigh
- Calories: 320
- Sugar: 1g
- Sodium: 620mg
- Fat: 24g
- Saturated Fat: 8g
- Unsaturated Fat: 14g
- Trans Fat: 0g
- Carbohydrates: 2g
- Fiber: 0g
- Protein: 26g
- Cholesterol: 120mg