Cake Pops Gourmet: Indulge in Delightful Treats Today!
Introduction to Cake Pops Gourmet
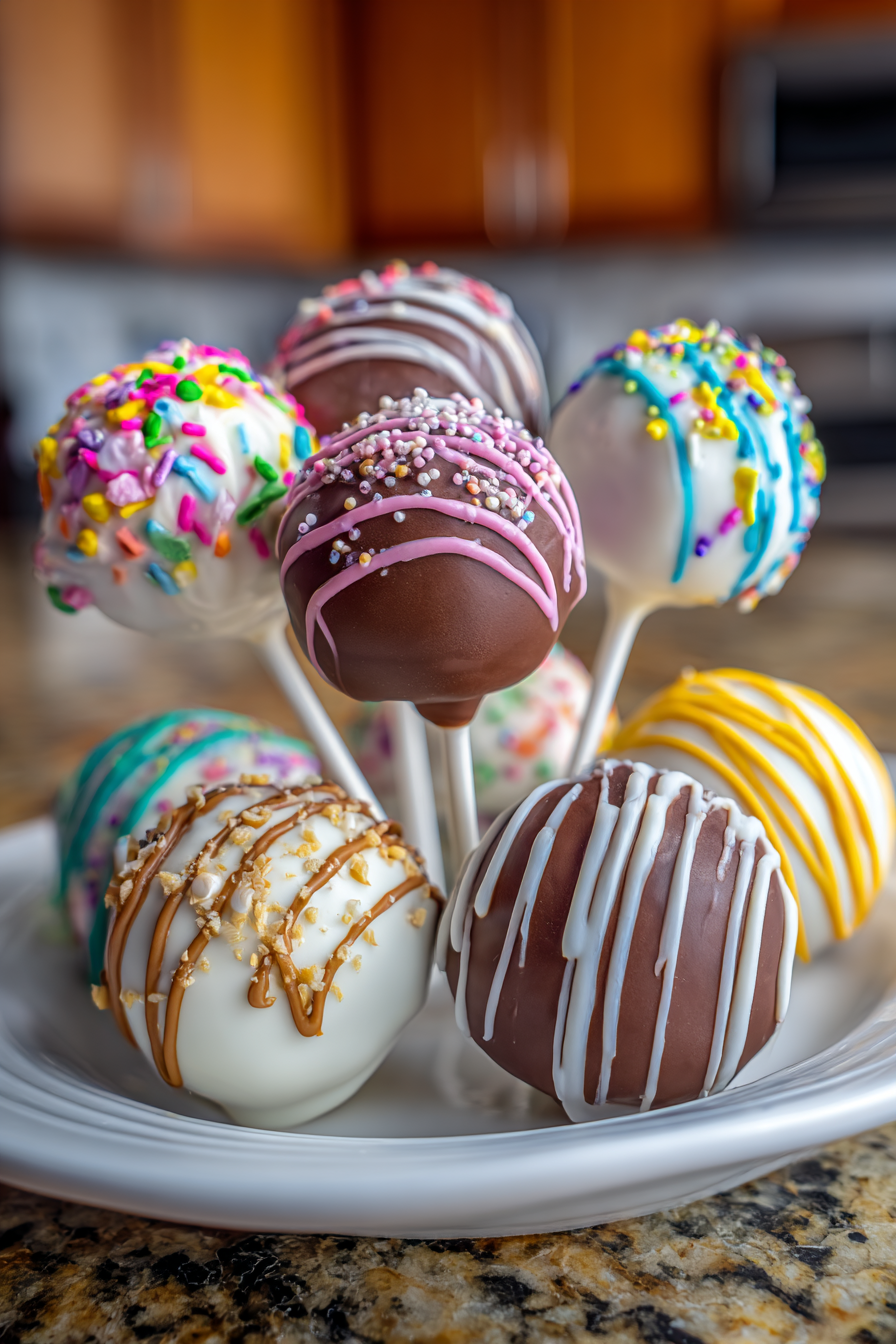
Welcome to the delightful world of cake pops gourmet! If you’re like me, juggling a busy schedule while trying to whip up something special for your loved ones can feel overwhelming. These little treats are not just adorable; they’re a quick solution for a busy day. Imagine the joy on your kids’ faces when they see these colorful bites of happiness! Plus, they’re perfect for any occasion, from birthday parties to cozy family gatherings. Let’s dive into this fun and easy recipe that will surely impress everyone around your table!
Why You’ll Love This Cake Pops Gourmet
These cake pops gourmet are a game-changer for busy moms and professionals alike. They’re incredibly easy to make, taking just an hour from start to finish. The taste? Oh, it’s a heavenly blend of moist cake and creamy frosting, all wrapped in a luscious chocolate coating. Plus, you can customize them to suit any occasion or preference, making them a versatile treat that everyone will adore!
Ingredients for Cake Pops Gourmet
Creating these delightful cake pops gourmet starts with a few simple ingredients. Here’s what you’ll need:
- Cake mix: Choose your favorite flavor! Chocolate, vanilla, or even red velvet can add a unique twist.
- Frosting: This is where the magic happens! Use store-bought or homemade frosting to bind the cake and add sweetness.
- Chocolate coating: A rich chocolate coating is essential for that indulgent finish. You can use milk, dark, or white chocolate, depending on your preference.
- Sprinkles or decorations: Get creative! Use colorful sprinkles, edible glitter, or even crushed nuts to make your cake pops pop.
- Wooden sticks: These are the backbone of your cake pops, allowing for easy handling and serving.
For those looking to mix things up, consider using different flavors of cake mix and frosting for variety. You can also substitute the chocolate coating with yogurt or candy melts for a lighter option. Remember, the exact quantities of these ingredients are available at the bottom of the article for your convenience!
How to Make Cake Pops Gourmet
Step 1: Prepare the Cake Mix
Start by preheating your oven according to the cake mix instructions. Grab your favorite cake mix and follow the package directions. It’s as easy as mixing, pouring, and baking! The aroma of the cake baking will fill your kitchen, making it feel like a warm hug.
Step 2: Cool the Cake
Once the cake is baked, let it cool completely. This step is crucial! If you skip it, your cake pops might turn into a gooey mess. I usually place mine on a wire rack to speed up the cooling process. Patience is key here!
Step 3: Crumble the Cake
When the cake is cool, it’s time to crumble it into a large bowl. Use your hands or a fork to break it apart. The texture should resemble fine crumbs. This is where the fun begins! Just imagine the sweet smell of cake filling the air as you crumble away.
Step 4: Mix with Frosting
Add your frosting to the crumbled cake. Mix it well until everything is combined. The mixture should be moist but not too sticky. If it feels too dry, add a bit more frosting. This is the secret to achieving that perfect cake pop consistency!
Step 5: Form Cake Balls
Now, it’s time to roll the mixture into small balls. Aim for about one inch in diameter. Place them on a baking sheet lined with parchment paper. This is where you can get creative! You can even let your kids help with this step; it’s a great way to bond.
Step 6: Freeze the Cake Pops
Insert wooden sticks into each cake ball and freeze them for about 30 minutes. This helps the cake pops hold their shape when you dip them in chocolate. Plus, it’s a great time to clean up your kitchen or enjoy a cup of coffee!
Step 7: Melt the Chocolate Coating
While the cake pops are freezing, melt your chocolate coating. You can use a microwave or a double boiler. If using a microwave, heat in short bursts, stirring in between. The chocolate should be smooth and glossy, perfect for dipping!
Step 8: Dip the Cake Pops
Once the cake pops are firm, dip each one into the melted chocolate. Allow the excess chocolate to drip off. This is where the magic happens! The chocolate coating transforms your cake pops into gourmet treats. Don’t worry if they aren’t perfect; they’ll still taste amazing!
Step 9: Decorate the Cake Pops
Before the chocolate sets, sprinkle your favorite toppings on the cake pops. Whether it’s colorful sprinkles or crushed nuts, this is your chance to get creative! Each cake pop can be a unique masterpiece, reflecting your personality.
Step 10: Cool and Serve
Let the decorated cake pops cool completely before serving. You can place them in a decorative stand or a simple cup for a charming presentation. Trust me, your family and friends will be impressed by these delightful treats!
Tips for Success
- Make sure your cake is completely cool before crumbling; this prevents a soggy mixture.
- Use a cookie scoop for uniform cake balls; it makes rolling easier and faster.
- Don’t rush the freezing step; it’s crucial for keeping the shape during dipping.
- Experiment with different chocolate coatings for unique flavors.
- Have fun with decorations; let your creativity shine!
Equipment Needed
- Baking sheet: A standard baking sheet works well; you can also use a large plate if needed.
- Parchment paper: This helps prevent sticking; aluminum foil can be a substitute.
- Mixing bowl: Any large bowl will do; a stand mixer can save time.
- Wooden sticks: You can use lollipop sticks or even sturdy straws.
- Microwave or double boiler: Both are great for melting chocolate; a heatproof bowl over a pot of simmering water works too.
Variations
- Flavorful Combinations: Try using lemon cake mix with cream cheese frosting for a refreshing twist.
- Gluten-Free Option: Use a gluten-free cake mix to make these treats accessible for everyone.
- Vegan Delight: Substitute eggs and milk in the cake mix with plant-based alternatives and use vegan frosting.
- Chocolate Lovers: Mix chocolate cake with chocolate frosting and dip in dark chocolate for an indulgent treat.
- Seasonal Flavors: Incorporate pumpkin spice cake mix and cream cheese frosting for a fall-inspired treat.
Serving Suggestions
- Pair your cake pops gourmet with a glass of cold milk or a warm cup of coffee for a delightful treat.
- Serve them on a decorative platter for a stunning presentation at parties or gatherings.
- Consider adding a side of fresh fruit to balance the sweetness.
- For a fun twist, create a cake pop bar with various toppings for guests to customize their treats.
FAQs about Cake Pops Gourmet
Can I use any cake mix for cake pops gourmet?
Absolutely! You can use any flavor of cake mix you love. Chocolate, vanilla, or even funfetti can make delightful cake pops gourmet. The choice is yours!
How do I store leftover cake pops?
Store your cake pops gourmet in an airtight container in a cool place. They can last for up to a week, but I bet they won’t last that long!
Can I make cake pops gourmet ahead of time?
Yes! You can prepare the cake balls and freeze them for up to a month. Just dip them in chocolate when you’re ready to serve!
What can I use instead of chocolate coating?
If you want a lighter option, consider using yogurt coating or candy melts. They add a fun twist to your cake pops gourmet!
Are cake pops gourmet suitable for special diets?
Definitely! You can easily make gluten-free or vegan versions by choosing the right cake mix and frosting. Everyone can enjoy these treats!
Final Thoughts
Making cake pops gourmet is more than just a baking project; it’s a delightful experience that brings joy to both the maker and the eater. The smiles on your loved ones’ faces as they take that first bite are priceless. These little treats are perfect for any occasion, and the creativity involved in decorating them adds a personal touch. Whether you’re celebrating a birthday or just want to brighten a regular day, these cake pops are sure to impress. So roll up your sleeves, gather your ingredients, and let the fun begin in your kitchen!
PrintCake Pops Gourmet: Indulge in Delightful Treats Today!
Cake pops gourmet are delightful bite-sized treats that combine the flavors of cake and frosting, coated in chocolate and decorated to perfection.
- Prep Time: 20 minutes
- Cook Time: 30 minutes
- Total Time: 1 hour
- Yield: 24 cake pops 1x
- Category: Dessert
- Method: Baking and Dipping
- Cuisine: American
- Diet: Vegetarian
Ingredients
- 1 box of cake mix
- 1 cup of frosting
- 1 lb of chocolate coating
- Sprinkles or decorations of choice
- Wooden sticks
Instructions
- Prepare the cake mix according to package instructions and bake.
- Allow the cake to cool completely.
- Crumble the cooled cake into a large bowl.
- Add frosting to the crumbled cake and mix until well combined.
- Form the mixture into small balls and place them on a baking sheet.
- Insert wooden sticks into each ball and freeze for about 30 minutes.
- Melt the chocolate coating in a microwave or double boiler.
- Dip each cake pop into the melted chocolate, allowing excess to drip off.
- Decorate with sprinkles or other toppings before the chocolate sets.
- Let the cake pops cool completely before serving.
Notes
- Use different flavors of cake mix and frosting for variety.
- Ensure the cake pops are completely cooled before dipping in chocolate.
- Store in a cool place to maintain their shape.
Nutrition
- Serving Size: 1 cake pop
- Calories: 150
- Sugar: 10g
- Sodium: 50mg
- Fat: 7g
- Saturated Fat: 4g
- Unsaturated Fat: 2g
- Trans Fat: 0g
- Carbohydrates: 20g
- Fiber: 1g
- Protein: 2g
- Cholesterol: 30mg