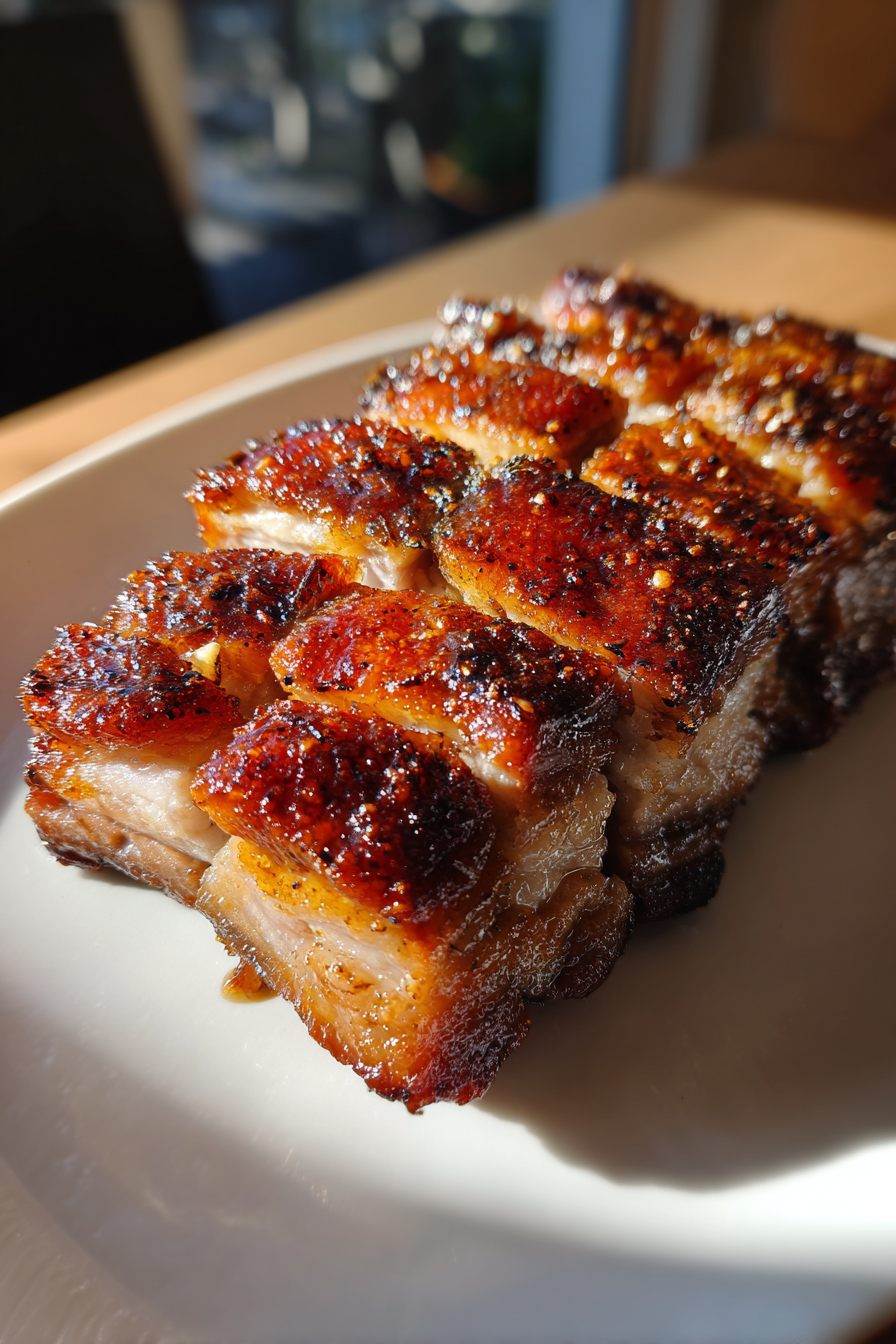
Heritage Breed Pork Belly Roast: Discover Its Unique Flavors!
Introduction to Heritage Breed Pork Belly Roast
As a busy mom, I know how challenging it can be to whip up a meal that feels special yet doesn’t take all day. That’s where my love for Heritage Breed Pork Belly Roast comes in! This dish is not just a feast for the eyes; it’s a celebration of flavors that will impress your loved ones without overwhelming your schedule. The rich taste and tender texture of heritage breed pork belly make it a standout choice for any occasion. Trust me, once you try this roast, it’ll become a go-to recipe in your kitchen!
Why You’ll Love This Heritage Breed Pork Belly Roast
This Heritage Breed Pork Belly Roast is a game-changer for busy families. It’s incredibly easy to prepare, allowing you to spend more time with your loved ones. The slow roasting process fills your home with mouthwatering aromas, making it feel like a special occasion. Plus, the rich, succulent flavors of heritage breed pork belly will have everyone asking for seconds. It’s comfort food at its finest!
Ingredients for Heritage Breed Pork Belly Roast
Gathering the right ingredients is key to making a delicious Heritage Breed Pork Belly Roast. Here’s what you’ll need:
- Heritage breed pork belly: This is the star of the show! Known for its rich flavor and tender texture, it’s a cut that truly shines when roasted.
- Olive oil: A drizzle of this golden liquid helps to create a beautiful crust while adding a hint of flavor.
- Salt: Essential for enhancing the natural flavors of the pork. It’s the magic ingredient that brings everything together.
- Black pepper: A dash of this spice adds a subtle kick, balancing the richness of the pork belly.
- Garlic: Minced garlic infuses the roast with a warm, aromatic essence that elevates the dish.
- Fresh rosemary: This herb brings a fragrant, earthy note that complements the pork beautifully.
- Fresh thyme: Another herb that adds depth and a hint of sweetness to the roast.
- Chicken broth: Pouring this around the pork belly keeps it moist and adds a savory base for the flavors to meld.
For those looking to experiment, consider marinating the pork belly overnight for an extra flavor boost. You can also swap out the herbs for your favorites or use dried versions if fresh isn’t available. Remember, the exact quantities for each ingredient are listed at the bottom of the article for easy printing!
How to Make Heritage Breed Pork Belly Roast
Now that you have your ingredients ready, let’s dive into the steps for making this mouthwatering Heritage Breed Pork Belly Roast. Each step is simple, and I promise you’ll feel like a culinary rockstar by the end!
Step 1: Preheat the Oven
First things first, preheat your oven to 300°F (150°C). Preheating is crucial because it ensures even cooking. You want that pork belly to roast perfectly, not just sit in a lukewarm oven. Trust me, this step sets the stage for a delicious meal!
Step 2: Score the Pork Belly
Next, take your pork belly and score the skin in a crosshatch pattern. This means making shallow cuts in the skin, about an inch apart. Scoring helps the fat render out during cooking, which means a crispier skin and more flavor. Plus, it allows the seasonings to penetrate deeper into the meat. It’s a win-win!
Step 3: Season the Pork Belly
Now it’s time to season! Rub the pork belly with olive oil, salt, and black pepper. Make sure to cover every inch. This seasoning is essential for enhancing the natural flavors of the pork. The salt draws out moisture, creating a beautiful crust as it roasts. Don’t be shy—this is where the flavor magic happens!
Step 4: Prepare the Herb Mixture
In a small bowl, mix together the minced garlic, fresh rosemary, and thyme. Fresh herbs are like a breath of fresh air for your dish. They add vibrant flavors that dried herbs just can’t match. Rub this fragrant mixture all over the pork belly, ensuring it gets into those scored cuts. Your kitchen will smell heavenly!
Step 5: Roast the Pork Belly
Place the seasoned pork belly in a roasting pan and pour the chicken broth around it. The broth keeps the meat moist and adds a savory depth to the dish. Cover the pan with foil and roast for 2-3 hours. This slow cooking allows the flavors to meld beautifully. Just imagine the aroma wafting through your home!
Step 6: Crisp the Skin
After the initial roasting, it’s time to get that skin crispy! Remove the foil and increase the oven temperature to 450°F (230°C). Roast for an additional 30 minutes. This step is crucial for achieving that perfect crunchy texture. You’ll want to keep an eye on it to prevent burning, but oh, the crispy skin is worth it!
Step 7: Rest and Serve
Once your pork belly is beautifully roasted and crispy, let it rest for 15 minutes before slicing. Resting allows the juices to redistribute, ensuring each slice is tender and juicy. After the wait, slice it up and serve it to your family. They’ll be raving about this Heritage Breed Pork Belly Roast for days!
Tips for Success
- Always use a meat thermometer to check for doneness; aim for an internal temperature of 190°F (88°C) for tender pork.
- Let the pork belly rest before slicing to keep it juicy and flavorful.
- For extra flavor, consider marinating the pork belly overnight with your favorite spices.
- Experiment with different herbs to find your perfect flavor combination.
- Pair with a tangy sauce or chutney for an added flavor boost!
Equipment Needed
- Roasting pan: A sturdy pan is essential. If you don’t have one, a baking dish will work too.
- Sharp knife: For scoring and slicing the pork belly. A chef’s knife is perfect.
- Meat thermometer: This ensures your pork is cooked perfectly. A simple instant-read thermometer will do.
- Aluminum foil: To cover the roast while it cooks. Parchment paper can be a substitute.
Variations
- Spicy Kick: Add a teaspoon of red pepper flakes to the herb mixture for a spicy twist that will awaken your taste buds.
- Asian-Inspired: Incorporate soy sauce and ginger into the marinade for a deliciously different flavor profile.
- Herb Swap: Try using sage or oregano instead of rosemary and thyme for a unique herbaceous flavor.
- Gluten-Free Option: Ensure your chicken broth is gluten-free, or use homemade broth to keep it safe for gluten-sensitive diners.
- Vegetarian Side: Serve with roasted root vegetables or a hearty grain salad to complement the richness of the pork belly.
Serving Suggestions
- Roasted Vegetables: Pair the pork belly with seasonal roasted vegetables for a colorful and nutritious side.
- Fresh Salad: A crisp green salad with a tangy vinaigrette balances the richness of the pork.
- Wine Pairing: Serve with a bold red wine, like a Cabernet Sauvignon, to enhance the flavors.
- Presentation: Slice the pork belly into thick pieces and arrange on a platter with herbs for a beautiful display.
FAQs about Heritage Breed Pork Belly Roast
What is heritage breed pork belly?
Heritage breed pork belly comes from traditional pig breeds that are raised in a more natural environment. This results in meat that is richer in flavor and has a better texture compared to conventional pork. It’s a true treat for any meat lover!
How do I know when the pork belly is done?
The best way to check for doneness is by using a meat thermometer. Aim for an internal temperature of 190°F (88°C). This ensures the pork belly is tender and juicy, perfect for slicing!
Can I make this recipe ahead of time?
Absolutely! You can prepare the pork belly and season it the night before. Just cover it and let it marinate in the fridge. This not only saves time but also enhances the flavors!
What can I do with leftovers?
Leftover Heritage Breed Pork Belly Roast can be stored in the refrigerator for up to three days. Use it in sandwiches, salads, or even stir-fries for a quick and delicious meal!
Is this recipe suitable for special diets?
This recipe is gluten-free, making it a great option for those with gluten sensitivities. Just ensure your chicken broth is gluten-free, or use homemade broth to keep it safe for everyone!
Final Thoughts
Cooking a Heritage Breed Pork Belly Roast is more than just preparing a meal; it’s about creating memories around the dinner table. The rich flavors and tender texture of this roast will have your family savoring every bite. I love how this dish transforms an ordinary day into something special, filling the air with mouthwatering aromas. Whether it’s a cozy family dinner or a gathering with friends, this roast is sure to impress. So, roll up your sleeves, embrace the process, and enjoy the joy that comes from sharing a delicious meal with your loved ones!
PrintHeritage Breed Pork Belly Roast: Discover Its Unique Flavors!
A succulent and flavorful roast made from heritage breed pork belly, known for its rich taste and tender texture.
- Prep Time: 15 minutes
- Cook Time: 3 hours
- Total Time: 3 hours 15 minutes
- Yield: 6 servings 1x
- Category: Main Course
- Method: Roasting
- Cuisine: American
- Diet: Gluten Free
Ingredients
- 2–3 pounds heritage breed pork belly
- 2 tablespoons olive oil
- 2 teaspoons salt
- 1 teaspoon black pepper
- 4 cloves garlic, minced
- 1 tablespoon fresh rosemary, chopped
- 1 tablespoon fresh thyme, chopped
- 1 cup chicken broth
Instructions
- Preheat the oven to 300°F (150°C).
- Score the skin of the pork belly in a crosshatch pattern.
- Rub the pork belly with olive oil, salt, and pepper.
- In a small bowl, mix garlic, rosemary, and thyme, then rub this mixture over the pork belly.
- Place the pork belly in a roasting pan and pour chicken broth around it.
- Cover the pan with foil and roast for 2-3 hours until tender.
- Remove the foil and increase the oven temperature to 450°F (230°C) to crisp the skin for an additional 30 minutes.
- Let the pork belly rest for 15 minutes before slicing and serving.
Notes
- For extra flavor, marinate the pork belly overnight.
- Serve with roasted vegetables or a fresh salad.
- Leftovers can be stored in the refrigerator for up to 3 days.
Nutrition
- Serving Size: 1 slice
- Calories: 350
- Sugar: 0g
- Sodium: 600mg
- Fat: 30g
- Saturated Fat: 10g
- Unsaturated Fat: 15g
- Trans Fat: 0g
- Carbohydrates: 1g
- Fiber: 0g
- Protein: 25g
- Cholesterol: 80mg