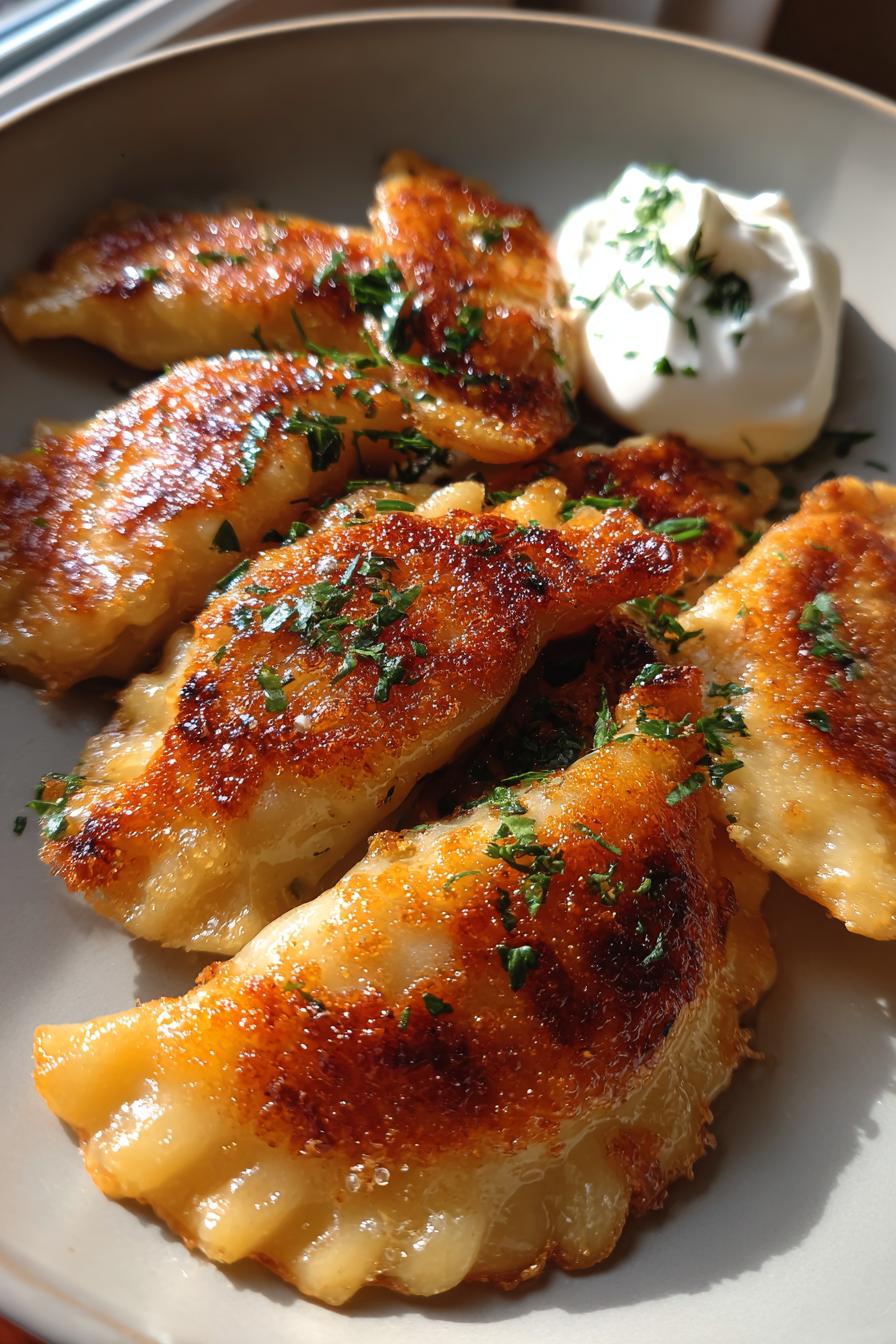
Gluten Free Pierogi Dough That Will Wow Your Taste Buds!
Introduction to Gluten Free Pierogi Dough
As a busy mom, I know how challenging it can be to whip up something delicious that everyone will love. That’s why I’m excited to share my gluten free pierogi dough recipe with you! This dough is not only easy to make, but it also delivers that comforting, homemade taste we all crave. Whether you’re looking for a quick solution for a hectic weeknight dinner or a dish to impress your loved ones at a gathering, this gluten free pierogi dough is your answer. Trust me, your taste buds will thank you!
Why You’ll Love This Gluten Free Pierogi Dough
This gluten free pierogi dough is a game changer for busy families. It’s quick to prepare, taking just 15 minutes of your time. Plus, the taste is simply divine! You’ll enjoy the satisfaction of creating something homemade without the fuss. It’s versatile too, allowing you to fill it with your favorite ingredients. Trust me, once you try it, you’ll be hooked!
Ingredients for Gluten Free Pierogi Dough
Gathering the right ingredients is key to making the perfect gluten free pierogi dough. Here’s what you’ll need:
- Gluten-free all-purpose flour: This is the star of the show! Choose a blend that includes xanthan gum for the best texture.
- Salt: Just a pinch enhances the flavor of the dough, making every bite delicious.
- Large egg: This binds the ingredients together and adds richness to the dough.
- Warm water: Helps to hydrate the flour, making the dough pliable and easy to work with.
- Olive oil: A touch of healthy fat that adds moisture and flavor to the dough.
Feel free to experiment with different fillings for your pierogi, like potatoes, cheese, or even fruits for a sweet twist! You can find the exact measurements for these ingredients at the bottom of the article, ready for printing. Happy cooking!
How to Make Gluten Free Pierogi Dough
Now that you have your ingredients ready, let’s dive into making this delightful gluten free pierogi dough. Follow these simple steps, and you’ll be on your way to creating a dish that will impress everyone at the table!
Step 1: Combine Dry Ingredients
Start by taking a large bowl and adding your gluten-free all-purpose flour and salt. Whisk them together until they’re well combined. This step is crucial because it ensures that the salt is evenly distributed throughout the flour. Trust me, you don’t want any salty surprises in your pierogi!
Step 2: Mix Wet Ingredients
In a separate bowl, whisk together the large egg, warm water, and olive oil. Make sure the water is warm, not hot, as this helps the dough come together smoothly. The egg adds richness, while the olive oil brings a lovely flavor. It’s like a little party in your bowl!
Step 3: Form the Dough
Gradually pour the wet mixture into the dry ingredients. Stir with a spoon or spatula until a dough begins to form. Don’t worry if it looks a bit crumbly at first; that’s perfectly normal. Just keep mixing until everything is combined. You’re almost there!
Step 4: Knead the Dough
Once the dough has come together, it’s time to knead! Lightly flour your work surface and turn the dough out onto it. Knead the dough for a few minutes until it’s smooth and elastic. This step is essential for developing the right texture. Think of it as giving your dough a little workout!
Step 5: Rest the Dough
Wrap the kneaded dough in plastic wrap and let it rest for 30 minutes. This resting period is crucial. It allows the gluten-free flour to hydrate fully, making the dough easier to roll out. Use this time to clean up your kitchen or plan your pierogi fillings!
Step 6: Roll and Cut the Dough
After the dough has rested, it’s time to roll it out! On a floured surface, use a rolling pin to roll the dough to about 1/8 inch thick. Then, use a round cutter or a glass to cut out circles. These will be your pierogi wrappers. Don’t worry if they’re not perfect; they’ll still taste amazing!
Tips for Success
- Always use a gluten-free flour blend with xanthan gum for the best texture.
- Don’t skip the resting time; it makes a world of difference in the dough’s pliability.
- Keep your work surface floured to prevent sticking while rolling out the dough.
- Experiment with different fillings to keep things exciting for your family.
- Use a fork to crimp the edges of the pierogi for a decorative touch!
Equipment Needed
- Mixing bowls: A large bowl for dry ingredients and a smaller one for wet ingredients. Any bowl will do!
- Whisk: Perfect for mixing wet ingredients. A fork works just as well in a pinch.
- Rolling pin: Essential for rolling out the dough. A wine bottle can be a fun alternative!
- Round cutter: Use a cookie cutter or a glass to cut out dough circles.
Variations of Gluten Free Pierogi Dough
- Herbed Dough: Add dried herbs like dill or parsley to the flour for an aromatic twist.
- Cheesy Dough: Mix in a bit of grated cheese, like cheddar or mozzarella, for a richer flavor.
- Sweet Dough: Incorporate a tablespoon of sugar and a splash of vanilla extract for dessert pierogi.
- Vegetable-Infused Dough: Blend in pureed spinach or beetroot for a colorful and nutritious option.
- Spicy Dough: Add a pinch of cayenne pepper or paprika for a kick of heat in your pierogi.
Serving Suggestions for Gluten Free Pierogi Dough
- Serve with sour cream: A dollop of sour cream adds creaminess and tang.
- Pair with sautéed onions: Caramelized onions bring a sweet, savory flavor that complements the pierogi.
- Accompany with a fresh salad: A light salad balances the richness of the pierogi.
- Enjoy with a glass of white wine: A crisp white wine enhances the meal beautifully.
- Garnish with fresh herbs: Chopped chives or parsley add a pop of color and freshness.
FAQs about Gluten Free Pierogi Dough
Can I use any gluten-free flour for this recipe?
While you can use various gluten-free flours, I recommend a blend that includes xanthan gum. This helps achieve the right texture for your gluten free pierogi dough. It’s like a secret ingredient that makes all the difference!
How do I store leftover pierogi dough?
If you have leftover dough, wrap it tightly in plastic wrap and store it in the refrigerator for up to 2 days. Just remember to let it come to room temperature before rolling it out again. It’s like giving your dough a little nap!
Can I freeze the pierogi once they are filled?
Absolutely! Once you’ve filled your pierogi, place them on a baking sheet in a single layer and freeze until solid. Then, transfer them to a freezer bag. They can be cooked straight from frozen, making dinner a breeze!
What fillings work best with gluten free pierogi dough?
The beauty of pierogi is their versatility! You can fill them with mashed potatoes, cheese, sauerkraut, or even sweet fillings like fruit. Get creative and use what you have on hand. Your family will love the surprises!
How do I cook gluten free pierogi?
To cook your pierogi, simply bring a pot of salted water to a boil. Add the pierogi and cook until they float to the surface, usually about 5-7 minutes. They’re ready to enjoy once they’re tender and delicious!
Final Thoughts
Making gluten free pierogi dough is more than just a recipe; it’s a delightful experience that brings joy to your kitchen. The process of creating these little pockets of goodness can be a fun family activity, sparking laughter and creativity. Each bite transports you to a cozy Polish kitchen, filled with warmth and love. Whether you’re enjoying them on a busy weeknight or serving them at a special gathering, this dough is sure to impress. So roll up your sleeves, gather your loved ones, and let the magic of gluten free pierogi dough fill your home with delicious memories!
PrintGluten Free Pierogi Dough That Will Wow Your Taste Buds!

A delicious and easy recipe for gluten-free pierogi dough that will impress your taste buds.
- Prep Time: 15 minutes
- Cook Time: 10 minutes
- Total Time: 55 minutes
- Yield: 4 servings 1x
- Category: Main Dish
- Method: Boiling
- Cuisine: Polish
- Diet: Gluten Free
Ingredients
- 2 cups gluten-free all-purpose flour
- 1/2 teaspoon salt
- 1 large egg
- 1/2 cup warm water
- 1 tablespoon olive oil
Instructions
- In a large bowl, combine the gluten-free flour and salt.
- In a separate bowl, whisk together the egg, warm water, and olive oil.
- Gradually add the wet ingredients to the dry ingredients, mixing until a dough forms.
- Knead the dough for a few minutes until smooth.
- Wrap the dough in plastic wrap and let it rest for 30 minutes.
- Roll out the dough on a floured surface and cut into circles for filling.
Notes
- Make sure to use a gluten-free flour blend that contains xanthan gum for better texture.
- Resting the dough is crucial for the best results.
- Feel free to experiment with different fillings for your pierogi.
Nutrition
- Serving Size: 1 serving
- Calories: 200
- Sugar: 0g
- Sodium: 200mg
- Fat: 5g
- Saturated Fat: 1g
- Unsaturated Fat: 4g
- Trans Fat: 0g
- Carbohydrates: 35g
- Fiber: 2g
- Protein: 6g
- Cholesterol: 50mg