“Creepy Dirt Pudding Cups: 5-Ingredient Halloween Magic”
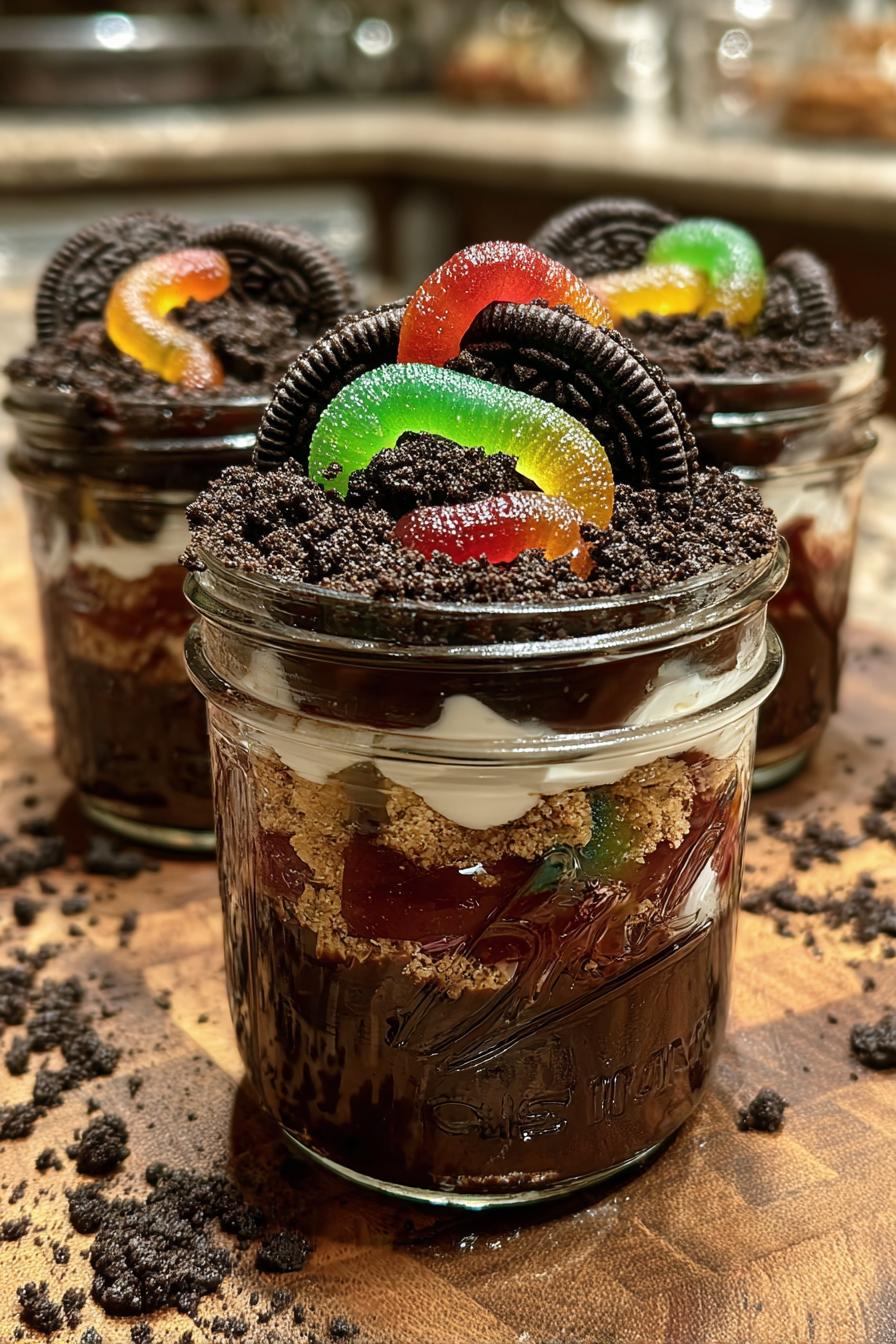
Halloween desserts should be equal parts delicious and delightfully creepy – that’s why I’m obsessed with these dirt pudding cups! Every October, my kitchen turns into a spooky dessert lab, and this recipe never fails to thrill kids (and sneaky adults). I’ve been making variations of dirt pudding since my first Halloween party disaster – let’s just say crushed cookies fly everywhere if you’re not careful! After years of perfecting the worm-to-dirt ratio, this version strikes the perfect balance between silly and scary. Trust me, nothing gets more “ewwws” of delight than pulling a gummy worm from chocolatey “dirt”!
Ingredients for Creepy Dirt Pudding Cups
Here’s what you’ll need to whip up these delightfully gross treats (trust me, the messier the better!):
- 2 cups cold milk – whole milk makes it extra creamy, but any kind works
- 1 package (3.9 oz) instant chocolate pudding mix – the secret to that rich “mud” base
- 15 chocolate sandwich cookies (like Oreos) – don’t skimp, the crumbs make the “dirt”
- 8 gummy worms – go for the extra-long creepy ones if you can find them!
- 1 cup whipped topping (Cool Whip or homemade) – this gives our “mud” perfect fluffiness
That’s it! Five simple ingredients for maximum Halloween fun. Now let’s get our hands dirty…
How to Make Creepy Dirt Pudding Cups
Ready to make the most gloriously messy Halloween treat? Here’s my foolproof method – I’ve made enough of these to know every trick in the book!
- Whisk like crazy – In a big bowl, pour that cold milk and dump in the chocolate pudding mix. Now whisk for a full 2 minutes (set a timer!). You want it thick enough to coat the whisk – that’s when you know it’s perfect.
- Fold in the fluff – Add your whipped topping and gently fold it in with a rubber spatula. Don’t stir hard or you’ll deflate all that airy goodness! Just fold until you see no white streaks.
- Crush those cookies – Toss cookies in a ziplock bag and go to town with a rolling pin. Leave some bigger chunks for texture – real dirt isn’t perfectly fine!
- Layer the “dirt” – Start with cookie crumbs in your cups, then pudding, then more crumbs. Repeat until cups are nearly full, leaving room for worms.
- Worm time! Bury those gummies halfway in the top layer so they look like they’re crawling out. The more crooked, the better!
- Chill out – Refrigerate for at least 1 hour (2 is better). This lets the flavors meld and the worms get nice and sticky.
Pro Tips for the Best Creepy Dirt Pudding Cups
- Use room temp gummy worms – cold ones tear when you bend them into creepy shapes
- For extra “eww” factor, drizzle caramel sauce over the top like slime
- Double the recipe – these disappear fast at parties!
- Let kids assemble their own – the mess is half the fun
Ingredient Substitutions & Variations
Here’s the beautiful thing about dirt pudding – it’s ridiculously easy to customize! Over the years, I’ve tried every swap imaginable for different diets and themes. My favorite gluten-free trick? Use gluten-free chocolate sandwich cookies (about 15 for the same “dirt” effect). For vegan versions, simply swap the milk for almond or oat milk and use dairy-free whipped topping.
Want to get creative? Try mint Oreos for a “swamp” version (so good with green gummy worms!). Peanut butter Oreos make an amazing “mudslide” variation – just add crushed peanuts on top. If gummy worms aren’t your thing, sour gummy spiders or candy bones work just as well. And for grown-up parties? A splash of coffee liqueur in the pudding takes these from kiddie treat to spooky sophisticate!
Serving and Storing Creepy Dirt Pudding Cups
Presentation is everything with these spooky treats! I love serving them in clear plastic cups so you can see all those delicious layers of “dirt.” For Halloween parties, I’ll stick plastic spiders or skeleton hands to the outside of the cups with a dab of frosting – instant creepy factor! These keep beautifully in the fridge for 2-3 days in airtight containers. Just wait to add the gummy worms until right before serving, or they’ll get too soft. Pro tip: the pudding gets even richer overnight!
Nutritional Information for Creepy Dirt Pudding Cups
Okay, let’s be real – these aren’t health food, but everything’s allowed at Halloween! *Nutrition facts are estimates* and will vary based on your specific brands. Each spooky cup (about 1 serving) contains roughly:
- 280 calories – mostly from cookie joy
- 22g sugar – blame the worms!
- 10g fat – the delicious kind
Want lighter dirt? Try sugar-free pudding mix and reduced-fat cookies. But personally? I say enjoy every creepy bite!
FAQs About Creepy Dirt Pudding Cups
Q1. Can I make dirt pudding cups ahead of time?
Absolutely! These actually taste better after chilling overnight. Just wait to add the gummy worms until right before serving so they stay perfectly chewy. The pudding firms up beautifully in the fridge.
Q2. Are there nut-free options?
You bet! Most standard chocolate sandwich cookies (like Oreos) are nut-free, but always check labels if allergies are a concern. Skip any peanut butter cookie variations and stick with classic chocolate cookies for safety.
Q3. Why do my cookies get soggy?
Ah yes, the great pudding cup dilemma! Layer thicker cookie crumbs (about 1/4 inch) between pudding layers to create a moisture barrier. And don’t assemble more than 6 hours ahead – the cookies will gradually soften no matter what!
Q4. Can I use homemade pudding instead?
Of course! Just make sure your cooked pudding is completely cooled before folding in whipped topping. Instant pudding gives that perfect thick consistency though – my go-to for worry-free results.
Q5. What’s the best way to bend gummy worms?
My secret? Microwave them for 3-5 seconds first – they become wonderfully pliable! Twist them into creepy shapes before they cool completely. For extra realism, dip one end in crushed cookies before “planting” it.
I’d love to see your spooky creations! Snap a pic of your wormiest dirt cups and tag me – nothing makes me happier than seeing Halloween treats come to life in your kitchens!
Print“Creepy Dirt Pudding Cups: 5-Ingredient Halloween Magic”

A fun and spooky dessert perfect for Halloween. These dirt pudding cups are made with chocolate pudding, crushed cookies, and gummy worms for a creepy touch.
- Prep Time: 10 minutes
- Cook Time: 0 minutes
- Total Time: 1 hour 10 minutes
- Yield: 4 servings 1x
- Category: Dessert
- Method: No-Cook
- Cuisine: American
- Diet: Vegetarian
Ingredients
- 2 cups cold milk
- 1 package (3.9 oz) instant chocolate pudding mix
- 15 chocolate sandwich cookies, crushed
- 8 gummy worms
- 1 cup whipped topping
Instructions
- Whisk milk and pudding mix in a bowl for 2 minutes until thickened.
- Fold in whipped topping until smooth.
- Layer crushed cookies and pudding mixture in small cups.
- Top with extra crushed cookies and gummy worms.
- Chill for 1 hour before serving.
Notes
- Use gluten-free cookies for a gluten-free version.
- Add more gummy worms for extra creepiness.
- Substitute dairy-free milk and whipped topping for a vegan option.
Nutrition
- Serving Size: 1 cup
- Calories: 280
- Sugar: 22g
- Sodium: 320mg
- Fat: 10g
- Saturated Fat: 4g
- Unsaturated Fat: 5g
- Trans Fat: 0g
- Carbohydrates: 42g
- Fiber: 1g
- Protein: 4g
- Cholesterol: 5mg