Spooky 5-Ingredient Glow-in-the-Dark Ghost Cookies That Wow
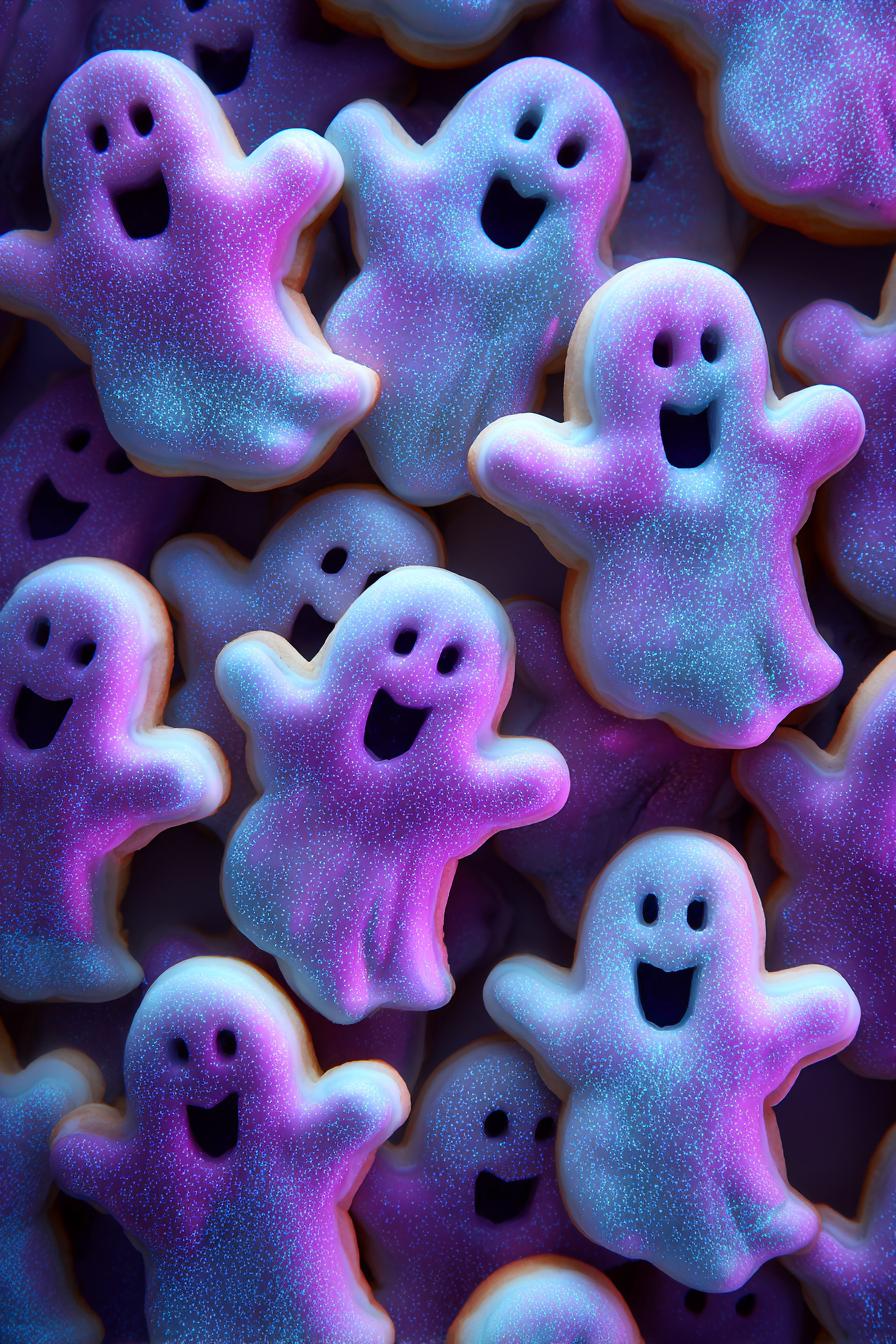
Oh my gosh, you HAVE to try these glow-in-the-dark ghost cookies! They’re the absolute hit of every Halloween party I throw. I still remember the first time I made them – my kitchen looked like a mad scientist’s lab with all these glowing little ghosts floating around. The best part? They’re ridiculously easy to make, even if you’re not a baking pro. Just imagine the kids’ faces (okay, and let’s be honest, the adults too) when the lights go out and these spooky treats start glowing! Trust me, these cookies will steal the show at your Halloween bash.
Ingredients for Glow-in-the-Dark Ghost Cookies
Gathering the right ingredients is half the fun with these spooky treats! Here’s what you’ll need to make your cookies glow:
- 1 cup all-purpose flour – spooned and leveled for perfect measurement
- 1/2 cup sugar – regular granulated works great
- 1/2 cup butter, softened – leave it out for 30 minutes (should dent easily when pressed)
- 1 egg – room temperature blends better
- 1 tsp vanilla extract – pure vanilla makes all the difference
- 1/2 tsp baking powder – for that perfect lift
- 1/4 tsp salt – just enough to balance the sweetness
- 1 cup powdered sugar – for the ghostly icing
- 2 tbsp milk – any kind works, I usually use whole milk
- 1 tsp glow-in-the-dark paint – must be food-safe (check the label!)
That’s it! Simple pantry staples plus one special ingredient for that magical glow effect. I always double check I have everything laid out before starting – nothing worse than realizing you’re out of vanilla mid-recipe!
How to Make Glow-in-the-Dark Ghost Cookies
Okay, let’s get spooky! Making these glow-in-the-dark ghost cookies is easier than you think. I’ve broken it down into simple steps so you can focus on the fun part – watching them light up your Halloween party!
Preparing the Cookie Dough
First, grab your biggest mixing bowl – you’ll want room to really get in there! Cream together the softened butter and sugar until it’s light and fluffy. This takes about 2 minutes with a hand mixer (or 3-4 minutes if you’re going old-school with a wooden spoon like I sometimes do). Crack in the egg and vanilla, mixing until just combined. Now, gently stir in the dry ingredients – flour, baking powder, and salt. The dough should come together nicely, not too sticky but not crumbly either. If it feels dry, add a teaspoon of milk. Too sticky? A sprinkle more flour does the trick.
Baking and Cooling
Preheat that oven to 350°F (175°C) while you shape your ghostly crew. Roll tablespoon-sized portions of dough into balls, then gently flatten them into ghost shapes – I make mine slightly oval with a little point at the bottom. Don’t worry about perfection here; ghosts are supposed to look a little wonky! Bake for 10-12 minutes until the edges just start turning golden. They’ll still feel soft when you take them out – that’s perfect! Let them cool completely on the baking sheet before decorating. I know it’s tempting, but trust me, icing warm cookies is a messy disaster waiting to happen.
Decorating for the Glow Effect
Now for the magic! Mix your powdered sugar, milk, and that all-important food-safe glow-in-the-dark paint. The consistency should be thick but pourable – like heavy cream. If it’s too thin, add more powdered sugar; too thick, a few drops more milk. Use a piping bag (or a ziplock with the corner snipped off) to draw ghost faces and wispy details. Let the icing dry completely before turning off the lights to test your glow! Pro tip: charge them under a bright light for 5 minutes before serving for maximum spook factor.
Why You’ll Love These Glow-in-the-Dark Ghost Cookies
Seriously, what’s not to love about these spooky little treats? Here’s why they’ve become my go-to Halloween recipe every single year:
- Total showstoppers – Nothing makes kids (and let’s be real, adults too) gasp louder than when you turn off the lights and these ghost cookies start glowing! They’re instant party magic.
- Easy peasy to make – If you can mix cookie dough and squeeze icing from a bag, you’ve got all the skills needed. No fancy equipment required.
- Perfect for little helpers – My nieces go wild helping shape the ghosts and pipe on the faces. Bonus: the glow-in-the-dark paint makes cleanup a breeze since it shows everywhere they’ve touched!
- Customizable spook factor – Make them cute or creepy depending on how you draw the faces. I like doing some with sweet smiles and others with terrifying frowns.
- Surprisingly tasty – Unlike some gimmicky treats, these actually taste amazing with their buttery vanilla flavor. The glow is just the spooky cherry on top!
I’ve made these glow-in-the-dark ghost cookies for classroom parties, neighborhood gatherings, and even a few adult Halloween bashes – they’re always the first treat to disappear. The combination of simple baking and maximum wow factor is just unbeatable!
Tips for Perfect Glow-in-the-Dark Ghost Cookies
After making dozens of batches (sometimes with more “ghostly casualties” than I’d like to admit), I’ve picked up some tricks that’ll guarantee your cookies come out perfect every time:
- Charge ’em up! For the brightest glow, place your decorated cookies under a bright light for 5-10 minutes before serving. I use my phone flashlight in a pinch when I forget!
- Don’t overmix the dough – Once the flour is incorporated, stop mixing. Overworked dough makes tough ghosts instead of tender, buttery ones.
- Test your glow paint first – Mix a tiny bit with icing on a plate and let it dry to check the glow intensity before committing to your whole batch.
- Keep icing thick enough – If it’s too runny, your ghost faces will spread. The consistency should hold its shape when piped.
- Make extras! Trust me, between taste-testers and light-testers, you’ll want at least double what you think you need. These disappear faster than ghosts at sunrise!
My biggest lesson? Don’t stress about perfect ghost shapes – the more “haunted” they look, the better! Last year’s most lopsided ghost cookie got the most compliments for being “authentically spooky.”
Ingredient Substitutions & Safety Notes
Need to tweak the recipe? No problem! Swap all-purpose flour with a 1:1 gluten-free blend if needed. Vegan? Use plant-based butter and a flax egg (1 tbsp ground flax + 3 tbsp water). The most important note? Only use food-safe glow-in-the-dark paint – regular craft paint isn’t edible! I always buy mine from baking supply stores to be safe. A quick pro tip: if you can’t find glow paint, edible glitter still adds sparkle (just no glow). Whatever substitutions you make, just ensure everything going in your mouth is actually food!
Storing and Serving Suggestions
These glow-in-the-dark ghost cookies are as easy to store as they are to make! Once the icing has fully dried (give it at least an hour), pop them into an airtight container. I like to layer them between sheets of parchment paper to keep the icing from sticking. They’ll stay fresh at room temperature for up to 3 days – though in my house, they rarely last that long!
When it’s time to serve, here’s my secret: charge them up under a bright light for 5-10 minutes before bringing them out. I’ve used everything from a lamp to my phone’s flashlight in a pinch. The brighter the light, the better the glow! If you’re serving them at a party, keep a small flashlight nearby so you can recharge them throughout the night – trust me, everyone will want to see them light up again and again.
And here’s a fun tip: if you’re making them ahead of time, you can freeze the undecorated cookies for up to a month. Just thaw completely before adding the glow-in-the-dark icing. That way, you can whip up a spooky batch in no time when the Halloween mood strikes!
Glow-in-the-Dark Ghost Cookies FAQs
I get so many questions about these spooky treats every Halloween! Here are the answers to everything you might be wondering:
Can I use regular icing if I don’t have glow-in-the-dark paint?
Absolutely! The cookies will still be delicious, just without the glowing effect. If you want some Halloween pizzazz, try mixing in black food coloring for creepy gray icing or add edible glitter for sparkle. But honestly? The glow is half the fun – it’s worth tracking down food-safe glow paint!
How long do the cookies actually glow?
The glow lasts about 30-45 minutes after charging under bright light. The intensity fades gradually, but here’s my trick: keep a flashlight at the party table so guests can “recharge” their cookies whenever they want another glowing moment! The cookies will continue to glow (though less brightly) for several hours.
Are these safe for kids to eat?
100% yes – as long as you use food-safe glow paint! I can’t stress this enough. Regular craft store glow paint isn’t edible. Look for products specifically labeled as food-safe, preferably from baking supply stores. I always test a tiny bit first to check for taste and glow intensity before decorating the whole batch.
Can I make the cookie dough ahead of time?
You bet! The dough keeps well in the fridge for 3 days or freezer for a month. Just wrap it tightly in plastic. When you’re ready to bake, let it come to room temperature first – cold dough is harder to shape into perfect little ghosts. This make-ahead trick has saved me so many last-minute Halloween baking panics!
Why did my cookies spread too much?
Oh no, flat ghosts! This usually happens if the butter was too soft or the dough got warm. Next time, chill the shaped cookies for 15 minutes before baking. Also, make sure your baking powder is fresh – expired powder won’t give the cookies enough lift. Don’t worry though – even flat ghosts still taste amazing and glow just as bright!
Nutritional Information
Just a quick note about the nutrition info for these glow-in-the-dark ghost cookies: the values I’ve included are estimates based on the ingredients I use. They can vary depending on the specific brands or substitutions you choose. So, if you’re tracking calories or macros, keep in mind these are just guidelines. The most important thing? Enjoy these spooky treats in moderation and have fun with them – after all, Halloween is all about indulging in a little magic!
Well, there you have it – everything you need to create the most spooktacular glow-in-the-dark ghost cookies this Halloween! I can’t wait to hear about your baking adventures. Did your ghosts turn out perfectly spooky? Did the kids go wild when the lights went out? Snap a pic of your glowing creations and share your best (or funniest) cookie moments in the comments below! And if you came up with any brilliant decorating ideas I haven’t tried yet, please share those too – I’m always looking for new ways to make these cookies even more ghostly. Happy haunting, bakers!
PrintSpooky 5-Ingredient Glow-in-the-Dark Ghost Cookies That Wow

Fun and spooky glow-in-the-dark ghost cookies perfect for Halloween. These sweet treats are easy to make and will light up your party.
- Prep Time: 15 mins
- Cook Time: 12 mins
- Total Time: 27 mins
- Yield: 12 cookies 1x
- Category: Dessert
- Method: Baking
- Cuisine: American
- Diet: Vegetarian
Ingredients
- 1 cup all-purpose flour
- 1/2 cup sugar
- 1/2 cup butter, softened
- 1 egg
- 1 tsp vanilla extract
- 1/2 tsp baking powder
- 1/4 tsp salt
- 1 cup powdered sugar
- 2 tbsp milk
- 1 tsp glow-in-the-dark paint (food-safe)
Instructions
- Preheat oven to 350°F (175°C). Line a baking sheet with parchment paper.
- In a bowl, mix flour, sugar, butter, egg, vanilla, baking powder, and salt until a dough forms.
- Roll dough into small balls and flatten slightly into ghost shapes. Place on baking sheet.
- Bake for 10-12 minutes until edges are lightly golden. Let cool completely.
- Mix powdered sugar, milk, and glow-in-the-dark paint to make icing.
- Decorate cooled cookies with icing to create ghost faces and details.
- Let icing dry before serving. Charge under light for glow effect.
Notes
- Use edible glow-in-the-dark paint for safety.
- Store in an airtight container to maintain freshness.
- For brighter glow, charge cookies under a bright light before serving.
Nutrition
- Serving Size: 1 cookie
- Calories: 120
- Sugar: 10g
- Sodium: 50mg
- Fat: 5g
- Saturated Fat: 3g
- Unsaturated Fat: 2g
- Trans Fat: 0g
- Carbohydrates: 18g
- Fiber: 0g
- Protein: 1g
- Cholesterol: 25mg