Spooky 15-Minute Chocolate Tombstone Biscuits Kids Love
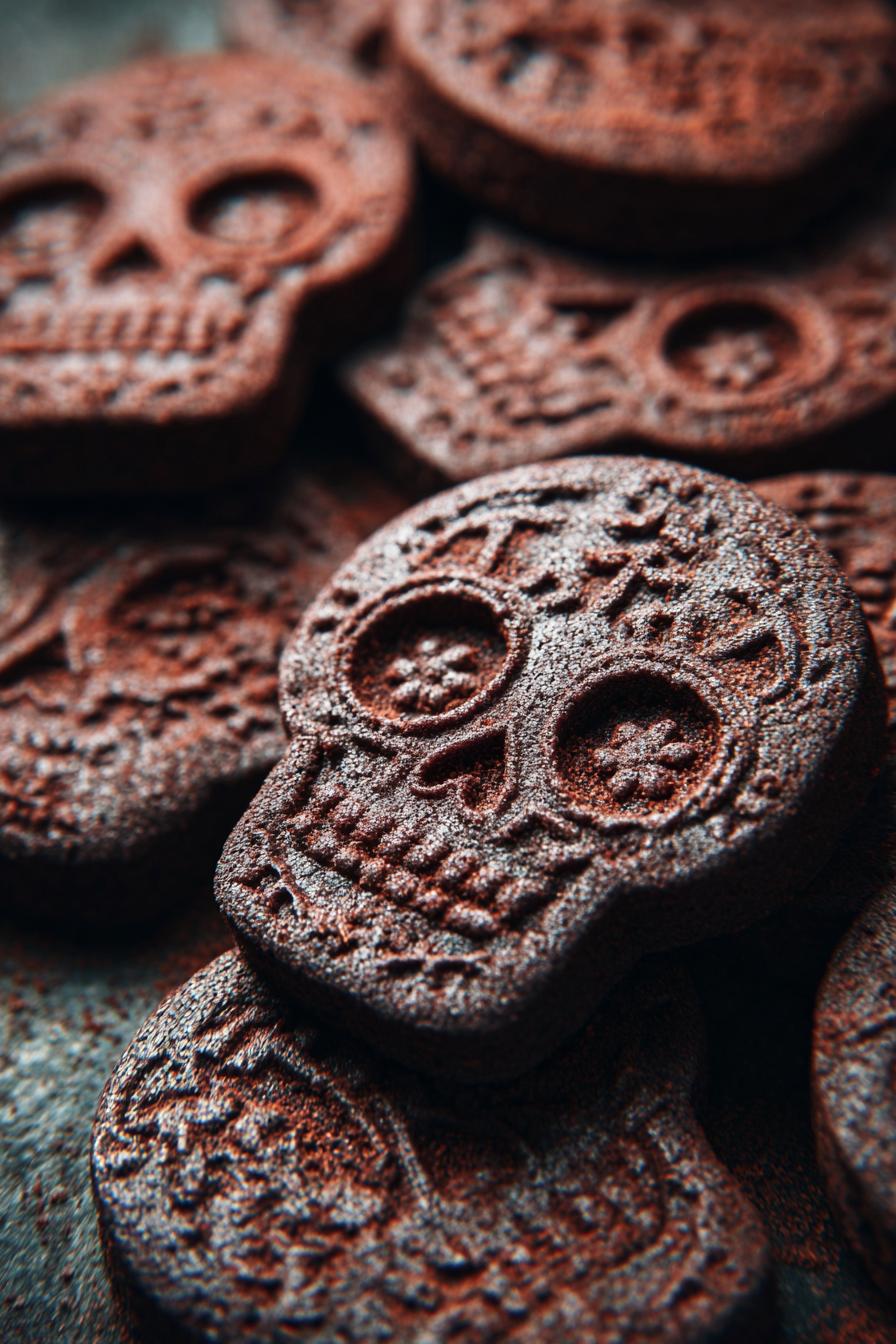
There’s something magical about Halloween baking, isn’t there? The moment I pull these chocolate tombstone biscuits out of the oven, my kitchen smells like a haunted chocolate factory. I’ve been making these spooky treats for years – they’re always the star of our Halloween parties! The kids go wild decorating them with silly RIP messages, while the adults sneak extras when they think no one’s looking. What I love most is how simple they are to make, yet they look so impressive. Just wait until you see your friends’ faces when you bring out a tray of these chocolatey tombstones at your next Halloween gathering!
Why You’ll Love These Chocolate Tombstone Biscuits
Trust me, these biscuits are going to be your new Halloween obsession! Here’s why:
- So easy to make – The dough comes together in minutes, even if you’re not a baking pro
- Perfect Halloween vibe – Nothing says spooky season like edible tombstones!
- Kid-approved decorating – Let little ghosts and goblins go wild with the icing
- Rich chocolate flavor – They taste as good as they look, with that deep, cocoa-y goodness
I’ve made these for years, and they never fail to disappear fast at parties!
Ingredients for Chocolate Tombstone Biscuits
Gathering the right ingredients makes all the difference with these spooky treats! Here’s exactly what you’ll need:
- 200g all-purpose flour – Spoon and level it for accuracy
- 50g cocoa powder – Sift it first to avoid lumps
- 100g butter – Softened (leave it out for 30 minutes)
- 100g granulated sugar – Standard white sugar works perfectly
- 1 large egg – Room temperature blends better
- 1 tsp vanilla extract – The good stuff, not imitation!
- Pinch of salt – Just a tiny bit to balance flavors
- White icing – Either homemade or store-bought works
Pro tip: I always measure everything before starting – it makes the process so much smoother!
Equipment You’ll Need
Don’t worry – you probably have most of this already! Here’s what you’ll need:
- A trusty rolling pin (mine’s covered in flour stains)
- Tombstone-shaped cookie cutter (or get creative with a knife!)
- Parchment paper – your baking sheet’s best friend
- Mixing bowls – one big, one small
That’s it! No fancy gadgets required – just good old-fashioned baking tools.
How to Make Chocolate Tombstone Biscuits
Ready to make some spooky magic? Follow these steps, and you’ll have a batch of chocolate tombstone biscuits that’ll wow your Halloween crowd!
Mixing the Dough
First, cream that butter and sugar together until it’s light and fluffy – this is where the magic starts! Add your egg and vanilla, mixing well. Now, gently fold in the dry ingredients. You’ll know the dough is ready when it comes together into a smooth, slightly firm ball. If it’s too sticky, add a touch more flour. Too dry? A splash of milk will do the trick!
Shaping and Baking
Roll out your dough to about 5mm thick – not too thin, or they’ll crisp up too much. Use your tombstone cutter (or a knife if you’re feeling crafty) to cut out your shapes. Space them out on the baking sheet – they don’t spread much, but you want them to bake evenly. Pop them in the oven for 10-12 minutes. Watch them closely – overbaking is the enemy of soft biscuits!
Decorating Tips
Let your biscuits cool completely before you start decorating – trust me, icing on warm biscuits is a messy disaster! Use a piping bag (or a ziplock with the corner snipped) to add cracks, RIP messages, or spooky designs. If you’re feeling fancy, chill the biscuits first – it makes the icing set faster and gives you cleaner lines. Have fun with it – there’s no wrong way to decorate a tombstone!
Tips for Perfect Chocolate Tombstone Biscuits
After making dozens of batches (some winners, some learning experiences!), here are my golden rules:
- Chill sticky dough – 15 minutes in the fridge makes rolling so much easier
- Rotate your tray – For even baking halfway through
- Toothpick magic – Perfect for etching tiny cracks before baking
- Cool completely – Warm biscuits make runny icing (been there!)
Oh, and sneaking one fresh from the oven? Totally allowed – chef’s privilege!
Storing and Freezing
These biscuits stay fresh in an airtight container for up to 5 days – if they last that long! For longer storage, freeze the undecorated biscuits for 2 months. Just thaw and decorate when you’re ready to spook your guests!
Chocolate Tombstone Biscuits Variations
Once you’ve mastered the classic version, try these fun twists! Swap vanilla for peppermint extract for a cool ghostly flavor. Use dark cocoa powder for extra-deep “graveyard” color. My kids love sprinkling crushed Oreos as “dirt” around the tombstones – messy but delicious! Feeling fancy? Dip half in melted white chocolate before decorating.
Serving Suggestions
These chocolate tombstone biscuits are perfect with a glass of witch’s brew punch or paired with Halloween candy like candy corn. Arrange them on a spooky platter for maximum effect!
Chocolate Tombstone Biscuits FAQs
I get asked these questions all the time when I make these spooky treats! Here’s what you need to know:
Can I make the dough ahead?
Absolutely! The dough keeps beautifully in the fridge for 2 days wrapped tightly in cling film. Just let it sit at room temperature for 15 minutes before rolling. You can even freeze it for up to a month!
Can I skip the cocoa powder?
While you’ll lose that rich graveyard color and flavor, you can substitute it with equal parts flour for plain biscuits. But trust me – the chocolate makes them special!
How do I fix runny icing?
Been there! Just add powdered sugar a tablespoon at a time until it thickens. If it’s too thick, a few drops of milk will loosen it up. Pro tip: I always test a small amount first!
Nutritional Information
Just so you know, these values are estimates per biscuit and can vary based on your specific ingredients – especially the type of butter or icing you use. Don’t stress about it though, it’s Halloween – live a little! The full nutrition breakdown is in the recipe details above if you’re curious.
Rate This Recipe
Did you make these spooky treats? I’d love to hear how they turned out – leave a comment and let me know!
PrintSpooky 15-Minute Chocolate Tombstone Biscuits Kids Love
Chocolate tombstone biscuits are rich, crumbly cookies shaped like tombstones, perfect for Halloween treats.
- Prep Time: 15 minutes
- Cook Time: 12 minutes
- Total Time: 27 minutes
- Yield: 20 biscuits 1x
- Category: Dessert
- Method: Baking
- Cuisine: International
- Diet: Vegetarian
Ingredients
- 200g all-purpose flour
- 50g cocoa powder
- 100g butter, softened
- 100g granulated sugar
- 1 egg
- 1 tsp vanilla extract
- Pinch of salt
- White icing for decoration
Instructions
- Preheat oven to 180°C (350°F). Line a baking tray with parchment paper.
- In a bowl, mix flour, cocoa powder, and salt.
- Cream butter and sugar until light. Add egg and vanilla, mixing well.
- Gradually add dry ingredients, forming a dough.
- Roll dough to 5mm thickness. Cut into tombstone shapes.
- Place on tray and bake for 10-12 minutes. Cool completely.
- Decorate with white icing for spooky details.
Notes
- Store in an airtight container for up to 5 days.
- For crispier biscuits, bake an extra minute.
- Use a template for uniform tombstone shapes.
Nutrition
- Serving Size: 1 biscuit
- Calories: 90
- Sugar: 5g
- Sodium: 20mg
- Fat: 4g
- Saturated Fat: 2.5g
- Unsaturated Fat: 1g
- Trans Fat: 0g
- Carbohydrates: 12g
- Fiber: 1g
- Protein: 2g
- Cholesterol: 15mg