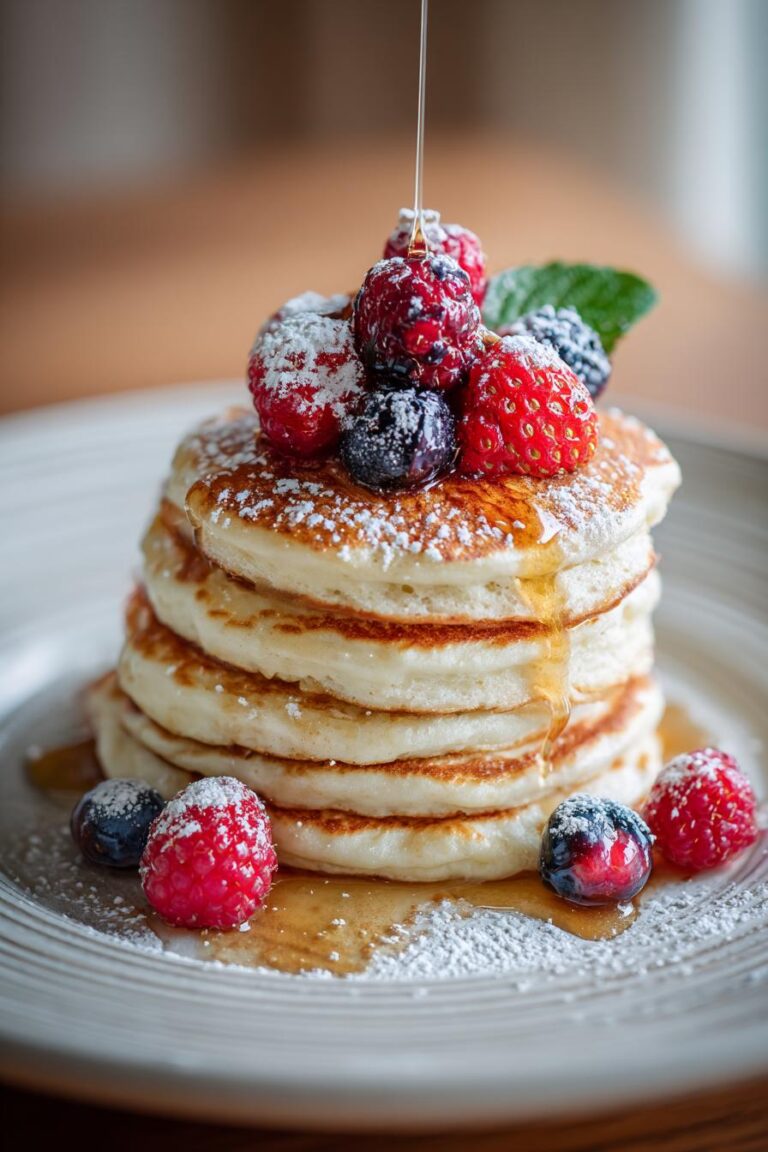
Fluffy 15-Minute Gluten-Free Pancakes Your Family Craves

There’s nothing quite like waking up to a stack of warm, fluffy gluten-free pancakes on a lazy Sunday morning. I remember the first time I made these for my niece who has celiac disease—her face lit up when she realized she could enjoy pancakes just as delicious as the “regular” ones! After years of tweaking recipes (and plenty of failed batches), I’ve perfected this simple version that never fails. These gluten-free pancakes are light, tender, and come together in minutes. No fancy ingredients, no complicated steps—just pure breakfast magic that happens to be gluten-free. Trust me, even pancake purists won’t know the difference!
Why You’ll Love These Gluten-Free Pancakes
Oh, where do I begin? These pancakes have become my go-to breakfast for so many reasons:
- Fluffy perfection: That light, airy texture? You’d never guess they’re gluten-free!
- Quick as can be: From bowl to plate in 15 minutes flat – even on sleepy mornings.
- Endless options: Dairy-free milk works beautifully (I’m partial to oat milk myself).
- Kid-approved: My picky nephew gobbles them up – no complaints about “weird gluten-free” taste!
- Weekend-worthy: Fancy enough for brunch guests, easy enough for everyday.
The best part? One bite and you’ll forget all about regular pancakes. They’re that good.
Ingredients for Gluten-Free Pancakes
Here’s what you’ll need to make magic happen (measurements matter – I learned that the hard way!):
- 1 cup gluten-free flour blend (my favorite has xanthan gum already in it)
- 1 tbsp sugar – just enough sweetness
- 1 tsp baking powder – our fluffy-maker
- 1/2 tsp baking soda
- 1/4 tsp salt – don’t skip this flavor booster!
- 1 cup milk (any kind works – I’ve used almond, oat, you name it)
- 1 egg – room temp if you remember
- 1 tbsp melted butter or oil (coconut oil’s great for dairy-free)
- 1 tsp vanilla extract (optional but oh-so-worth-it)
See? Nothing weird or hard-to-find. Just simple ingredients that make extraordinary pancakes!
How to Make Gluten-Free Pancakes
Okay, let’s get cooking! I promise this is easier than you think – I’ve burned enough pancakes to know all the tricks now. Here’s how we make magic happen:
First, the dry team: Grab a big bowl and whisk together your gluten-free flour blend, sugar, baking powder, baking soda, and salt. Really get in there – you want everything evenly distributed. I learned the hard way that clumpy baking powder makes for weird pancake volcanoes!
Now, the wet crew: In another bowl (or just a big measuring cup to save dishes), mix your milk, egg, melted butter/oil, and vanilla if using. Pro tip: If your butter’s too hot, it’ll cook the egg – ask me how I know! Let it cool slightly first.
The grand mix: Pour the wet ingredients into the dry and stir just until combined. Some small lumps are fine – overmixing makes tough pancakes. If the batter seems too thick (it should pour slowly off a spoon), add a splash more milk.
Heat things up: Get your pan or griddle nice and hot over medium heat – about 300°F if you’re fancy with a thermometer. A drop of water should sizzle. Lightly grease it (I use butter for flavor, but oil works too).
Pancake time! Pour about ¼ cup batter per pancake. Wait for those telltale bubbles to form on top and the edges to look set – usually 2-3 minutes. Then flip with confidence! Cook another 1-2 minutes until golden brown. Keep finished pancakes warm in a 200°F oven while you cook the rest.
Serve immediately with all your favorite toppings. That first bite of warm, fluffy goodness? Pure breakfast bliss!
Tips for Perfect Gluten-Free Pancakes
After making approximately nine million batches (okay, maybe just hundreds), I’ve picked up some foolproof tricks:
- Batter consistency is key: It should pour slowly off a spoon – add milk by the tablespoon if it’s too thick. Too thin? Sprinkle in a bit more flour.
- Non-stick is your friend: Gluten-free batter can be stickier – use a quality non-stick pan or well-seasoned cast iron.
- Patience pays: Wait for those bubbles before flipping! Gluten-free pancakes need a tiny bit longer than regular ones.
- Keep ’em cozy: Store leftovers between parchment paper in an airtight container – they reheat beautifully in the toaster!
Follow these simple tips and you’ll have perfect pancakes every time – promise!
Ingredient Notes and Substitutions
Let’s talk about why each ingredient matters and how you can tweak things if needed:
Gluten-free flour blend is non-negotiable for structure – my favorite contains xanthan gum (which helps mimic gluten’s elasticity). Single flours like almond or coconut won’t work the same – trust me, I’ve tried!
Milk can be any variety you like – dairy, almond, oat (my personal favorite for richness). Even buttermilk works if you reduce baking powder by ¼ tsp.
Vanilla extract is optional but adds lovely depth. When I’m feeling fancy, I sometimes swap in almond extract or add lemon zest for a bright twist!
The rest? They’re all team players working together to create that perfect rise and texture, so I don’t recommend substituting them.
Serving Suggestions for Gluten-Free Pancakes
Now for the best part – topping these beauties! My Sunday ritual involves a ridiculous tower of pancakes swimming in pure maple syrup with a side of crispy bacon. But honestly, anything goes:
- Classic: Butter and warm maple syrup (the good stuff!)
- Fresh & fancy: Sliced bananas or berries with a dollop of yogurt
- Decadent: Peanut butter drizzle with chocolate chips
- Complete breakfast: Pair with scrambled eggs and turkey sausage
Pro tip: Keep toppings simple – these pancakes shine all on their own!
Storage and Reheating Instructions
Got leftovers? Lucky you! Let the pancakes cool completely, then stack them with parchment paper between each one to prevent sticking. Pop them in an airtight container – they’ll keep in the fridge for up to 3 days. To reheat, use a toaster for that perfect crispy edge or microwave for 20-30 seconds if you’re in a hurry. Breakfast just got easier!
Nutritional Information for Gluten-Free Pancakes
Nutrition values may vary depending on the specific ingredients and brands you use. For example, using dairy-free milk or different flours will change the numbers. Always check labels for accurate info!
Frequently Asked Questions About Gluten-Free Pancakes
Over the years, I’ve gotten some great questions about these pancakes – here are the ones that come up most often:
Can I use almond flour instead of gluten-free flour blend?
Oh honey, I wish! Almond flour alone makes dense, crumbly pancakes – trust me, I’ve tried. Stick with a proper gluten-free flour blend (the ones with rice flour and xanthan gum work best).
How do I make these completely dairy-free?
Easy peasy! Just swap the milk for your favorite non-dairy alternative (oat milk’s my top pick), and use oil instead of butter. They’ll still be just as fluffy and delicious.
Why are my pancakes turning out flat?
Usually means your baking powder’s gone bad (check the expiration date!) or you overmixed the batter. Next time, stir just until combined – lumps are totally fine.
Can I freeze these pancakes?
Absolutely! Cool them completely, then stack with parchment between each one. They’ll keep beautifully in the freezer for up to 2 months. Just pop ’em straight in the toaster when you’re ready!
What’s the best gluten-free flour blend to use?
My go-to is Bob’s Red Mill 1-to-1 blend – it already has xanthan gum mixed in. Cup4Cup works great too. Basically, any “all-purpose” gluten-free blend labeled for baking will do the trick!
Fluffy 15-Minute Gluten-Free Pancakes Your Family Craves

A simple recipe for fluffy gluten-free pancakes.
- Prep Time: 5 mins
- Cook Time: 10 mins
- Total Time: 15 mins
- Yield: 8 pancakes 1x
- Category: Breakfast
- Method: Pan-frying
- Cuisine: American
- Diet: Gluten Free
Ingredients
- 1 cup gluten-free flour blend
- 1 tbsp sugar
- 1 tsp baking powder
- 1/2 tsp baking soda
- 1/4 tsp salt
- 1 cup milk (or dairy-free alternative)
- 1 egg
- 1 tbsp melted butter or oil
- 1 tsp vanilla extract (optional)
Instructions
- Whisk dry ingredients in a bowl.
- Mix milk, egg, melted butter, and vanilla in another bowl.
- Combine wet and dry ingredients until smooth.
- Heat a greased pan over medium heat.
- Pour batter into small rounds.
- Cook until bubbles form, then flip.
- Cook until golden brown.
- Serve warm.
Notes
- Adjust batter thickness with more milk if needed.
- Use non-stick pan for best results.
- Store leftovers in airtight container.
Nutrition
- Serving Size: 2 pancakes
- Calories: 180
- Sugar: 4g
- Sodium: 320mg
- Fat: 6g
- Saturated Fat: 3g
- Unsaturated Fat: 2g
- Trans Fat: 0g
- Carbohydrates: 28g
- Fiber: 2g
- Protein: 4g
- Cholesterol: 50mg