20-Minute No-Bake Oreo Cheesecake Bars Recipe – Heavenly!
Oh my gosh, let me tell you about my secret weapon for last-minute desserts – these crazy delicious No-Bake Oreo Cheesecake Bars! I first made them when my sister showed up unexpectedly with friends, and now they’re my go-to for every potluck. The best part? No oven required – just mix, chill, and boom! You’ve got the creamiest cheesecake filling sandwiched between that perfect Oreo crust. My nephew once ate three pieces before dinner (sorry sis!) and I still get requests for “those cookie bars” at family gatherings. Trust me, these disappear faster than you can say “Oreo” – and with just 20 minutes of hands-on work, you’ll see why!
Why You’ll Love These No-Bake Oreo Cheesecake Bars
Seriously, these bars are magical – here’s why:
- Zero oven drama: Perfect for summer or when baking feels like too much effort (we’ve all been there)
- Quick fix: 20 minutes of active time means you’re practically eating cheesecake already
- Crowd magnet: I’ve never brought leftovers home – people go wild for that Oreo crunch
- Foolproof: Even my cousin who burns toast nailed these on her first try
- Make-ahead win: Tastes even better after chilling overnight (if you can resist that long!)
Basically, it’s everything you want in a dessert – easy, impressive, and packed with Oreo goodness.
Ingredients for No-Bake Oreo Cheesecake Bars
Here’s what you’ll need to whip up these dreamy bars – trust me, it’s all simple stuff:
- 24 Oreo cookies (for the crust – and yes, you’ll want to use the whole cookie, cream filling and all!)
- 1/4 cup melted butter (this binds the crust together for that perfect crunch)
- 16 oz full-fat cream cheese (softened to room temperature – low-fat just won’t give you that creamy texture)
- 1/2 cup powdered sugar (for just the right amount of sweetness – no granulated sugar here!)
- 1 tsp vanilla extract (pure vanilla if you have it – it makes a difference)
- 1 cup heavy cream (you’ll whip this to stiff peaks for that airy cheesecake filling)
- 6 Oreo cookies, crushed (for mixing into the filling – I like mine chunky but you do you!)
Pro tip: Make sure your cream cheese is soft and your heavy cream is cold – it’s the little things that make these bars perfect!
Equipment You’ll Need
Don’t worry – you probably have everything already! Here’s your simple checklist:
- 8×8-inch baking pan (square or rectangle – this is my go-to size)
- Parchment paper (lifesaver for easy removal – no stuck crusts here!)
- Mixing bowls (one large, one medium – or just wash and reuse)
- Electric mixer (handheld or stand – your arms will thank you)
- Spatula (for scraping every last bit of filling – no wasting cheesecake!)
That’s it! No fancy gadgets needed – just basics you likely have tucked away.
How to Make No-Bake Oreo Cheesecake Bars
Okay, here’s where the magic happens – and it’s honestly so simple! The key is taking your time with each layer and not rushing that all-important chill time. Trust me, it’s worth the wait for that perfect, firm-yet-creamy texture that makes these bars absolutely irresistible.
Preparing the Oreo Crust
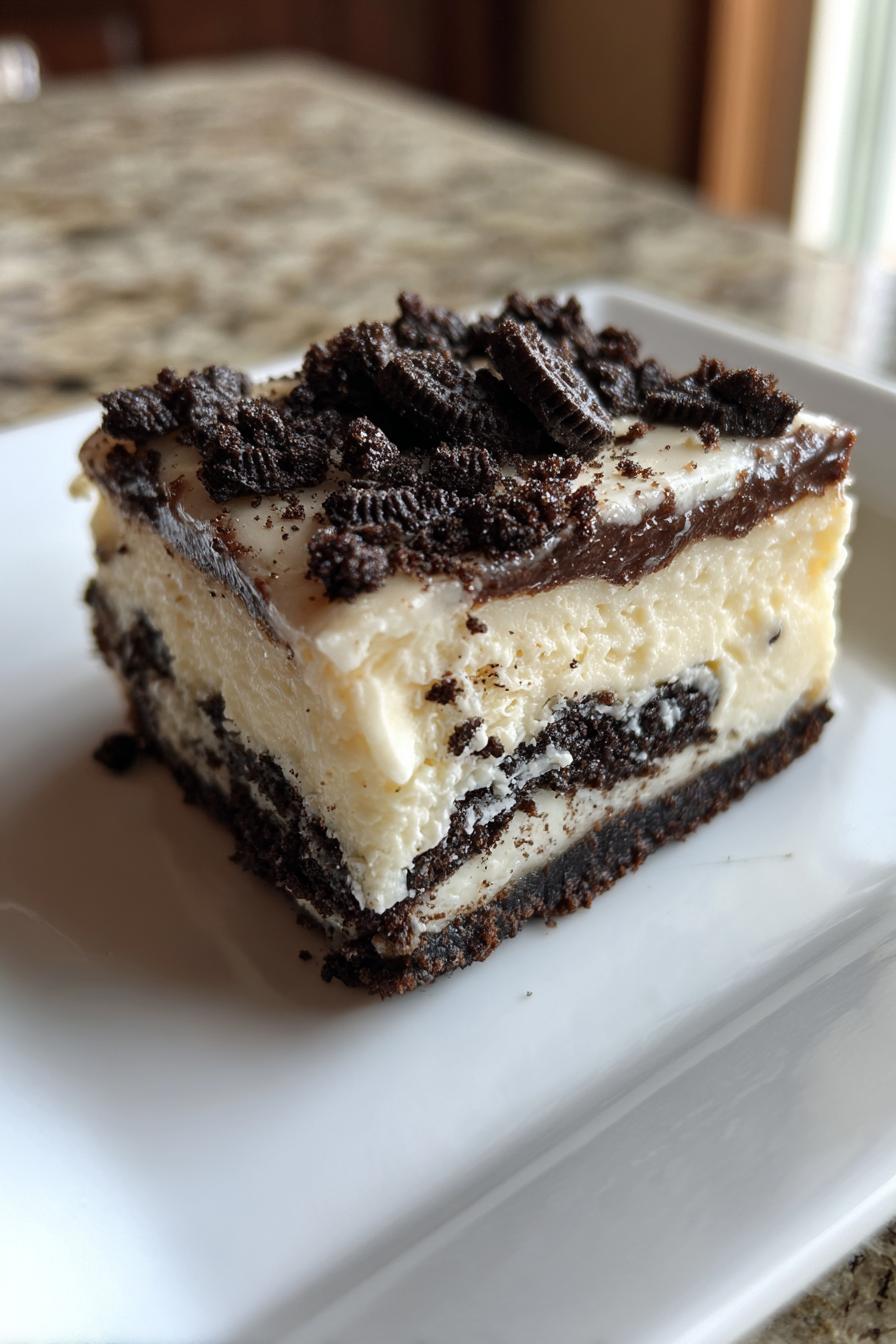
First, grab those 24 Oreos – no need to remove the cream filling! Crush them into fine crumbs (I use a food processor or a good old zip-top bag and rolling pin). Mix with the melted butter until it looks like dark, damp sand. Press this firmly into your lined pan – I mean really pack it down with the back of a measuring cup. This creates that solid base that won’t crumble when you slice!
Making the Cheesecake Filling
Now, beat your softened cream cheese until it’s completely smooth – no lumps allowed! Gradually mix in the powdered sugar and vanilla. In a separate, chilled bowl (this helps so much!), whip the heavy cream to stiff peaks. Gently fold the whipped cream into the cream cheese mixture until just combined – be patient and don’t overmix! Finally, stir in those crushed Oreos for that perfect cookie crunch throughout.
Assembling and Chilling
Spread your creamy filling evenly over the crust. If you’re feeling fancy, sprinkle a few extra cookie crumbs on top. Now, the hardest part – pop it in the fridge for at least 4 hours, but overnight is even better. I know it’s tempting, but this chill time is non-negotiable for that perfect sliceable texture!
Tips for Perfect No-Bake Oreo Cheesecake Bars
After making these bars more times than I can count (seriously, my friends are obsessed), here are my foolproof secrets:
- Chill everything: Cold cream whips better, and a chilled bowl makes it practically foolproof
- Scrape often: Get every bit of cream cheese from the bowl edges – lumps are the enemy!
- Slice smart: Run your knife under hot water and wipe dry between cuts for clean edges
- Patience pays: That 4-hour chill isn’t optional – but overnight gives you next-level texture
Bonus trick: For extra Oreo love, press whole cookies into the top before chilling!
Variations and Substitutions
Want to mix things up? Here are my favorite twists on these bars:
- Oreo flavors: Swap in mint or golden Oreos for a fun twist (my niece loves the birthday cake ones!)
- Chocolate magic: Drizzle melted chocolate on top or swirl some into the filling
- Nutty crunch: Add chopped pecans or peanuts for texture – works great with peanut butter Oreos!
- Low-fat option: You can use reduced-fat cream cheese… but the texture won’t be quite as dreamy
Just promise me one thing – don’t skip chilling time, no matter what variations you try!
Storing and Serving Suggestions
Keep these bars fresh by storing them in an airtight container in the fridge for up to 3 days – though good luck keeping them around that long! Serve chilled with a glass of cold milk or a hot cup of coffee for the ultimate treat.
FAQs About No-Bake Oreo Cheesecake Bars
I get asked these questions all the time – here’s what you need to know:
Can I freeze these bars?
Absolutely! They freeze well for up to 2 months, but the texture changes slightly – more icy than creamy. Thaw overnight in the fridge for best results. My friend swears by freezing individual slices for emergency dessert cravings!
Why is my filling runny?
Two likely culprits: undermixed whipped cream (it should hold stiff peaks) or not chilling long enough. If it’s soupy after mixing, pop the bowl in the freezer for 10 minutes before folding. And yes, I’ve learned the hard way – that 4-hour chill is sacred!
Can I use a different pan size?
Sure! A 9×9 pan makes thinner bars (reduce chill time to 3 hours). For thicker bars, use a loaf pan – just know they’ll need extra chilling. My mom uses mini muffin tins for bite-sized treats!
What if I don’t have heavy cream?
You can substitute with cool whip in a pinch, but the texture won’t be as rich. Full-fat coconut cream works too for a dairy-free version – just don’t tell Grandma!
Nutritional Information
Just to keep it real – these are treats, not health food! Per bar (based on standard brands): ~320 calories, 22g fat (12g saturated), 22g sugar. Values vary slightly by ingredient choices – but who’s counting when Oreos are involved?
Final Thoughts
There you have it – my foolproof recipe for No-Bake Oreo Cheesecake Bars that never fails to impress. Give them a try and let me know how yours turn out! I love hearing your twists on this simple but oh-so-satisfying treat.
Print20-Minute No-Bake Oreo Cheesecake Bars Recipe – Heavenly!
Easy no-bake Oreo cheesecake bars with a creamy filling and crunchy cookie crust.
- Prep Time: 20 minutes
- Cook Time: 0 minutes
- Total Time: 4 hours 20 minutes
- Yield: 9 bars 1x
- Category: Dessert
- Method: No-Bake
- Cuisine: American
- Diet: Vegetarian
Ingredients
- 24 Oreo cookies
- 1/4 cup melted butter
- 16 oz cream cheese, softened
- 1/2 cup powdered sugar
- 1 tsp vanilla extract
- 1 cup heavy cream
- 6 Oreo cookies, crushed
Instructions
- Line an 8×8-inch pan with parchment paper.
- Crush 24 Oreos into fine crumbs and mix with melted butter.
- Press the mixture into the pan to form the crust.
- Beat cream cheese, powdered sugar, and vanilla until smooth.
- Whip heavy cream to stiff peaks and fold into the cream cheese mixture.
- Stir in crushed Oreos and spread over the crust.
- Chill for at least 4 hours before slicing.
Notes
- Use full-fat cream cheese for best texture.
- Chill the mixing bowl before whipping cream.
- Store leftovers covered in the fridge.
Nutrition
- Serving Size: 1 bar
- Calories: 320
- Sugar: 22g
- Sodium: 210mg
- Fat: 22g
- Saturated Fat: 12g
- Unsaturated Fat: 8g
- Trans Fat: 0g
- Carbohydrates: 28g
- Fiber: 1g
- Protein: 4g
- Cholesterol: 55mg