Irresistible Pumpkin Cheesecake Bars in Just 8 Steps
There’s something magical about the first crisp breeze of fall that sends me straight to the kitchen for pumpkin cheesecake bars. That creamy-spiced aroma wafting through the house? Pure nostalgia. I still remember the year I brought these to Thanksgiving – my aunt, who “never eats dessert,” sneaked three bars into her purse when she thought no one was looking. That’s the power of this recipe!
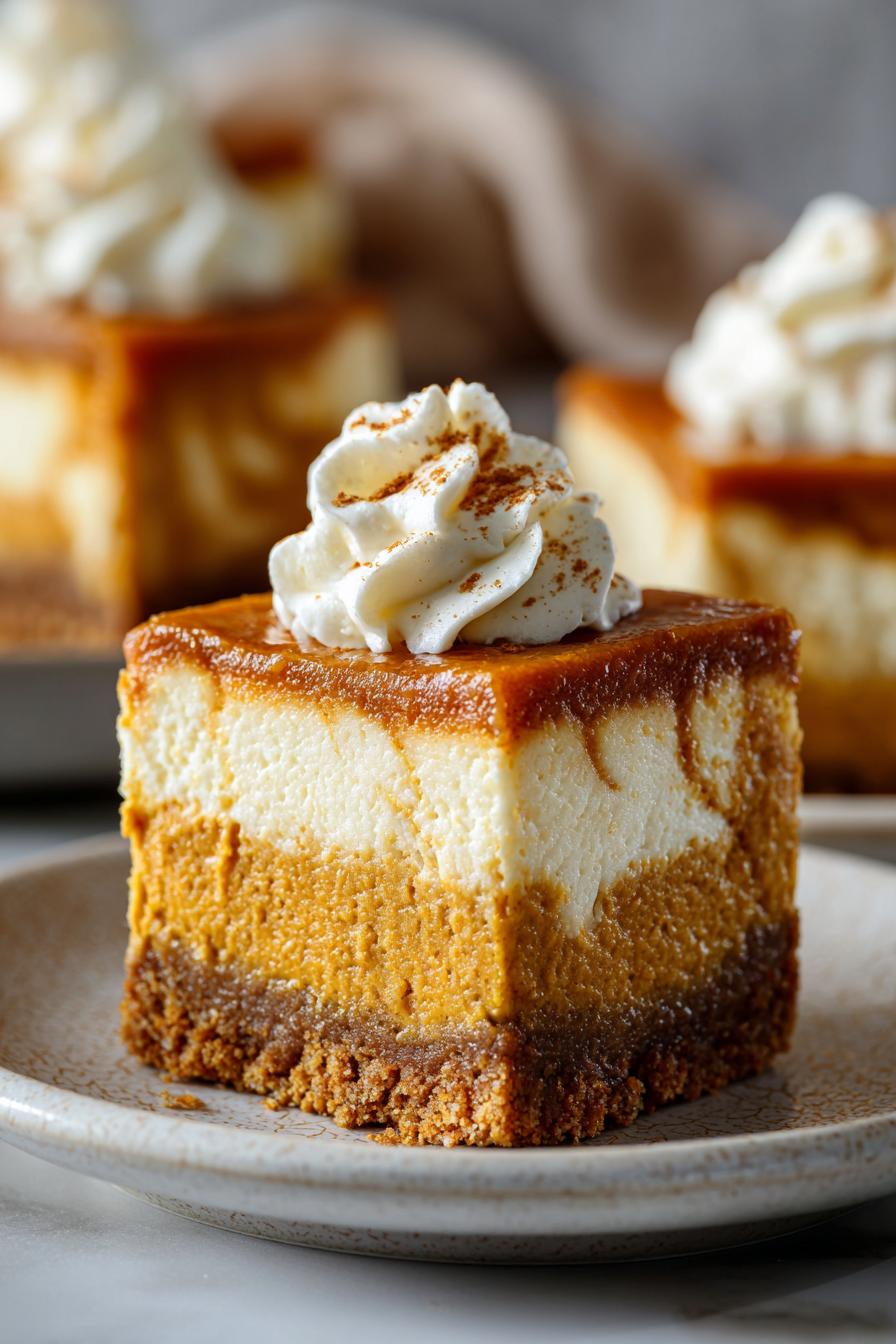
These pumpkin cheesecake bars strike the perfect balance between rich and light. The graham cracker crust gets this wonderful toasty flavor in the oven, while the filling – oh, that filling! – blends tangy cream cheese with earthy pumpkin and warm spices. It’s like autumn in every bite. What I love most is how deceptively easy they are to make. You get all the elegance of a full cheesecake without the stress of water baths or cracks (we’ll get to that trick later).
Why You’ll Love These Pumpkin Cheesecake Bars
Let me tell you what makes these bars so special – they’re the kind of dessert that disappears from the plate before anyone remembers to take a photo! Here’s why they’re always a hit:
- Easier than pie: No fussy water baths or cracking like traditional cheesecakes – just mix, pour, and bake!
- Creamy dreamy texture: That perfect balance between dense cheesecake and light pumpkin pie will have you sneaking bites straight from the pan.
- Fall flavors in every bite: Warm spices, sweet pumpkin, and toasty graham cracker crust taste like your favorite sweater feels.
- Crowd-pleaser magic: I’ve served these to pumpkin lovers and skeptics alike – watch every single plate come back clean!
- Make-ahead friendly: They actually get better after chilling, so you can bake them the day before your gathering.
Ingredients for Pumpkin Cheesecake Bars
Gathering ingredients is my favorite part of baking – it’s like a treasure hunt where everything ends up delicious! Here’s exactly what you’ll need for these dreamy pumpkin cheesecake bars (and why each one matters):
- 1 1/2 cups graham cracker crumbs (about 12 full sheets) – That golden, toasty base that makes you want to eat the crust first
- 1/4 cup granulated sugar – Just enough sweetness to balance the tangy cream cheese
- 1/2 cup melted butter – The glue that holds our crust together (salted butter adds the best flavor!)
- 16 oz cream cheese, softened – Leave it out for 2 hours until it smooshes easily with your finger
- 3/4 cup granulated sugar – The perfect amount to sweeten without overpowering the pumpkin
- 1 cup pumpkin puree – Not pie filling! We’ll talk about this crucial difference below
- 2 large eggs – Room temperature blends smoother into our creamy filling
- 1 tsp vanilla extract – The secret background note that makes all flavors pop
- 1 tsp pumpkin pie spice – That warm hug of cinnamon, ginger, nutmeg, and cloves
- 1/4 tsp salt – Just a pinch to make all the flavors sing together
Ingredient Notes & Substitutions
I’ve made every substitution mistake so you don’t have to! Here’s what really works:
Pumpkin Puree vs. Pie Filling: This is non-negotiable, friends! Pure pumpkin puree (just cooked pumpkin) gives perfect texture. Pie filling has added sugars and thickeners that’ll make your bars weirdly gummy. Libby’s brand is my go-to.
Butter Alternatives: In a pinch, coconut oil works for the crust, but the flavor won’t be quite as rich. Margarine makes the crust weep – trust me, real butter’s worth it.
Spice Adjustments: No pumpkin pie spice? Mix 1/2 tsp cinnamon + 1/4 tsp ginger + 1/8 tsp nutmeg + 1/8 tsp cloves. Want extra kick? Add a dash of cardamom – my grandma’s secret!
Gluten-Free Option: Swap graham crumbs for gluten-free ones (or crushed gluten-free vanilla cookies for extra decadence). The crust holds up beautifully.
Sugar Note: Brown sugar can replace half the granulated sugar in the filling for deeper flavor, but it’ll darken the color slightly.
Cream Cheese Tip: Low-fat works in a pinch, but full-fat gives that luxurious melt-in-your-mouth texture we’re after.
Equipment You’ll Need
Don’t worry – you won’t need any fancy gadgets for these pumpkin cheesecake bars! Just grab these kitchen basics (I bet you already have most of them):
- 8×8-inch baking dish – My trusty Pyrex works perfectly every time
- Parchment paper – For easy lifting and clean slices (trust me, it’s worth the extra minute!)
- Hand mixer or stand mixer – Either works great for that creamy filling
- Measuring cups and spoons – Precision matters for cheesecake success
- Mixing bowls – One for crust, one for filling – keeps things simple
- Spatula – For scraping every last bit of that delicious filling
- Cooling rack – Helps prevent soggy bottoms
See? Nothing complicated. Just everyday tools that make baking these bars a breeze. Now let’s get to the fun part – making them!
How to Make Pumpkin Cheesecake Bars
Okay, let’s get baking! I promise this is easier than it looks – just follow these simple steps and you’ll have perfect pumpkin cheesecake bars that’ll make everyone think you’re a pastry pro. The secret? Take your time and enjoy the process (and maybe sneak a spoonful of that filling – I won’t tell!).
Step 1: Prepare the Graham Cracker Crust
First things first – preheat that oven to 350°F (175°C). While it’s warming up, let’s make our crust. Mix those graham cracker crumbs with sugar in a bowl, then pour in the melted butter. Stir until it looks like wet sand – you should be able to squeeze a handful and have it hold its shape.
Now, line your 8×8-inch pan with parchment paper (leave some overhang for easy lifting later). Dump in the crumb mixture and press it down firmly with your fingers or the bottom of a measuring cup. I mean business here – really pack it in! This gives you that perfect sturdy base that won’t crumble when you slice the bars. Pop it in the oven for 10 minutes to set, then let it cool slightly while you make the filling.
Step 2: Make the Pumpkin Cheesecake Filling
Here’s where the magic happens! In a large bowl, beat that softened cream cheese until it’s completely smooth – no lumps allowed! This is why room temperature cream cheese is so important. Cold cream cheese will leave you with little white specks in your filling (been there, cried over that).
Add the sugar and beat again until fluffy. Now, mix in the pumpkin puree, eggs (one at a time!), vanilla, pumpkin pie spice, and salt. Scrape down the sides of the bowl as you go – those sneaky bits at the bottom love to stay unmixed. The filling should be silky smooth and the color of a perfect pumpkin patch sunset.
Step 3: Bake and Cool
Pour that gorgeous orange filling over your slightly cooled crust and smooth the top. Bake for 30-35 minutes – you’ll know it’s done when the edges look set but the center still has a slight jiggle (like Jell-O, not like a wave pool). Don’t wait for it to look completely firm or you’ll overbake it!
Here’s my golden rule: Let the bars cool completely at room temperature first (about 1 hour), then chill in the fridge for at least 2 hours, preferably overnight. I know, the waiting is torture, but this patience pays off with perfect slices that don’t fall apart. Pro tip: Run a knife under hot water and dry it before slicing for clean edges.
Tips for Perfect Pumpkin Cheesecake Bars
After making these pumpkin cheesecake bars more times than I can count (okay fine, I’ve lost track because I make them every fall!), I’ve picked up some foolproof tricks to guarantee bakery-worthy results every time. Here’s what really makes a difference:
- The waiting game is worth it: I know it’s tempting to slice into these bars right out of the oven, but resist! That 2-hour chill time (overnight is even better) lets the flavors develop and gives you those clean, Instagram-worthy slices.
- Watch the jiggle, not the clock: Ovens vary, so don’t just set a timer and walk away. At 30 minutes, open the oven door and gently shake the pan. You want the edges set but the center should have a subtle wiggle – like Jell-O, not pudding. It’ll firm up as it cools.
- Room temp ingredients are non-negotiable: Cold cream cheese = lumpy filling. Cold eggs = uneven texture. Take everything out 2 hours before baking. In a pinch, you can microwave cream cheese in 10-second bursts (but don’t let it melt!).
- The parchment paper trick: Leave enough overhang to create “handles” – it makes lifting the whole slab out for slicing so much easier. No more wrestling with the pan!
- Slice with a hot knife: Run your sharp knife under hot water between each cut for the cleanest slices. Wipe it dry first so you don’t get water spots on your pretty bars.
- Storage secret: Place wax paper between layers if stacking them in a container. Otherwise, the tops will stick together and ruin your beautiful swirls.
- Extra flavor boost: For a grown-up twist, add 1 tbsp bourbon to the filling – it makes the pumpkin flavor sing! (Just don’t tell the kids.)
Remember, even if your bars crack or don’t slice perfectly (it happens to the best of us!), they’ll still taste incredible. That’s the beauty of pumpkin cheesecake bars – they’re delicious no matter what!
Serving and Storing Pumpkin Cheesecake Bars
Now for the best part – enjoying your masterpiece! These pumpkin cheesecake bars are delicious plain, but a little extra love makes them truly special. Here’s how I like to serve them:
Garnishes that wow: A dollop of fresh whipped cream with a sprinkle of cinnamon is my go-to. For holidays, I pipe little rosettes on each square using a star tip. Crushed gingersnaps or candied pecans add fantastic crunch. Drizzle with caramel sauce or melted chocolate for extra decadence – my kids love when I make “pumpkin patch” designs with chocolate drizzle!
Serving temperature matters: Take the bars out of the fridge 15 minutes before serving. That slight softening makes the texture absolutely perfect – cool and creamy without being fridge-cold. If you’re plating them, use a thin spatula dipped in hot water for clean transfers.
Storage like a pro: These bars keep beautifully in the fridge for up to 5 days. Cover tightly with plastic wrap or store in an airtight container. The parchment paper liner makes stacking easy – just place wax paper between layers if you need to stack them. Pro tip: Write the bake date on the container so you don’t lose track!
Can you freeze them? Absolutely! Freeze individual bars on a parchment-lined tray first (about 2 hours), then transfer to a freezer bag with parchment between layers. They’ll keep for 2 months. Thaw overnight in the fridge – the texture stays perfect. I always stash a few away for unexpected guests or sudden pumpkin cravings!
Pumpkin Cheesecake Bars Nutritional Info
Let’s talk nutrition – because even dessert deserves a little transparency! Now, I’m no dietitian (just a pumpkin enthusiast with a sweet tooth), but here’s the general scoop on what’s in these dreamy bars. Keep in mind these are estimates – your exact numbers will vary based on ingredient brands and how generously you slice them!
Each pumpkin cheesecake bar packs creamy richness balanced by pumpkin’s natural goodness. You’re getting:
- Protein power: Thanks to all that cream cheese and eggs, these bars offer more protein than your average cookie.
- Vitamin A boost: Pumpkin’s starring role means you’re getting beta-carotene – nature’s orange glow-up!
- Moderate sugar: Sweet enough to satisfy, but not so much you’ll crash afterward (though you might from sheer happiness!).
- Good fats: That butter and cream cheese provide satiating fats that make one bar truly satisfying.
Remember – nutritional info varies based on:
- The exact pumpkin puree brand you use
- Whether you opt for full-fat or reduced-fat cream cheese
- How thick you slice your bars (no judgment here!)
- Any toppings or drizzles you add (caramel sauce, I’m looking at you)
At the end of the day, these pumpkin cheesecake bars are meant to be enjoyed – not stressed over! A little indulgence is good for the soul, especially when it’s packed with autumn flavors.
FAQs About Pumpkin Cheesecake Bars
After years of baking (and eating!) these pumpkin cheesecake bars, I’ve heard every question under the sun. Here are the answers to the ones I get most often – consider it your cheat sheet for perfect bars every time!
Can I freeze pumpkin cheesecake bars?
Absolutely! These freeze like a dream. I like to cut them into squares first, then freeze on a parchment-lined tray for 2 hours before transferring to a freezer bag. They’ll keep for 2 months. Thaw overnight in the fridge – the texture stays creamy perfect. Pro tip: Freeze individual portions so you can thaw just one when that pumpkin craving hits!
Why did my bars crack on top?
Oh honey, I’ve been there! Cracking happens when the cheesecake cools too quickly. Here’s how to prevent it: 1) Don’t overbake (remember that jiggle test!), 2) Let the pan cool gradually in the oven with the door slightly ajar for 30 minutes, then move to the counter, and 3) Resist the urge to peek while baking – temperature changes make cracks more likely. But hey, even cracked bars taste amazing – just cover the evidence with whipped cream!
Can I use a different size pan?
You can, but adjustments are needed. For a 9×13 pan, double the recipe and bake 5-10 minutes longer. For mini bars, use a muffin tin lined with papers – bake just 18-20 minutes. The crust-to-filling ratio changes though, so I prefer sticking to the 8×8 size for that perfect bite. Just remember: shallower pans bake faster, deeper ones take longer!
My filling turned out lumpy – what went wrong?
Lumpy filling breaks my heart! The culprit is usually cold cream cheese. It must be truly softened – leave it out for 2 hours or microwave in 5-second bursts (but don’t let it melt!). Another tip: scrape the bowl constantly while mixing. Those sneaky unmixed bits at the bottom love to cause trouble. If you do get lumps, strain the filling through a sieve before baking – it’s a lifesaver!
How do I know when the bars are done baking?
This is the million-dollar question! Look for edges that are set but the center still jiggles slightly – like Jell-O, not liquid. The bars will finish setting as they cool. A toothpick test doesn’t work well here because you want some moisture. If the top starts looking dry or cracked, they’re overdone. Remember: underbaked is better than overbaked with cheesecake – it’ll firm up in the fridge!
Share Your Feedback
I’d love to hear how your pumpkin cheesecake bars turned out! Did you add any special twists? Maybe your family fought over the last piece like mine always does? Drop me a note below – your stories make my day and help other bakers too. Happy baking, friends!