25-Minute Lemon Cake with Fruit – Moist & Dreamy Delight
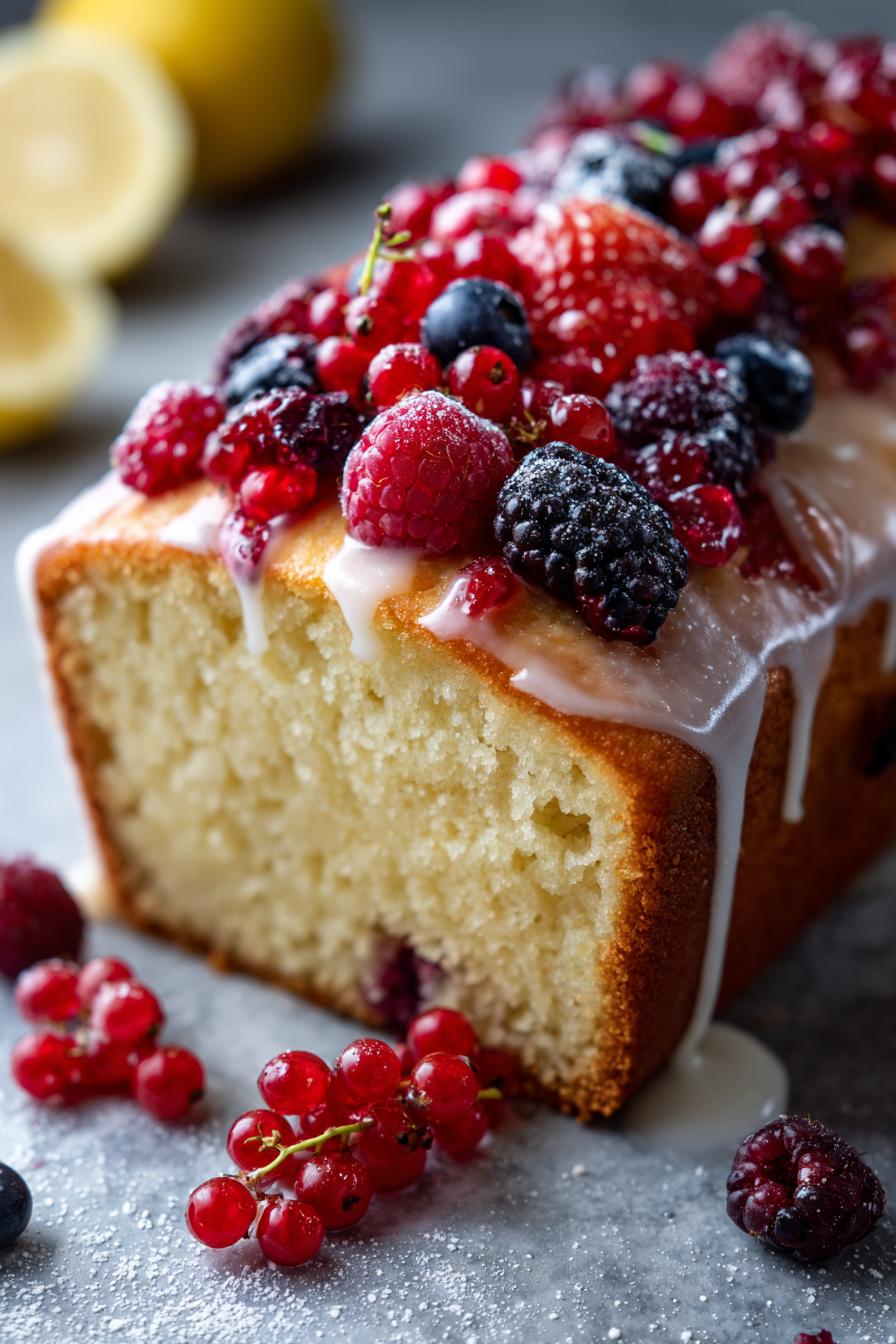
Oh, let me tell you about my absolute favorite lemon cake with fruit – it’s like sunshine on a plate! This recipe came to me one summer when I had a mountain of lemons from my neighbor’s tree and a fridge full of berries begging to be used. The result? A cake so moist and tangy it’ll make your taste buds dance.
What I love most is how effortlessly it comes together – no fancy techniques, just honest ingredients doing their magic. The lemon zest perfumes the whole kitchen while it bakes, and those juicy berries on top? Pure happiness. It’s become my go-to for everything from lazy Sunday brunches to last-minute dinner parties.
Trust me, this isn’t just any lemon cake. The balance of sweet and tart is perfection, and the fruit topping means every slice looks like it came from a fancy bakery. My kids call it “mom’s happy cake” because I’m always grinning when I pull it out of the oven!
Why You’ll Love This Lemon Cake with Fruit
This isn’t just another cake recipe – it’s the one you’ll keep coming back to! Here’s why it’s special:
- Moist like a dream: The perfect balance of butter and lemon juice keeps every bite tender (no dry crumbs here!)
- Sunshine in every slice: Fresh lemon zest and juice give that bright, zingy flavor store-bought cakes can’t match
- Foolproof prep: No mixer needed – just bowls, a whisk, and about 15 minutes of hands-on time
- Your fruit, your rules: Use whatever berries look best at the market, or get creative with stone fruits in season
- Instant crowd-pleaser: Pretty enough for parties, simple enough for weeknights (I’ve served it at both!)
Ingredients for Lemon Cake with Fruit
Here’s everything you’ll need to make this sunshine-filled cake – simple ingredients that work magic together. I’ve included my little prep notes because trust me, they make all the difference!
- 1 1/2 cups all-purpose flour – spooned and leveled (no packing it down!)
- 1/2 cup granulated sugar – or a bit more if your fruit is extra tart
- 1/4 cup unsalted butter, softened – leave it out for 30 minutes (it should dent when you press it)
- 2 eggs – room temp helps them incorporate smoothly
- 1/4 cup fresh lemon juice – about 2 juicy lemons (none of that bottled stuff!)
- 1 tbsp lemon zest – from those same lemons (the yellow part only – white pith is bitter)
- 1/2 cup milk – whole milk makes it richest, but any works
- 1 tsp baking powder – check it’s fresh for good rise
- 1/4 tsp salt – balances all the sweetness
- 1 cup mixed fresh fruit – I love berries (strawberries, blueberries, raspberries) but peaches or mango work too!
Quick tip: Measure your lemon zest before juicing – so much easier than trying to zest a squeezed lemon! And don’t stress about perfect fruit sizes – I often just halve strawberries and leave smaller berries whole for a rustic look.
Equipment You’ll Need
Grab these basics – I promise you probably have them all already!
- 9-inch round cake pan (springform works too)
- 2 mixing bowls – one for dry, one for wet ingredients
- Whisk and spatula – my trusty stirring duo
- Microplane or fine grater – for perfect lemon zest
- Measuring cups/spoons – no eyeballing!
See? Nothing fancy – just simple tools for simple baking joy.
How to Make Lemon Cake with Fruit
Alright, let’s get baking! This lemon cake comes together so easily – just follow these simple steps and you’ll have a gorgeous dessert in no time. I’ll walk you through each part like we’re baking together in my kitchen (with all my little tricks I’ve learned over the years!).
Step 1: Prep the Dry Ingredients
First things first – preheat that oven to 350°F (175°C) so it’s nice and toasty when we’re ready. Now grab your flour, baking powder and salt – we’re going to whisk them together in a bowl until they’re completely combined. This isn’t just about mixing – we’re aerating the flour too, which helps give our cake that lovely light texture. No need to sift unless your flour is super lumpy – just whisk for about 30 seconds until it looks evenly mixed.
Step 2: Cream Butter and Sugar
Here’s where the magic starts! In your other bowl, beat the softened butter and sugar together until it’s light and fluffy – this should take about 2 minutes with a hand mixer or 3-4 minutes by hand. You’ll know it’s ready when the mixture turns pale yellow and looks almost like whipped cream. Don’t rush this step – those tiny air bubbles we’re creating will make our cake tender instead of dense. Now beat in the eggs one at a time, letting each fully incorporate before adding the next.
Step 3: Combine Wet and Dry Ingredients
Time to bring everything together! Add your lemon juice, zest and milk to the butter mixture – it might look a bit curdled but don’t panic, that’s normal. Now alternate adding the dry ingredients and milk, starting and ending with the flour mixture. Here’s my secret: mix just until the flour disappears after each addition. Overmixing is the enemy of tender cake – a few small lumps are totally fine! The batter should be thick but pourable – if it seems stiff, add a splash more milk.
Step 4: Bake and Cool
Pour your beautiful batter into the greased pan and smooth the top. Bake for 25-30 minutes – but start checking at 20 minutes just in case. The cake is done when it’s golden, springs back when lightly touched, and a toothpick comes out with just a few moist crumbs (not wet batter). Let it cool in the pan for 10 minutes, then transfer to a rack to cool completely before adding fruit – trust me, warm cake makes the berries slide right off! Now pile on those gorgeous fruits and prepare for compliments.
See? I told you it was easy! The hardest part is waiting for it to cool before digging in – but that just builds anticipation, right?
Tips for the Best Lemon Cake with Fruit
After making this cake more times than I can count, here are my can’t-live-without tips:
- Room temp is your friend: Cold ingredients don’t blend as smoothly – take butter and eggs out at least 30 minutes early
- Taste your fruit first: Super tart berries? Add an extra tablespoon of sugar to balance them
- Zest before juicing: Trying to zest a squeezed lemon is like wrestling a wet fish – do it first!
- Don’t peek!: Resist opening the oven door until at least 20 minutes in – temperature drops make cakes sink
Follow these and you’ll get perfect lemon cake every single time!
Variations and Substitutions
Oh, the beauty of this recipe is how easily it bends to what you’ve got on hand! Swap all-purpose flour for a 1:1 gluten-free blend if needed – I’ve done it for my niece and the cake still turns out beautifully. Dairy-free? Almond milk works like a charm in place of regular milk. And those fruits? Mix it up with whatever’s in season – I’ve used everything from juicy peach slices to tropical mango chunks. Even thin apple slices arranged in a pretty spiral make a stunning top. Your cake, your rules!
Serving and Storing Lemon Cake with Fruit
This lemon cake is wonderful served at room temperature when you want the fruit flavors to shine, or chilled from the fridge for a refreshing treat on hot days. Either way, wait to add the fresh fruit topping until right before serving – it keeps everything looking (and tasting) perfect. Cover any leftovers and refrigerate for up to 2 days – though in my house, it never lasts that long!
Nutrition Information
Just so you know what you’re enjoying – here’s the nutritional breakdown per slice (but let’s be honest, we’re here for the taste, not the numbers!). Remember, these values are estimates and will vary based on your exact ingredients and fruit choices.
- Serving Size: 1 slice (1/8 of cake)
- Calories: 220
- Sugar: 15g
- Sodium: 120mg
- Fat: 8g
- Saturated Fat: 4.5g
- Carbohydrates: 34g
- Fiber: 1g
- Protein: 4g
- Cholesterol: 55mg
Now go enjoy your cake – life’s too short to stress over every calorie when something tastes this good!
Frequently Asked Questions
Q1. Can I use bottled lemon juice instead of fresh?
Oh honey, I wouldn’t recommend it! Fresh lemon juice makes ALL the difference – that bright, vibrant flavor just can’t be matched by bottled. Plus, you need those fresh lemons anyway for the zest (and trust me, the zest is where half the magic happens!). If you’re really in a pinch, use half the amount of bottled juice since it’s more concentrated, but promise me you’ll try fresh next time?
Q2. How do I keep my lemon cake from drying out?
Here’s my foolproof method: first, don’t overbake it – start checking at 20 minutes even if the recipe says 25. Second, that combo of butter and lemon juice is your moisture insurance – don’t skimp on either! Lastly, store any leftovers (ha – as if!) wrapped tightly in the fridge. A little pro tip? Brush the cooled cake with a mix of lemon juice and sugar syrup before adding fruit for extra moisture.
Q3. Can I make this lemon cake ahead of time?
Absolutely! Bake the cake up to a day in advance and keep it wrapped at room temperature. Just wait to add the fresh fruit until right before serving – nobody likes soggy berries! If you need to prep further ahead, freeze the unfrosted cake wrapped tightly for up to a month. Thaw overnight in the fridge, then bring to room temp before decorating.
Q4. What fruits work best besides berries?
Oh, let your imagination run wild! Thinly sliced peaches or nectarines are heavenly in summer. In winter, I love using mandarin orange segments or even sautéed apples with cinnamon. Tropical fruits like mango or kiwi add fun color too. The key is using fruits that aren’t too watery – so maybe skip the watermelon topping (learned that one the messy way!).
Q5. My cake sunk in the middle – what went wrong?
Don’t worry, we’ve all been there! Usually it means either:
- The oven temp was off (get an oven thermometer – they’re lifesavers!)
- We opened the door too early (I know it’s tempting!)
- The baking powder was old (check that expiration date!)
The good news? Even sunken cake tastes delicious – just pile extra fruit in the center and call it a “fruit well” instead of a mistake!