Irresistible Biscoff Cheesecake Recipe
I still remember the first time I tried Biscoff cheesecake at this tiny café in Amsterdam. One bite of that creamy, spiced dessert had me hooked—I spent the next month perfecting my own version at home. Now, it’s the most requested dessert at every family gathering!
What makes this Biscoff cheesecake so special? It’s that magical combo of rich cream cheese filling swirled with caramelized cookie butter, all resting on a buttery Biscoff crust. The flavors are complex, but the recipe? Surprisingly simple. Even if you’ve never made cheesecake before, this foolproof method gives you that perfect dense-yet-creamy texture every time.
What really won me over was how versatile it is. Serve it plain for that pure Biscoff experience, or go wild with extra cookie crumbles and whipped cream. Honestly, I’ve yet to meet someone who doesn’t go back for seconds. Just warning you – it disappears fast!
Ingredients for Biscoff Cheesecake
Let me tell you – the magic of this cheesecake starts with getting your ingredients just right. I’ve learned through trial and error (and a few cracked cheesecakes!) that quality and preparation make all the difference. Here’s exactly what you’ll need, broken down so you can’t go wrong:
For the crust (the best part, if you ask me!)
- 200g Biscoff cookies – crushed into fine crumbs (I use a food processor, but a rolling pin works too – just don’t skip the crushing step!)
- 100g unsalted butter – melted and slightly cooled (trust me, salted butter changes the flavor balance)
For that dreamy filling
- 500g full-fat cream cheese – softened at room temperature for at least 2 hours (this is CRUCIAL for smooth texture)
- 150g granulated sugar – regular white sugar works perfectly here
- 200g smooth Biscoff spread – I always keep an extra jar because someone inevitably eats spoonfuls while baking
- 2 large eggs – room temperature (cold eggs can make the batter lumpy)
- 1 tsp pure vanilla extract – skip the artificial stuff for best flavor
- 200ml heavy cream (also called double cream) – cold straight from the fridge
Pro tip: Measure everything before starting! There’s nothing worse than realizing you’re short on Biscoff spread mid-recipe. Ask me how I know…
How to Make Biscoff Cheesecake
Okay, let’s get to the fun part – making this dreamy dessert! I’ll walk you through each step just like I learned (after a few hilarious kitchen disasters). Follow these instructions, and you’ll have the creamiest, most flavorful Biscoff cheesecake that’ll make everyone think you’re a pastry chef.
Preparing the Crust
First things first – that irresistible Biscoff cookie base! Here’s how I do it:
- Crush those cookies into fine crumbs (I pulse them in my food processor about 10 times). You want them sandy, not powdery.
- Mix the crumbs with melted butter until it looks like wet sand. Test it – when you squeeze some in your hand, it should hold its shape.
- Press firmly into your springform pan. I mean FIRMLY – use a glass or measuring cup to really pack it down evenly.
- Pop it in the fridge for 10 minutes while you make the filling. This stops the crust from crumbling later!
Making the Filling
Now for the creamy magic – this is where patience pays off:
- Beat the room-temperature cream cheese until smooth (about 2 minutes). No lumps allowed!
- Add sugar and Biscoff spread, mixing until fully incorporated. Scrape the bowl – hidden pockets of cream cheese are the enemy.
- Add eggs one at a time, mixing just until combined after each. Overbeating = cracks later!
- Gently fold in whipped cream (soft peaks) with a rubber spatula. This keeps the filling light and airy.
Baking and Chilling
The make-or-break phase – don’t rush this part:
- Pour filling over chilled crust and smooth the top. Tap the pan gently to release air bubbles.
- Bake at 160°C for 45 minutes. It’s done when edges look set but the center still jiggles slightly (like Jell-O).
- Turn off the oven, crack the door, and let it cool slowly for 1 hour. This prevents sinking!
- Chill in fridge for at least 4 hours (overnight is better). I know it’s hard to wait – but trust me, it’s worth it.
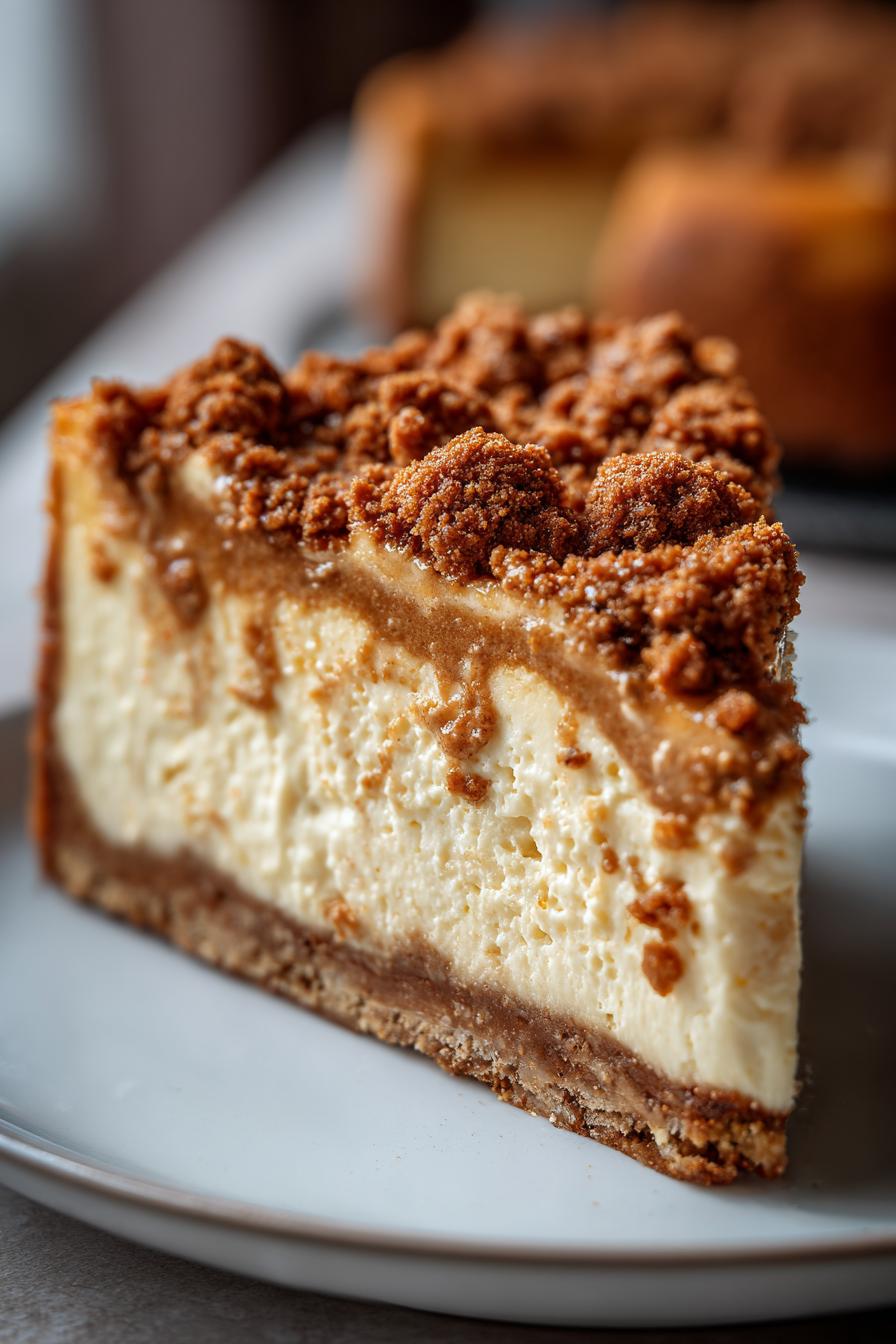
See those beautiful layers? That’s the magic of taking your time with each step. Now resist the urge to dive in immediately – good things come to those who wait (and properly chill their cheesecake)!
Tips for the Perfect Biscoff Cheesecake
Let me share my tried-and-true tips for making this cheesecake absolutely foolproof. These little tricks are what took my recipe from “good” to “can you bring this to every event?” level.
- Use a water bath: I know it sounds fancy, but it’s just placing your springform pan in a larger pan filled with hot water. This keeps the oven moist and prevents cracks – total game changer!
- Softened cream cheese is non-negotiable: I leave mine out for at least 2 hours before starting. Cold cream cheese = lumpy filling = sad cheesecake.
- Add Biscoff swirls: Before baking, drop spoonfuls of extra Biscoff spread on top and use a knife to create beautiful marbled patterns. It looks stunning and adds extra flavor pockets!
- Don’t overmix the eggs: Once you add them, mix just until combined. Overbeating = too much air = cracks. I learned this the hard way with my first cheesecake that looked like a canyon!
- Chill. Chill. Chill: I know it’s tempting to dig in, but letting it set overnight in the fridge makes all the difference. It firms up perfectly and lets the flavors develop.
Follow these tips, and you’ll have a cheesecake that’s not just delicious but also Instagram-worthy. And hey, if it cracks? Just cover it with whipped cream and extra cookies. Nobody will know – it’s our little secret!
Ingredient Substitutions
Okay, I know what you’re thinking – “What if I don’t have exactly these ingredients?” Don’t panic! Over the years, I’ve tested all sorts of swaps for this Biscoff cheesecake. Some work brilliantly, while others… well, let’s just say I’ve had some interesting experiments. Here’s the real talk on substitutions that actually work:
Crust Alternatives
- Graham crackers: These make a great substitute if you can’t find Biscoff cookies. Use the same 200g amount, but add ½ tsp cinnamon to mimic that warm spice flavor.
- Digestive biscuits: Their mild sweetness works surprisingly well. You might want to add an extra tablespoon of butter since they’re less buttery than Biscoff.
- Shortbread cookies: Delicious, but go easy on the additional butter – they’re already plenty rich!
Filling Swaps
- Lactose-free cream cheese: Works perfectly! Just make sure to get the full-fat version for the right texture.
- Greek yogurt (for some cream cheese): You can replace up to 100g of cream cheese with thick Greek yogurt if you want a slightly tangier flavor.
- Other cookie butters: Speculoos is basically the same as Biscoff, but I’ve also had success with peanut butter (use 175g since it’s stronger flavored).
What Doesn’t Work (Trust Me!)
- Low-fat cream cheese: It changes the texture completely – your cheesecake will be more dense and less creamy.
- Margarine instead of butter: The crust won’t have that rich flavor or hold together as well.
- Whipping cream substitutes: Those “light” whipped toppings don’t set properly. Stick with real heavy cream.
Remember, the best results come from sticking to the original recipe, but life happens! If you do need to substitute, pick from the “works” list above. And hey, some of my favorite variations came from happy accidents – like that time I used ginger snaps in the crust. Delicious mistake!
Serving Suggestions
Now for my favorite part – dressing up this gorgeous Biscoff cheesecake! I love playing with different ways to serve it depending on the occasion. Here are my go-to presentation ideas that always impress:
- Classic elegance: Just a simple dusting of powdered sugar and a few whole Biscoff cookies on top. Perfect for dinner parties when you want that “professional baker” look.
- Biscoff drizzle: Warm up extra Biscoff spread with a splash of cream to make a pourable sauce. Drizzle it artfully over each slice – the caramelized flavor takes it to another level!
- Whipped cream clouds: Pipe or dollop fresh whipped cream around the edges. I like to add a pinch of cinnamon to mine for extra warmth.
- Coffee pairing: Serve with strong espresso or a latte. The bitterness balances the sweetness beautifully – my husband’s favorite way to enjoy it.
- Crunchy topping: Right before serving, sprinkle crushed Biscoff cookies over the top for that irresistible texture contrast.
Pro tip: If you’re serving it for a special occasion, let guests customize their slices with different toppings. I set up a little “cheesecake bar” with bowls of melted Biscoff, whipped cream, and cookie crumbles. It’s always a hit!
Storage and Reheating
Alright, let’s talk about keeping your Biscoff cheesecake fresh and delicious! I’ve learned a few tricks over the years to make sure every slice tastes as good as the first. First things first – always store it in the fridge. I cover mine with plastic wrap or place it in an airtight container. It’ll stay perfect for up to 3 days, though let’s be honest… it rarely lasts that long in my house!
Now, if you’re lucky enough to have leftovers (or you’re planning ahead), freezing is totally doable. Here’s how I do it:
- Let the cheesecake chill completely in the fridge first.
- Wrap the whole cheesecake (or individual slices) tightly in plastic wrap. Then, add a layer of aluminum foil for extra protection.
- Freeze for up to 2 months. I like to label it with the date so I don’t forget when it went in.
- When you’re ready to enjoy, thaw it overnight in the fridge. No need to reheat – it’s best served cold!
One quick note: if you’ve added whipped cream or cookie crumbles on top, those are best added fresh after thawing. The cream can get a little weepy in the freezer, and the cookies lose their crunch. Trust me, it’s worth the extra minute to make it look (and taste) perfect!
And hey, if you’re wondering about reheating – personally, I don’t recommend it. This cheesecake is meant to be served chilled, and warming it up can mess with that amazing texture. But if you absolutely must, a quick 5-10 seconds in the microwave for individual slices can work. Just don’t blame me if it’s not quite the same!
Biscoff Cheesecake FAQs
After making this cheesecake dozens of times (and answering all my friends’ texts at 2am with baking emergencies), I’ve put together answers to the most common questions. Save yourself the stress I went through!
Can I use crunchy Biscoff spread instead of smooth?
Absolutely! I actually prefer the texture surprise of crunchy spread in the filling. Just know the cookie bits might sink slightly during baking – I like to swirl extra on top to distribute them evenly. The flavor is identical, so it’s purely a texture preference.
Why did my cheesecake crack?
Oh honey, we’ve all been there! The main culprits are:
- Overmixing after adding eggs (creates too many air pockets)
- Temperature changes – cooling too quickly is the worst offender
- Overbaking (remember – it should jiggle slightly in the center)
Here’s my foolproof fix: run a hot knife around the edges right after baking to prevent pulling. And if it does crack? More Biscoff spread on top hides everything – I call it “cheesecake makeup.”
Can I make this without a springform pan?
You can, but it’s trickier. A regular cake pan lined with parchment paper (with overhanging edges) works in a pinch. Just know you’ll lose that beautiful crusty edge. I’ve even made mini versions in muffin tins – bake for just 20 minutes if you go that route!
How do I know when it’s perfectly baked?
Look for these signs:
- Edges are set and slightly puffed
- Center jiggles like Jell-O when gently shaken (not liquidy!)
- Internal temp should be about 65°C if you’re using a thermometer
The hardest part? Walking away when it reaches this stage. I set a timer for 5 minutes less than recommended, then check every 2 minutes after that.
Can I halve this recipe?
Yes! Use a 6-inch springform pan and bake for 30-35 minutes. The crust ratio is forgiving – just use half the cookies and butter. Pro tip: Make the full amount of filling and bake the extra in ramekins for “cheesecake cups” – my kids love these personal portions!
Nutritional Information
Okay, let’s be real – we’re not eating cheesecake for our health, but I know some of you like to keep track (or just want to know how much extra yoga you’ll need to do after that second slice). Here’s the scoop on what’s in each serving, but remember: these are estimates based on my exact ingredients. Your numbers might vary slightly depending on brands or adjustments you make.
- Serving Size: 1 slice (about 1/8 of the cheesecake)
- Calories: 450
- Total Fat: 30g (15g saturated)
- Carbohydrates: 40g
- Sugar: 30g
- Protein: 6g
- Sodium: 200mg
A few things to note: The sugar content includes both the natural sugars from the dairy and the added sugar. The fat? Totally worth it for that creamy texture. And hey, the cookies add 2g of fiber per serving – that counts for something, right?
If you’re watching specific macros, you can tweak things – maybe use less sugar in the filling or a sugar substitute (though I haven’t tested this myself). Just know that any changes will affect both the nutrition and the final texture. Personally? I say enjoy every indulgent bite – life’s too short not to!
Your Turn – Let Me Know How It Goes!
There you have it – everything I’ve learned through countless batches of this heavenly Biscoff cheesecake! Now I’d love to hear about your baking adventures. Did you stick to my exact recipe or put your own spin on it? Maybe you discovered an amazing new topping combination or have questions I didn’t cover?
Leave a comment below telling me how your cheesecake turned out – the good, the bad, and the deliciously ugly! Nothing makes me happier than hearing about your kitchen triumphs (or even the funny fails – we’ve all been there). And if you snapped a photo of your masterpiece? Share it with me! I’m always looking for new presentation ideas to steal… I mean, be inspired by.
Happy baking, friends! May your crusts be crisp, your fillings creamy, and your Biscoff jars always full.
PrintIrresistible Biscoff Cheesecake Recipe

A creamy cheesecake with the rich flavor of Biscoff cookies, perfect for any occasion.
- Prep Time: 20 minutes
- Cook Time: 45 minutes
- Total Time: 5 hours 5 minutes
- Yield: 8 servings 1x
- Category: Dessert
- Method: Baking
- Cuisine: International
- Diet: Vegetarian
Ingredients
- 200g Biscoff cookies
- 100g melted butter
- 500g cream cheese
- 150g sugar
- 200g Biscoff spread
- 2 eggs
- 1 tsp vanilla extract
- 200ml heavy cream
Instructions
- Crush the Biscoff cookies and mix with melted butter. Press into a springform pan.
- Beat cream cheese, sugar, and Biscoff spread until smooth.
- Add eggs one at a time, then vanilla extract.
- Whip the heavy cream and fold into the mixture.
- Pour over the crust and bake at 160°C for 45 minutes.
- Let cool, then refrigerate for at least 4 hours.
Notes
- Use room temperature cream cheese for smoother texture.
- Chill the crust before adding the filling for better results.
- Top with extra Biscoff spread or cookies before serving.
Nutrition
- Serving Size: 1 slice
- Calories: 450
- Sugar: 30g
- Sodium: 200mg
- Fat: 30g
- Saturated Fat: 15g
- Unsaturated Fat: 10g
- Trans Fat: 0g
- Carbohydrates: 40g
- Fiber: 2g
- Protein: 6g
- Cholesterol: 100mg