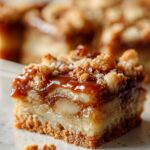
Irresistible Caramel Apple Bars Recipe in Just 45 Minutes

Oh my goodness, let me tell you about these caramel apple bars – they’re like autumn in dessert form! The first time I made them, my kitchen smelled like a cozy apple orchard mixed with a candy shop. That perfect balance of tart apples and rich caramel gets me every time. What I love most is how simple they are – no fancy techniques, just layers of buttery crumble, juicy apples, and that glorious caramel drizzle. My family goes absolutely wild for these bars (seriously, I have to hide a few pieces if I want leftovers). They disappear faster than pumpkin spice lattes in October!
Why You’ll Love These Caramel Apple Bars
Let me count the ways these bars will steal your heart (and probably your waistline):
- Effortless magic: Just 15 minutes of prep for that “you slaved all day” taste – my kind of baking!
- That caramel-apple hug: Tart apples and gooey caramel wrapped in buttery crumble? Yes please!
- Crowd-pleaser guarantee: I’ve brought these to every fall gathering since 2012 – still get recipe requests!
- No-fuss perfection: Even my baking-challenged cousin nailed these on her first try.
Trust me, one bite and you’ll understand why these bars have become my signature fall treat!
The Must-Have Ingredients for Perfect Caramel Apple Bars
Okay, let’s talk ingredients – because quality matters here! I’ve learned through many batches (and many happy taste-testers) that these simple components create magic together. Here’s exactly what you’ll need:
- 2 cups all-purpose flour – spooned and leveled, please! No packing it in.
- 1 cup granulated sugar – the sweet foundation of our crumble
- 1/2 cup unsalted butter, softened – set it out 30 minutes before baking (trust me, cold butter won’t cream right)
- 2 medium apples, peeled and diced – I’m partial to Granny Smith for that perfect tartness
- 1/2 cup caramel sauce – homemade or store-bought, no judgment here!
- 1 tsp cinnamon – because apples and cinnamon are soulmates
- 1/4 tsp salt – just enough to balance all that sweetness
Pro tip: Measure your apples after dicing – you want about 2 cups total. And don’t skip peeling! Apple skins can get weirdly chewy in baked goods. Now let’s make some magic!
How to Make Caramel Apple Bars
Alright, let’s get baking! These caramel apple bars come together so easily – I’ll walk you through each step like I’m right there in your kitchen with you. In about 45 minutes, you’ll have a pan of gooey, cinnamon-spiced heaven that’ll make your whole house smell incredible.
Preparing the Dough
First things first – preheat that oven to 350°F (175°C). Now grab a big bowl and mix together the flour, sugar, butter, and salt. Use your fingers or a pastry cutter to work the butter in until it looks like coarse crumbs – you want that perfect sandy texture that’ll turn golden and crisp in the oven. This is your base layer and topping all in one!
Layering the Apples and Caramel
Here’s where the magic happens! Press half of your crumb mixture firmly into a greased 8×8 pan. Now scatter those beautiful diced apples evenly over the top – I like to pretend I’m making a little apple mosaic. Drizzle caramel sauce over the apples (don’t skimp!), then dust with cinnamon. Sprinkle the remaining crumb mixture over everything – no need to press, just let it fall where it may.
Baking and Cooling
Pop those beauties in the oven for 30 minutes – you’ll know they’re done when the top is golden and you can see caramel bubbling at the edges. Now comes the hardest part: WAIT until they’re completely cool before cutting! I know, torture. But trust me, if you try to cut warm bars, you’ll have caramel everywhere (delicious, but messy). The wait makes all the difference for perfect, clean slices.
Tips for Perfect Caramel Apple Bars
After making these more times than I can count (and eating even more), I’ve picked up some foolproof tricks:
- Apple smarts: Always use firm baking apples – Granny Smith are my ride-or-die, but Honeycrisp work great too. Soft apples turn mushy!
- Butter temperature is key: Your butter should be softened but still cool to the touch – press it and it’ll give slightly without being greasy.
- The golden rule: Pull them out when the edges are just turning golden – overbaked bars lose that magical gooey texture.
- Storage secret: Layer parchment between bars if stacking them – otherwise, you’ll have one delicious caramel brick on your hands!
Follow these, and you’ll get perfect bars every single time – pinky promise!
Fun Twists on Classic Caramel Apple Bars
Once you’ve mastered the basic recipe (and trust me, you will!), try these delicious variations that make the bars your own:
- Nutty crunch: Stir 1/2 cup chopped pecans or walnuts into the crumb topping – that extra texture is divine!
- Spice it up: Add a pinch of nutmeg or cardamom to the cinnamon for a warm, complex flavor
- Apple swap: Try a mix of tart Granny Smith and sweet Fuji apples for balanced flavor
- Salty-sweet magic: Sprinkle flaky sea salt over the caramel layer – it cuts the sweetness perfectly
The beauty is how easily you can customize these bars to match your cravings!
Serving and Storing Caramel Apple Bars
Nothing beats enjoying these bars fresh at room temperature with the caramel still slightly gooey – I usually serve them with a scoop of vanilla ice cream for that perfect hot-cold contrast. If you miraculously have leftovers (rare in my house!), they keep beautifully in an airtight container for 3 days. Want them warm? Just pop individual bars in the microwave for 10 seconds to bring back that fresh-from-the-oven magic. You can also freeze them for up to a month – just layer between parchment paper first so they don’t stick together!
Nutritional Information
Here’s the scoop on nutrition per bar (but remember, these are estimates – your exact ingredients might change things slightly): about 220 calories, 8g fat, and 35g carbs. Not health food, but totally worth every delicious bite!
Frequently Asked Questions
Can I use store-bought caramel sauce?
Absolutely! While homemade caramel is divine, I often use the jarred stuff when I’m short on time. Just warm it slightly so it drizzles easily.
What’s the best apple variety for these bars?
Granny Smith are my go-to for their tartness that balances the sweet caramel, but Honeycrisp or Braeburn work great too. Avoid super soft apples like Red Delicious!
Can I make these gluten-free?
Yes! I’ve successfully used a 1:1 gluten-free flour blend – just make sure your caramel sauce is GF too.
Why did my bars turn out soggy?
Two likely culprits: apples released too much juice (always pat them dry!) or you cut them while still warm. Patience is key!
Can I double the recipe?
Of course! Use a 9×13 pan and add 5-10 minutes to baking time. More bars = more happiness!
Share Your Thoughts
Did you make these caramel apple bars? I’d love to hear how they turned out! Leave a comment below or tag me on social media – nothing makes me happier than seeing your baking creations!
PrintIrresistible Caramel Apple Bars Recipe in Just 45 Minutes
A delicious dessert combining caramel and apples in a bar form.
- Prep Time: 15 minutes
- Cook Time: 30 minutes
- Total Time: 45 minutes
- Yield: 12 bars 1x
- Category: Dessert
- Method: Baking
- Cuisine: American
- Diet: Vegetarian
Ingredients
- 2 cups all-purpose flour
- 1 cup granulated sugar
- 1/2 cup unsalted butter, softened
- 2 medium apples, peeled and diced
- 1/2 cup caramel sauce
- 1 tsp cinnamon
- 1/4 tsp salt
Instructions
- Preheat oven to 350°F (175°C).
- Mix flour, sugar, butter, and salt to form a crumbly dough.
- Press half the dough into a greased baking pan.
- Layer diced apples and drizzle caramel sauce over the dough.
- Sprinkle cinnamon and top with remaining dough.
- Bake for 30 minutes or until golden brown.
- Cool before cutting into bars.
Notes
- Use firm apples like Granny Smith for best results.
- Store in an airtight container for up to 3 days.
Nutrition
- Serving Size: 1 bar
- Calories: 220
- Sugar: 18g
- Sodium: 85mg
- Fat: 8g
- Saturated Fat: 5g
- Unsaturated Fat: 2g
- Trans Fat: 0g
- Carbohydrates: 35g
- Fiber: 1g
- Protein: 2g
- Cholesterol: 20mg