Perfect Crispy Cauliflower Pizza Crust in 5 Simple Steps
I’ll never forget the first time I tried making cauliflower pizza crust – it was a complete disaster! The soggy mess that came out of my oven looked nothing like pizza, but that failed attempt only made me more determined to perfect it. After years of tweaking (and plenty more failed experiments), I finally cracked the code for a crispy, flavorful crust that even my carb-loving husband begs me to make.
This magical cauliflower pizza crust recipe lets you enjoy all the cheesy goodness of pizza without the carb crash afterward. It’s become my go-to for weeknight dinners when we’re craving something indulgent but still want to keep it light. The secret? Getting every last drop of moisture out of that cauliflower – trust me, your kitchen towel will become your new best friend!
What I love most is how versatile this crust is. Pile it high with your favorite toppings or keep it simple with just sauce and cheese. Either way, you’re in for a healthy, gluten-free pizza night that won’t leave you feeling weighed down.
Why You’ll Love This Cauliflower Pizza Crust
Let me tell you why this crust has become my pizza night hero – it’s not just about skipping the carbs (though that’s a pretty sweet bonus). Here’s what makes it so special:
- Guilt-free indulgence: You get all that crispy, cheesy pizza goodness without the bloat afterward. I can actually enjoy seconds without feeling like I need a nap!
- Crazy easy prep: Just a few simple ingredients and about 15 minutes of hands-on time. Even my kids can help with the mixing.
- Total texture win: When baked right, this crust gets beautifully crisp on the edges while staying sturdy enough to hold all your favorite toppings.
- Kitchen therapy: There’s something oddly satisfying about squeezing all that moisture out of the cauliflower – trust me, it’s the best stress reliever!
The best part? No one will believe it’s actually good for them until they take that first delicious bite.
Ingredients for Cauliflower Pizza Crust
Here’s the beautiful part – you only need a handful of simple ingredients to make this magical crust happen. I’ve learned through trial and error that quality matters here, especially with the cheese (skip the pre-shredded stuff if you can). Here’s what you’ll need to grab:
- 1 medium head cauliflower, riced (about 4 cups) – look for tight, bright white florets
- 1 large egg – this is our glue, so make sure it’s fresh!
- 1/2 cup shredded mozzarella cheese – shred it yourself for best meltability
- 1/4 cup grated Parmesan cheese – the real stuff, not the powdered kind
- 1/2 teaspoon dried oregano – crush it between your fingers to wake up the flavor
- 1/2 teaspoon garlic powder – because everything’s better with garlic
- 1/4 teaspoon salt – I use kosher salt for better distribution
- 1/4 teaspoon black pepper – freshly cracked adds a nice little bite
See? Nothing fancy – just pantry staples that come together to create pizza magic. Now let’s turn these simple ingredients into something amazing!
Equipment You’ll Need
Don’t worry – you don’t need any fancy gadgets to make this crust! Just gather these trusty kitchen tools (I bet you already have most of them):
- Food processor – to rice that cauliflower into perfect little bits (or a box grater if you want an arm workout!)
- Clean kitchen towel – your secret weapon for squeezing out every last drop of moisture
- Baking sheet – I use a standard half-sheet pan lined with parchment paper
- Parchment paper – non-negotiable for easy release and cleanup
- Mixing bowl – any medium-sized bowl will do the trick
That’s it! No special equipment required – just the basics that make kitchen magic happen.
How to Make Cauliflower Pizza Crust
Alright, let’s get our hands dirty and turn that humble cauliflower into pizza gold! I’ve made this crust more times than I can count, and these steps will guide you to crispy perfection every time.
Preparing the Cauliflower
First things first – we need to transform that cauliflower into rice. Break the head into florets (save the stems for soup!) and pulse them in your food processor until they look like little grains of rice. Don’t overdo it – you want texture, not mush!
Now here’s the crucial part: moisture removal. Microwave the riced cauliflower for 4-5 minutes (or steam it) to soften it up. Let it cool just enough so you can handle it, then dump it onto a clean kitchen towel. Wrap it up tight and squeeze like you’re trying to wring out every last drop – I’m talking serious elbow grease here. You’ll be shocked how much liquid comes out!
Mixing the Crust
Time to bring our crust together! In a big bowl, combine your dry cauliflower rice with the egg (our binder), mozzarella, Parmesan, and all those lovely seasonings. Get in there with your hands – it’s the best way to make sure everything’s evenly distributed.
The mixture should hold together when you press it, but still feel a bit crumbly. If it’s too wet, add a sprinkle more Parmesan. Too dry? A tiny splash of water will do the trick. This is where you can taste and adjust the seasoning too – I sometimes add an extra pinch of garlic powder because, well, garlic!
Baking the Crust
Spread your mixture onto parchment-lined baking sheet, pressing it into an even circle about 1/4-inch thick. Pro tip: make the edges slightly thicker to prevent burning. Pop it in your preheated 400°F oven and resist the urge to peek for at least 20 minutes!
You’ll know it’s ready when the edges turn golden brown and the top looks dry. If you’re adding toppings, now’s the time – pile them on and bake for another 5-10 minutes until everything’s melted and bubbly. Let it cool for a couple minutes before slicing – patience rewards you with the perfect crispiness!
Tips for Perfect Cauliflower Pizza Crust
After burning (literally!) through more cauliflower crusts than I’d like to admit, I’ve learned these foolproof tricks that make all the difference:
- Squeeze like your life depends on it: That cauliflower holds way more water than you’d think. I press mine until my arms ache – it’s the secret to crispiness!
- Press it thin, but not too thin: Aim for about 1/4-inch thickness. Any thinner and it might fall apart; thicker and it won’t crisp up properly.
- Preheat your pan: Pop your baking sheet in the oven while it preheats for extra crunch. Just be careful when adding the parchment!
- Let it cool slightly before topping: A 5-minute rest helps the crust set so it won’t get soggy under sauce.
- Pizza stone magic: If you’ve got one, use it! The even heat gives restaurant-quality crispiness.
Remember – even if it cracks a little, it’ll still taste amazing. That’s the beauty of homemade!
Serving Suggestions for Cauliflower Pizza Crust
Now comes the fun part – loading up your golden crust with deliciousness! My family loves making DIY pizza nights with little bowls of toppings set out for everyone. Here are my go-to combos:
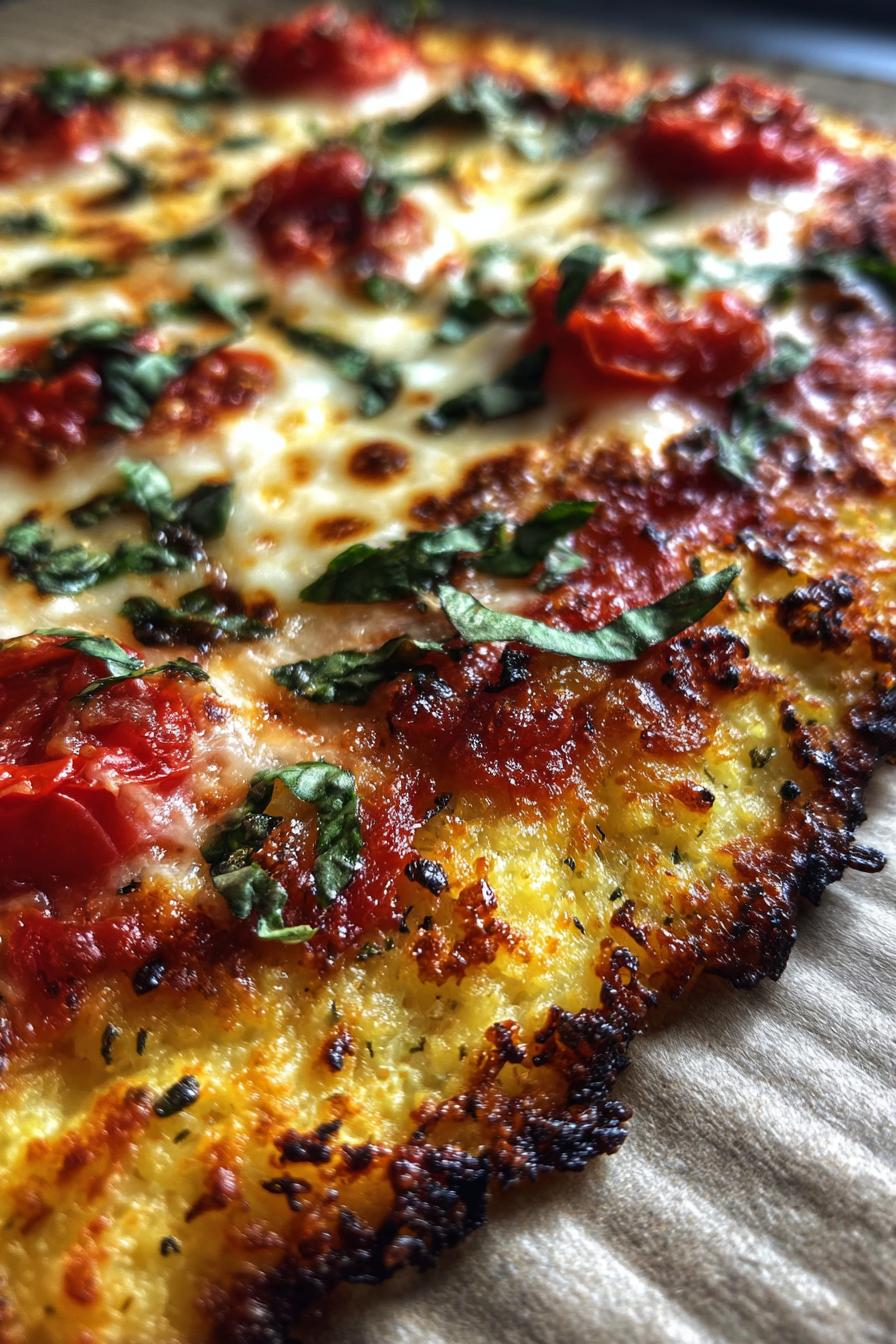
- Classic Margherita: Smear on some homemade tomato sauce, fresh mozzarella slices, and basil leaves after baking
- BBQ Chicken: Brush with barbecue sauce, shredded chicken, red onions, and a sprinkle of cheddar
- Garden Veggie: Pesto base with roasted zucchini, cherry tomatoes, and goat cheese crumbles
- Breakfast Pizza: Top with scrambled eggs, crispy bacon, and a drizzle of hollandaise (yes, it’s amazing!)
Pair it with a simple arugula salad dressed in lemon juice and olive oil for the perfect light meal. The possibilities are endless – what will you try first?
Storage and Reheating
Here’s the good news – this crust keeps beautifully! Let it cool completely, then store it in an airtight container in the fridge for up to 3 days. When you’re ready to enjoy it again, pop it back in a 375°F oven for 5-7 minutes to crisp it right back up. No soggy leftovers here!
For longer storage, you can freeze the baked crust (without toppings) between sheets of parchment paper. Just thaw overnight in the fridge and reheat – it’ll taste just as fresh as the day you made it. Trust me, having a stash of these in the freezer is a weeknight lifesaver!
Cauliflower Pizza Crust FAQs
I’ve gotten so many questions about this crust over the years – here are the ones that pop up most often from fellow cauliflower pizza lovers!
Can I use frozen cauliflower rice instead of fresh?
You can, but fresh really works best. Frozen tends to be too wet, even after squeezing. If you must use frozen, thaw it completely and squeeze, squeeze, squeeze! You might need to add extra cheese to help bind it.
Why did my crust fall apart?
Two likely culprits: not enough squeezing (I told you it was important!) or not enough egg. The mixture should hold together when pressed – if it doesn’t, add another egg yolk or a bit more cheese.
Can I make this vegan?
Absolutely! Swap the egg for a flax egg (1 tbsp ground flax + 3 tbsp water) and use vegan cheeses. The texture will be slightly different but still delicious.
How do I know when it’s done baking?
The edges should be golden brown and the top should look dry. Give it a gentle poke – it should feel firm but still have a little give. If it’s still soft in the middle, give it a few more minutes.
Can I prep the crust ahead of time?
Yes! You can make the crust up to a day in advance – just bake it until lightly golden, let it cool, then store wrapped in the fridge. Finish baking with toppings when ready to serve.
Nutritional Information
Just a quick note – these numbers are estimates based on the ingredients I use. Your exact nutrition may vary depending on cheese brands or cauliflower size. But here’s the good news: each serving (about 1/3 of the crust) comes in at roughly 120 calories with 3g of fiber and 8g of protein – way better than traditional pizza dough! Always check labels if you’re tracking closely.
Share Your Cauliflower Pizza Crust
Now I want to hear about your pizza adventures! Did you try any wild topping combos? Did your crust turn out crispy-perfect? Leave a comment below or tag me on Instagram – I love seeing your kitchen creations!
PrintPerfect Crispy Cauliflower Pizza Crust in 5 Simple Steps

A healthy, gluten-free alternative to traditional pizza crust made with cauliflower, perfect for low-carb diets.
- Prep Time: 15 minutes
- Cook Time: 25 minutes
- Total Time: 40 minutes
- Yield: 1 pizza crust (serves 2-3) 1x
- Category: Main Dish
- Method: Baking
- Cuisine: Italian-Inspired
- Diet: Gluten Free
Ingredients
- 1 medium head cauliflower, riced (about 4 cups)
- 1 large egg
- 1/2 cup shredded mozzarella cheese
- 1/4 cup grated Parmesan cheese
- 1/2 teaspoon dried oregano
- 1/2 teaspoon garlic powder
- 1/4 teaspoon salt
- 1/4 teaspoon black pepper
Instructions
- Preheat oven to 400°F (200°C) and line a baking sheet with parchment paper.
- Rice the cauliflower by pulsing florets in a food processor until fine.
- Microwave or steam the riced cauliflower for 4-5 minutes, then let it cool slightly.
- Wrap the cauliflower in a clean towel and squeeze out excess moisture.
- Mix the cauliflower with egg, mozzarella, Parmesan, oregano, garlic powder, salt, and pepper.
- Spread the mixture onto the baking sheet, shaping it into a thin, even crust.
- Bake for 20-25 minutes until golden and firm.
- Add toppings if desired and bake for another 5-10 minutes.
Notes
- Press the crust firmly to prevent crumbling.
- Use a pizza stone for extra crispiness.
- Store leftovers in an airtight container for up to 3 days.
Nutrition
- Serving Size: 1/3 of crust
- Calories: 120
- Sugar: 2g
- Sodium: 250mg
- Fat: 7g
- Saturated Fat: 3g
- Unsaturated Fat: 3g
- Trans Fat: 0g
- Carbohydrates: 8g
- Fiber: 3g
- Protein: 8g
- Cholesterol: 60mg