Irresistible Cheesy Cauliflower Bake Ready in 30 Minutes
Oh, this Cheesy Cauliflower Bake is my ultimate comfort food trick – it’s the dish that turns veggie skeptics into believers! I swear, the moment that creamy cheddar and Parmesan crust bubbles up in the oven, my whole kitchen smells like happiness. It’s crazy how something so simple (just 8 ingredients!) can feel so indulgent. My kids? They call it “mac and cheese’s cool cousin,” and honestly, that’s the highest compliment. Whether you need a quick side dish or a cozy meatless main, this bake delivers every time. The best part? It’s ready in 30 minutes flat – because who has time to wait when cheese is involved?
Ingredients for Cheesy Cauliflower Bake
Gather these simple ingredients – I promise you probably have most of them already! The magic happens when these humble players come together. Just wait until you see what they become after 20 minutes in the oven.
- 1 large head cauliflower (about 2 pounds), cut into bite-sized florets (you’ll get roughly 6 cups)
- 2 cups shredded sharp cheddar cheese – the sharper the better for that punch of flavor (I like to shred my own from a block for maximum meltiness)
- 1/2 cup heavy cream – this is our secret weapon for that luscious sauce (though I’ve used whole milk in a pinch and it still works beautifully)
- 2 cloves garlic, minced (don’t skip this – it adds that wonderful savory note)
- 1/4 cup grated Parmesan cheese – the nutty flavor takes this to the next level
- 1/2 teaspoon kosher salt (or to taste – I always start with less and adjust)
- 1/4 teaspoon freshly ground black pepper – freshly cracked makes all the difference
- 1/4 teaspoon paprika (smoked paprika is my personal twist for extra depth)
See? Nothing fancy – just good, honest ingredients that transform cauliflower into something downright addictive. I always say, the better your ingredients, the more magical this bake becomes!
How to Make Cheesy Cauliflower Bake
Okay, let’s turn these simple ingredients into pure comfort food magic! I’ve made this recipe so many times I could do it in my sleep, but I’ll walk you through each step carefully. Trust me – it’s easier than you think, and the results are always showstopping.
Preparing the Cauliflower
First things first – let’s get our cauliflower ready for its cheesy transformation. I like to steam mine because it keeps more flavor than boiling (and no watery mush!). Just bring about an inch of water to boil in a large pot with a steamer basket, then toss in those florets. Cover and let them steam for exactly 5 minutes – we want them fork-tender but still with a bit of bite. They’ll finish cooking in the oven, and nobody likes soggy cauliflower!
Here’s my pro tip: Immediately drain the cauliflower and give it a quick shake in the colander. Let it sit for a minute while you prep everything else – this helps prevent a watery bake later. See? We’re already avoiding common pitfalls!
Mixing the Cheesy Sauce
Now for the good stuff – that creamy, garlicky sauce that makes this dish irresistible. Grab a medium bowl and whisk together the heavy cream, minced garlic, salt, pepper, and paprika until perfectly blended. The garlic should be evenly distributed – no one wants a surprise chunk!
Here’s where I usually sneak a taste (quality control, right?). Adjust the seasoning if needed – sometimes I’ll add an extra pinch of paprika if I’m feeling fancy. The sauce should taste slightly stronger than you’d think, because it’ll mellow out once baked with all that cheese.
Baking to Perfection
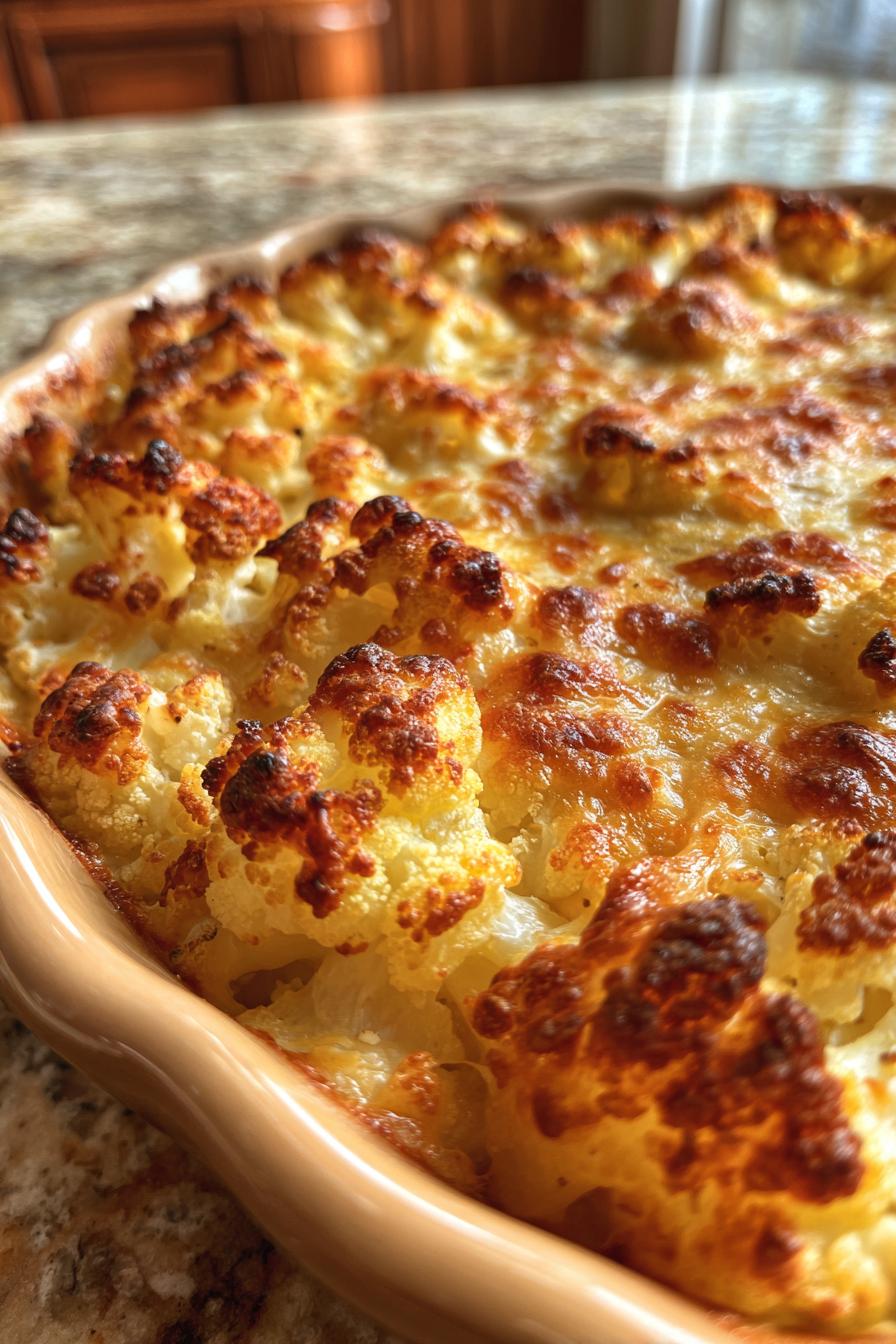
Time for the grand finale! Spread your steamed cauliflower evenly in a 9×13 baking dish (or any similar size – I’ve used cast iron skillets too!). Pour that glorious cream mixture over top, making sure every floret gets some love. Now comes the best part – sprinkle both cheeses evenly across the top. Don’t skimp here – that golden crust is what dreams are made of!
Pop it in your preheated 375°F oven and bake for about 20 minutes. You’ll know it’s ready when the cheese is bubbly all over and has those irresistible golden-brown spots. If your oven runs hot, check at 18 minutes – burnt cheese is a tragedy we must avoid!
Let it cool for just 5 minutes before serving (those cheese strings are dangerous when piping hot!). Then watch as everyone dives in – I’ve never seen cauliflower disappear so fast!
Why You’ll Love This Cheesy Cauliflower Bake
Honestly, this dish has become my go-to for so many reasons – let me count the ways it’ll steal your heart too! Every time I make it, I’m reminded why it’s earned a permanent spot in my recipe rotation.
- Creamy, dreamy texture – That perfect balance of tender cauliflower swimming in rich, cheesy sauce? Absolute perfection. It’s like comfort food hugged a vegetable.
- Ready in 30 minutes flat – From chopping to bubbling cheesy goodness in under half an hour? That’s my kind of weeknight magic.
- Secret veggie win – I can’t tell you how many times picky eaters (kids AND adults!) have gobbled this up without realizing how much cauliflower they’re eating. Score!
- Endlessly adaptable – Add some crispy bacon, swap in different cheeses, or throw in breadcrumbs for crunch. It’s a blank canvas for your cravings.
- Leftovers reheat like a dream – Unlike some baked dishes that turn watery, this keeps its texture beautifully for next-day lunches (if it lasts that long!).
- One dish wonder – Minimal prep, easy cleanup, and it looks gorgeous coming straight from the baking dish to the table. No fancy plating required!
Seriously, what’s not to love? It’s the dish that somehow manages to feel indulgent and wholesome at the same time – my favorite kind of kitchen magic!
Ingredient Substitutions & Tips
Listen, I know we don’t always have exactly what a recipe calls for – that’s why I’ve tested every possible swap for this cheesy cauliflower bake! Here are my tried-and-true substitutions and hard-earned tips to guarantee success every time.
When You’re Out of Heavy Cream
Don’t panic if you’re fresh out of heavy cream! Whole milk works in a pinch – just add an extra tablespoon of butter to the sauce for richness. For a dairy-free version, I’ve had great results with full-fat coconut milk (the canned kind). It sounds weird, but trust me – the flavor blends right in with all that cheese!
Cheese Variations That Work Wonders
While sharp cheddar is my go-to, I’ve experimented with all sorts of cheeses. Gruyère adds fancy French bistro vibes, while pepper jack gives it a nice kick. Even mozzarella works if that’s all you’ve got – just add an extra sprinkle of Parmesan for flavor. The key? Always shred your own cheese if possible – those pre-shredded bags contain anti-caking agents that can make your sauce grainy.
Cauliflower Shortcuts & Fixes
Short on time? Frozen cauliflower florets are totally fine here – just thaw and pat them very dry first. And if your bake turns out watery (it happens!), here’s my trick: pop it under the broiler for 2-3 minutes to evaporate excess moisture and crisp up the top.
Pro Tips I’ve Learned the Hard Way
- Don’t overcook the cauliflower during steaming – remember, it keeps cooking in the oven! Mushy florets = sad bake.
- Let the dish rest 5 minutes after baking – this helps the sauce thicken up perfectly.
- For extra crunch, mix 1/4 cup panko breadcrumbs with melted butter and sprinkle on top before baking.
- Garlic lovers? Double the garlic and add a pinch of garlic powder too – no judgment here!
- Watch your baking dish size – too small and it’ll overflow, too large and the sauce spreads too thin.
The beauty of this recipe is how forgiving it is – once you’ve made it a few times, you’ll develop your own little tweaks. That’s how family recipes are born!
Serving Suggestions for Cheesy Cauliflower Bake
Here’s the thing about this cheesy cauliflower bake – it plays well with pretty much everything! I’ve served it at everything from casual weeknight dinners to fancy holiday meals, and it always fits right in. Let me share my favorite ways to make it the star of your table.
Classic Comfort Food Pairings: For those nights when you just need a hug on a plate, pair this bake with roasted chicken (those crispy thighs from my other recipe work perfectly) or juicy pork chops. The creamy cauliflower balances out the savory meats so beautifully. And don’t even get me started about how amazing it is with meatloaf – the ultimate nostalgic combo!
Lighter Options: When I want to keep things fresh, I’ll serve it alongside a bright arugula salad with lemon vinaigrette – the peppery greens cut through all that richness. It’s also fantastic with roasted cherry tomatoes or a simple cucumber-dill salad. My vegetarian friends love when I make this the main event with a side of crusty bread for scooping up every last cheesy bite.
Brunch Game-Changer: Oh, you haven’t lived until you’ve had this with poached eggs on top! The runny yolks mix with the cheese sauce to create something magical. It’s become our go-to lazy Sunday brunch alongside some crispy bacon and mimosas (because why not?).
Party Perfect: For potlucks, I sometimes bake it in individual ramekins – they look so cute and prevent the dreaded “double-dipping.” And at holiday dinners? It holds its own next to glazed ham or roast turkey better than any plain old mashed potatoes ever could.
Really, the only wrong way to serve this is… not serving it at all! Whether it’s the cozy centerpiece of your meal or a supporting player, this bake makes every dish around it taste better. Just don’t be surprised when people start asking for the recipe – it happens every time at my house!
Storing and Reheating
Okay, confession time – I rarely have leftovers of this cheesy cauliflower bake because it disappears so fast! But on those rare occasions when I do manage to save some, here’s exactly how I store and reheat it to keep that perfect texture. Because soggy, separated cheese sauce? That’s a crime against cauliflower!
Storing Like a Pro: First rule – let your bake cool completely before storing (but who can resist nibbling those crispy cheese edges while it’s still warm?). Transfer it to an airtight container – I’m obsessed with glass ones because they don’t absorb smells. It’ll keep beautifully in the fridge for 3-4 days. For longer storage, you can freeze it for up to 2 months, though I find the texture changes slightly.
Reheating Magic: My absolute favorite method? The oven! Preheat to 350°F and spread leftovers in an oven-safe dish. Cover with foil and bake for 15-20 minutes until heated through. Then remove the foil and broil for 2 minutes to bring back that gorgeous golden top. If you’re in a rush, the microwave works too – just use 50% power in 30-second bursts, stirring between each. And here’s my secret weapon – sprinkle a tiny bit of fresh grated cheese on top before microwaving. It revives the “fresh from the oven” look!
Freezing Tips: If you must freeze (maybe you’re meal prepping?), portion it out first – individual servings reheat better than one big block. Thaw overnight in the fridge before reheating, and don’t be alarmed if it looks a bit watery at first – that moisture evaporates during reheating. A quick stir halfway through brings it back together.
Honestly? Sometimes I think the leftovers taste even better – all those flavors have more time to mingle! Just promise me you won’t eat it cold straight from the fridge… okay, maybe just one little bite.
Cheesy Cauliflower Bake Nutritional Info
Now, I’m no nutritionist, but I’ve done my homework on what’s actually in this glorious cheesy cauliflower bake. Keep in mind these numbers can change based on your specific ingredients (like using low-fat cheese vs. full-fat), but here’s the general breakdown per generous serving:
- Calories: About 220 per cup – not bad for something that tastes this indulgent!
- Fat: 16g (9g saturated) – hey, cheese is the star here, and we embrace that
- Carbs: 8g total – with 3g of fiber from all that cauliflower goodness
- Protein: A solid 12g – who knew cauliflower could pack such a punch?
- Sodium: Around 380mg – I always say go easy on added salt if you’re watching this
Here’s the fun part – compared to traditional mac and cheese, you’re getting way more nutrients per bite! All that cauliflower means you’re scoring vitamin C, vitamin K, and folate without even trying. And let’s be real – when something tastes this good AND gives you actual vitamins? That’s what I call a win-win.
Important note: These numbers are estimates based on standard ingredients. Your exact nutrition will vary depending on cheese types, exact cauliflower size, and whether you add any extras like breadcrumbs or bacon (no judgment here!). If you’re tracking macros closely, definitely calculate based on your specific brands.
Common Questions About Cheesy Cauliflower Bake
I’ve gotten so many questions about this recipe over the years – let me answer the ones that pop up most often! Trust me, no question is too silly – I’ve probably wondered the same thing myself at some point.
“Can I freeze this cheesy cauliflower bake?”
Absolutely! Though I’ll be honest – the texture changes slightly after freezing. The cauliflower gets softer and the sauce might separate a tiny bit when reheated. My trick? Portion it before freezing (muffin tins work great for single servings!) and sprinkle a little fresh cheese on top when reheating to bring back that “just baked” magic. It’ll keep frozen for about 2 months.
“Is this recipe keto-friendly?”
You bet! One serving has about 8g net carbs (total carbs minus fiber), making it perfect for keto diets. Just watch your cheese choices – some pre-shredded cheeses contain starch. For strict keto, I’d skip any breadcrumb topping and maybe add extra butter to the sauce.
“Help! My bake turned out watery – what went wrong?”
Oh honey, I’ve been there! Usually it’s one of three things: 1) You didn’t drain the cauliflower well enough after steaming (give it a good shake!), 2) The cauliflower was overcooked before baking (remember – fork-tender, not mushy!), or 3) You used frozen cauliflower without thawing and patting dry first. The fix? Pop it under the broiler for a few minutes to evaporate excess moisture!
“Can I make this ahead?”
Totally! Here’s my make-ahead secret: Prepare everything up to the baking step, cover tightly, and refrigerate for up to 24 hours. When ready to bake, add about 5 extra minutes to the cooking time since it’s going in cold. The texture actually improves with this rest time!
“What’s the best cheese blend?”
While I love sharp cheddar and Parmesan, don’t be afraid to experiment! Gruyère and fontina make it extra fancy, while Monterey Jack keeps it mild for kids. My wildcard? A handful of smoked Gouda – it adds the most incredible depth. Just remember – no matter what cheeses you use, always grate them fresh for the creamiest melt!
Got more questions? Drop them in the comments – I love helping troubleshoot this recipe! After all, cheesy cauliflower happiness should be accessible to everyone.
Ready to Make Magic? Try This Cheesy Cauliflower Bake Today!
There you have it – everything you need to create the most irresistible cheesy cauliflower bake of your life! I’ve poured all my tips, tricks, and hard-earned lessons into this recipe, so you can skip the trial-and-error phase and go straight to cheesy perfection. Whether you’re cooking for a crowd, meal prepping for the week, or just treating yourself to some comfort food, this dish never lets me down. So, what are you waiting for? Grab that cauliflower and get baking! And hey, if you put your own spin on it, I’d love to hear about it – drop your twists in the comments below. Happy cooking!
PrintIrresistible Cheesy Cauliflower Bake Ready in 30 Minutes

A creamy and cheesy cauliflower bake that’s perfect as a side dish or a light main course.
- Prep Time: 10 minutes
- Cook Time: 20 minutes
- Total Time: 30 minutes
- Yield: 4 servings 1x
- Category: Side Dish
- Method: Baking
- Cuisine: American
- Diet: Vegetarian
Ingredients
- 1 large head cauliflower, cut into florets
- 2 cups shredded cheddar cheese
- 1/2 cup heavy cream
- 2 cloves garlic, minced
- 1/4 cup grated Parmesan cheese
- 1/2 teaspoon salt
- 1/4 teaspoon black pepper
- 1/4 teaspoon paprika
Instructions
- Preheat oven to 375°F (190°C).
- Steam cauliflower florets for 5 minutes until slightly tender.
- In a bowl, mix heavy cream, garlic, salt, pepper, and paprika.
- Place cauliflower in a baking dish and pour cream mixture over it.
- Sprinkle cheddar and Parmesan cheese evenly on top.
- Bake for 20 minutes until cheese is bubbly and golden.
Notes
- You can substitute heavy cream with milk for a lighter version.
- Add breadcrumbs on top for extra crunch.
- Store leftovers in an airtight container for up to 3 days.
Nutrition
- Serving Size: 1 cup
- Calories: 220
- Sugar: 3g
- Sodium: 380mg
- Fat: 16g
- Saturated Fat: 9g
- Unsaturated Fat: 5g
- Trans Fat: 0g
- Carbohydrates: 8g
- Fiber: 3g
- Protein: 12g
- Cholesterol: 45mg