Creepy Handprint Cake: Bake This Masterpiece in 5 Steps
Halloween baking is my absolute favorite time of year – it’s when I get to unleash my inner spooky artist in the kitchen. And let me tell you, nothing screams “creepy” like my infamous creepy handprint cake. It’s the perfect centerpiece for any Halloween party, guaranteed to make your guests do a double-take. I first made this cake for a neighborhood potluck, and let’s just say it was the talk of the night – in the best (and creepiest) way possible.
The beauty of this cake is how simple it is to create something so delightfully eerie. With just a few ingredients and a little imagination, you can transform a classic chocolate cake into a masterpiece that looks like it crawled straight out of a horror movie. Trust me, the look on people’s faces when they see that handprint emerging from the frosting? Priceless.
Why You’ll Love This Creepy Handprint Cake
This isn’t your average Halloween dessert—it’s a showstopper that’ll have everyone whispering, “How’d you do that?” Here’s why it’s become my go-to spooky season treat:
- So simple, it’s scary: Just bake a basic chocolate cake (no fancy skills needed!), then “haunt” it with one easy handprint press.
- Party magic: Works as both dessert and decoration—centerpiece and conversation starter in one.
- Endlessly fun: Go classic with chocolate frosting, or get wild with green “zombie skin” tint or edible blood drips.
Last year, my niece begged me to teach her this recipe—now it’s her Halloween tradition too. That’s the real magic!
Ingredients for the Creepy Handprint Cake
Gather these simple ingredients to bring your terrifyingly tasty vision to life. I always use pantry staples for this cake—no special trips needed!
- 2 cups all-purpose flour (spooned and leveled)
- 1 1/2 cups granulated sugar
- 1/2 cup unsweetened cocoa powder (Dutch-process works great)
- 1 tsp baking soda
- 1/2 tsp salt
- 1 cup water
- 1/3 cup vegetable oil
- 1 tsp vanilla extract
- 1 tbsp white vinegar (yes, really—it reacts with the baking soda!)
- 1 batch chocolate frosting (homemade or store-bought—no judgement here)
- Red food coloring (optional, for those “bloody” details)
See? Nothing too scary in that list—unless you count how quickly this cake disappears at parties!
Equipment You’ll Need
Here’s what you’ll need to make your creepy masterpiece: a 9-inch round cake pan, mixing bowls, a spatula, and a latex glove (trust me, it’s cleaner for the handprint). That’s it—simple and spooky!
How to Make the Creepy Handprint Cake
Alright, let’s get our hands dirty—figuratively speaking, at least until we make that creepy handprint! Follow these steps, and you’ll have a cake that looks like it was touched by something… otherworldly.
Preparing the Cake Batter
First, preheat your oven to 350°F (175°C)—this cake likes it hot! In a big bowl, whisk together the flour, sugar, cocoa powder, baking soda, and salt. No need to sift, but make sure there are no cocoa lumps! In another bowl, mix the water, oil, vanilla, and that surprising splash of vinegar. Now, pour the wet into the dry and stir just until combined. Overmixing is the real monster here—it makes the cake tough. A few flour streaks are totally fine; they’ll disappear when baking.
Baking and Cooling
Pour your batter into a greased 9-inch round pan and bake for 30-35 minutes. Do the toothpick test—if it comes out with a few moist crumbs (not wet batter), you’re golden. Let the cake cool in the pan for 10 minutes, then transfer to a rack. Here’s the important part: let it cool completely before frosting. I know it’s tempting, but warm cake + frosting = melty handprint disaster. Patience, my spooky friend!
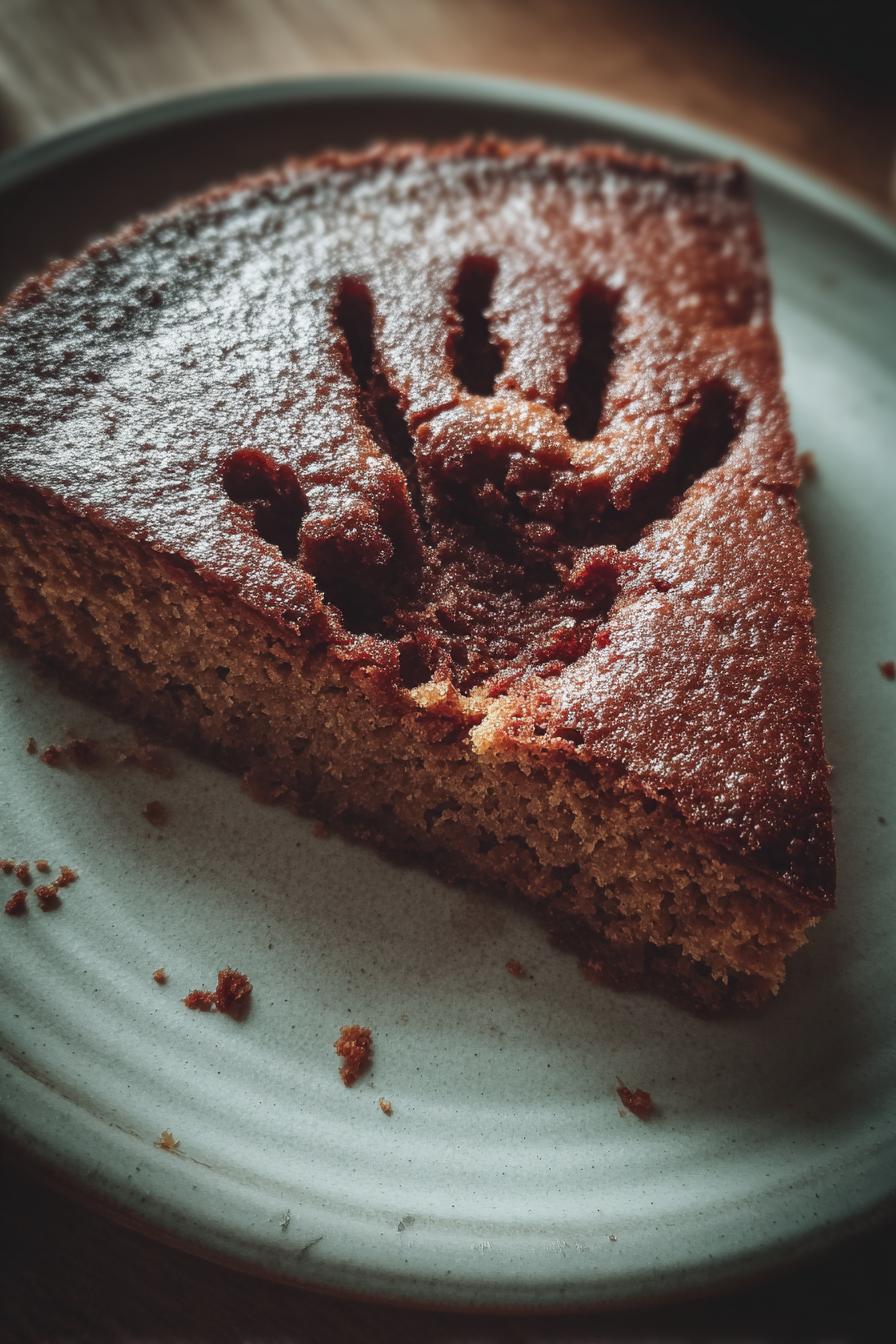
Creating the Creepy Handprint
Now for the fun part! Frost your cooled cake generously with chocolate frosting—it should look like fresh grave dirt. Slip on a clean latex glove (much more sanitary than bare hands!) and lightly press your hand into the frosting. Don’t push too deep—just enough to leave a clear print. For extra creep factor, mix red food coloring with a bit of corn syrup and dab it around the edges of the print like blood. Step back and admire your work… if you dare!
Tips for the Perfect Creepy Handprint Cake
Want your handprint cake to look professionally terrifying? Here are my hard-earned tricks from years of Halloween baking disasters (oops!) and triumphs:
- Chill first: Pop your frosted cake in the fridge for 15 minutes before making the handprint—it helps the impression stay crisp.
- Pressure test: Practice your handprint pressure on a plate of frosting first—too light and it disappears, too hard and you’ll hit cake.
- Bloody brilliant: Mix corn syrup with red food coloring for glossy “blood” that drips realistically down the sides.
Remember—even “mistakes” can make it creepier. A smudged handprint? Just call it a ghostly fade!
Creepy Handprint Cake Variations
Don’t be afraid to mix it up! Swap the chocolate cake for vanilla or red velvet if you’re feeling adventurous. Green frosting creates an eerie “zombie skin” effect, while black frosting makes it look straight out of a haunted house. Need it gluten-free? Just use a 1:1 gluten-free flour blend—same spooky results, no sacrifices!
Serving and Storing the Creepy Handprint Cake
For maximum creep factor, serve this cake chilled—the frosting holds those eerie handprint details best when cold. Leftovers? Ha! Like there’ll be any—but if miracles happen, store it airtight at room temperature for a day or in the fridge for up to 3 days. The handprint might fade slightly, but honestly? That just makes it spookier!
Nutritional Information
Here’s the spooky scoop—each slice of this creepy handprint cake has about 320 calories, with 12g fat and 50g carbs. But let’s be real, when you’re baking for Halloween, nutrition facts feel about as real as the monster under your bed! These numbers are estimates and will vary based on your specific ingredients (like homemade vs store-bought frosting).
FAQ About the Creepy Handprint Cake
Got questions about making your cake extra creepy? I’ve got answers from all my years of Halloween baking fails and wins!
Can I use my bare hand instead of a glove? Please don’t! Even clean hands have oils that can mess with the frosting texture. Plus, food safety first—a latex glove keeps everything hygienic while giving that perfect print.
Help! My handprint smudged—can I fix it? Totally! Just smooth out the frosting with a knife and try again. Or lean into it—add some red “blood” streaks to make it look like a desperate claw mark. Spooky bonus!
Can I make this cake ahead of time? Absolutely! Bake it 1-2 days before, wrap it well, and frost day-of. Or make the full cake a day early and keep it chilled—the cold actually makes the handprint details sharper.
What if I want bigger fingers? Easy—press harder for deeper prints, or wear rubber gloves stuffed with cotton balls at the fingertips for exaggerated monster fingers.
Will the handprint fade overnight? A bit, but like I always say—ghosts fade too! If it gets too soft, just redefine the lines with a toothpick.
Share Your Creepy Creation!
I’d absolutely love to see your handprint masterpieces! If you share photos online, tag me—I live for seeing your spooky kitchen creations. Happy haunting, bakers!
PrintCreepy Handprint Cake: Bake This Masterpiece in 5 Steps

A creepy handprint cake perfect for Halloween or spooky-themed parties. This cake features a realistic-looking handprint emerging from the frosting.
- Prep Time: 15 mins
- Cook Time: 35 mins
- Total Time: 50 mins
- Yield: 1 cake (8 servings) 1x
- Category: Dessert
- Method: Baking
- Cuisine: American
- Diet: Vegetarian
Ingredients
- 2 cups all-purpose flour
- 1 1/2 cups granulated sugar
- 1/2 cup unsweetened cocoa powder
- 1 tsp baking soda
- 1/2 tsp salt
- 1 cup water
- 1/3 cup vegetable oil
- 1 tsp vanilla extract
- 1 tbsp white vinegar
- 1 batch chocolate frosting
- Red food coloring (optional for blood effect)
Instructions
- Preheat oven to 350°F (175°C). Grease a round cake pan.
- Mix flour, sugar, cocoa powder, baking soda, and salt in a bowl.
- Add water, vegetable oil, vanilla extract, and vinegar. Stir until smooth.
- Pour batter into the pan and bake for 30-35 minutes. Let cool.
- Frost the cake with chocolate frosting.
- Press a clean hand lightly into the frosting to create a handprint.
- Use red food coloring to enhance the creepy effect if desired.
Notes
- Use a latex glove for a cleaner handprint.
- Chill the cake before frosting for easier handling.
- Add edible fake blood for extra spookiness.
Nutrition
- Serving Size: 1 slice
- Calories: 320
- Sugar: 25g
- Sodium: 200mg
- Fat: 12g
- Saturated Fat: 3g
- Unsaturated Fat: 7g
- Trans Fat: 0g
- Carbohydrates: 50g
- Fiber: 2g
- Protein: 4g
- Cholesterol: 0mg