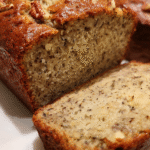
Diabetic Friendly Banana Bread No Sugar That Tastes Amazing!

Introduction to Diabetic Friendly Banana Bread No Sugar
As a busy mom, I know how challenging it can be to whip up something delicious and healthy. That’s why I’m excited to share my recipe for diabetic friendly banana bread no sugar. This delightful treat is not only easy to make, but it also satisfies those sweet cravings without the guilt. Imagine the aroma of freshly baked banana bread wafting through your home, making it the perfect solution for a quick breakfast or a snack to impress your loved ones. Trust me, this recipe will become a staple in your kitchen!
Why You’ll Love This Diabetic Friendly Banana Bread No Sugar
This diabetic friendly banana bread no sugar is a game-changer for busy lives. It’s quick to prepare, taking just 15 minutes of your time. The best part? It’s packed with flavor and moisture, thanks to those ripe bananas. You won’t miss the sugar at all! Plus, it’s a fantastic way to use up overripe bananas, turning them into a delicious treat that everyone can enjoy.
Ingredients for Diabetic Friendly Banana Bread No Sugar
Gathering the right ingredients is key to making this diabetic friendly banana bread no sugar a success. Here’s what you’ll need:
- Ripe Bananas: The star of the show! Choose bananas that are very ripe for natural sweetness and moisture.
- Whole Wheat Flour: A healthier alternative to white flour, it adds fiber and nutrients to your bread.
- Unsweetened Applesauce: This acts as a natural sweetener and keeps the bread moist without added sugar.
- Almond Milk: A dairy-free option that adds creaminess. You can substitute with any milk you prefer.
- Chopped Walnuts (optional): For a delightful crunch and added healthy fats. Feel free to skip or substitute with pecans.
- Baking Soda: Helps the bread rise, giving it that fluffy texture we all love.
- Baking Powder: Works alongside baking soda to ensure your bread is light and airy.
- Vanilla Extract: A splash of this adds depth and enhances the overall flavor of the bread.
- Cinnamon: This warm spice brings a cozy aroma and flavor that pairs perfectly with bananas.
- Salt: Just a pinch to balance the sweetness and enhance the flavors.
For exact measurements, check the bottom of the article where you can find everything listed for easy printing. Happy baking!
How to Make Diabetic Friendly Banana Bread No Sugar
Now that you have your ingredients ready, let’s dive into the fun part—making this diabetic friendly banana bread no sugar! Follow these simple steps, and you’ll have a delicious loaf in no time.
Step 1: Preheat the Oven
First things first, preheat your oven to 350°F (175°C). Preheating is crucial because it ensures even baking. If you skip this step, your bread might not rise properly, leaving you with a dense loaf. Trust me, you want that fluffy texture!
Step 2: Prepare the Bananas
Next, grab those ripe bananas and place them in a large bowl. Using a fork or a potato masher, mash them until they’re smooth. Aim for a creamy consistency, with no large chunks. The more mashed they are, the better the sweetness and moisture in your bread!
Step 3: Mix Wet Ingredients
Now, it’s time to add the wet ingredients. Pour in the unsweetened applesauce, almond milk, and vanilla extract. Mix everything together until well combined. These ingredients not only add flavor but also keep your bread moist and delicious without any added sugar.
Step 4: Combine Dry Ingredients
In a separate bowl, combine the whole wheat flour, baking soda, baking powder, cinnamon, and salt. Mixing dry ingredients separately is important because it ensures that the leavening agents are evenly distributed. This way, your bread will rise beautifully!
Step 5: Combine Wet and Dry Mixtures
Now, it’s time to bring it all together! Gradually add the dry mixture to the wet ingredients. Stir gently until just combined. Be careful not to overmix; a few lumps are perfectly fine. Overmixing can lead to a tough texture, and we want our bread to be soft and tender!
Step 6: Add Optional Ingredients
If you’re feeling adventurous, fold in the chopped walnuts or any other add-ins you like. They add a delightful crunch and extra flavor. If you prefer a nut-free version, feel free to skip this step. Your bread will still be fantastic!
Step 7: Pour and Bake
Pour the batter into a greased loaf pan, spreading it evenly. Bake in your preheated oven for 50-60 minutes. To check for doneness, insert a toothpick into the center. If it comes out clean, your bread is ready to shine!
Step 8: Cooling the Bread
Once baked, let the bread cool in the pan for about 10 minutes. This step is essential because it allows the bread to set. After that, transfer it to a wire rack to cool completely. Slicing it too soon might lead to a crumbly mess, and we want perfect slices!
Tips for Success
- Use very ripe bananas for maximum sweetness and moisture.
- Don’t overmix the batter; a few lumps are okay!
- Let the bread cool completely before slicing for cleaner cuts.
- Store leftovers in an airtight container to keep it fresh.
- Experiment with spices like nutmeg for a unique twist.
Equipment Needed
- Mixing bowls: Use any size you have on hand; a large bowl is ideal.
- Fork or potato masher: Perfect for mashing bananas; a blender works too!
- Loaf pan: A standard 9×5 inch pan is great; silicone pans are a fun alternative.
- Measuring cups and spoons: Essential for accuracy; you can use a kitchen scale if preferred.
- Oven mitts: Safety first! Protect your hands when handling hot pans.
Variations
- Chocolate Chip Delight: Add a handful of sugar-free dark chocolate chips for a sweet twist.
- Fruit Fusion: Incorporate dried fruits like raisins or cranberries for added sweetness and texture.
- Nutty Banana Bread: Swap walnuts for pecans or almonds for a different nutty flavor.
- Spiced Banana Bread: Experiment with spices like nutmeg or ginger for a warm, cozy flavor.
- Gluten-Free Option: Use a gluten-free flour blend to make this recipe suitable for gluten-sensitive diets.
Serving Suggestions
- Pair your banana bread with a dollop of Greek yogurt for a creamy contrast.
- Enjoy it with a warm cup of herbal tea or coffee for a cozy afternoon treat.
- Top slices with a sprinkle of cinnamon or a drizzle of almond butter for extra flavor.
- Serve with fresh fruit on the side for a colorful and nutritious plate.
FAQs about Diabetic Friendly Banana Bread No Sugar
Can I use regular flour instead of whole wheat flour?
Yes, you can use regular all-purpose flour, but keep in mind that whole wheat flour adds more fiber and nutrients. If you’re looking for a healthier option, stick with whole wheat!
How can I make this banana bread more flavorful?
Consider adding spices like nutmeg or ginger for an extra kick. You can also fold in sugar-free chocolate chips or dried fruits for added sweetness and texture.
Can I freeze the banana bread?
Absolutely! This diabetic friendly banana bread no sugar freezes well. Just wrap it tightly in plastic wrap and then in aluminum foil. It can last up to three months in the freezer.
Is this recipe suitable for kids?
Definitely! Kids will love the taste, and it’s a healthier alternative to traditional banana bread. Plus, it’s a great way to sneak in some whole grains!
How do I know when the banana bread is done baking?
Insert a toothpick into the center of the loaf. If it comes out clean or with a few crumbs, your bread is ready. If it’s wet, give it a few more minutes in the oven.
Final Thoughts
Making this diabetic friendly banana bread no sugar has been a delightful journey for me, and I hope it becomes a cherished recipe in your home too. The joy of baking fills the air with warmth, and the smiles on my family’s faces when they take that first bite are priceless. This bread is not just a treat; it’s a reminder that healthy can be delicious. So, whether you’re enjoying it for breakfast or as a snack, know that you’re nourishing your body while indulging your taste buds. Happy baking, and may your kitchen always be filled with love and laughter!
PrintDiabetic Friendly Banana Bread No Sugar That Tastes Amazing!
A delicious and healthy banana bread recipe that is diabetic-friendly and contains no added sugar.
- Prep Time: 15 minutes
- Cook Time: 60 minutes
- Total Time: 1 hour 15 minutes
- Yield: 1 loaf 1x
- Category: Baking
- Method: Baking
- Cuisine: American
- Diet: Diabetic
Ingredients
- 3 ripe bananas
- 2 cups whole wheat flour
- 1/2 cup unsweetened applesauce
- 1/4 cup almond milk
- 1/4 cup chopped walnuts (optional)
- 1 tsp baking soda
- 1 tsp baking powder
- 1 tsp vanilla extract
- 1/2 tsp cinnamon
- 1/4 tsp salt
Instructions
- Preheat the oven to 350°F (175°C).
- In a large bowl, mash the ripe bananas until smooth.
- Add the unsweetened applesauce, almond milk, and vanilla extract to the mashed bananas and mix well.
- In another bowl, combine the whole wheat flour, baking soda, baking powder, cinnamon, and salt.
- Gradually add the dry ingredients to the wet ingredients, mixing until just combined.
- If using, fold in the chopped walnuts.
- Pour the batter into a greased loaf pan.
- Bake for 50-60 minutes or until a toothpick inserted in the center comes out clean.
- Let the bread cool in the pan for 10 minutes before transferring to a wire rack to cool completely.
Notes
- Make sure the bananas are very ripe for the best sweetness.
- This bread can be stored in an airtight container for up to 5 days.
- For added flavor, consider adding a handful of dark chocolate chips (sugar-free) or dried fruits.
Nutrition
- Serving Size: 1 slice
- Calories: 120
- Sugar: 2g
- Sodium: 150mg
- Fat: 3g
- Saturated Fat: 0.5g
- Unsaturated Fat: 2g
- Trans Fat: 0g
- Carbohydrates: 22g
- Fiber: 3g
- Protein: 3g
- Cholesterol: 0mg