Easy Ghost Meringue Cookies Haunt with 4 Simple Ingredients

There’s something magical about Halloween in the kitchen – the smell of sugar, the flicker of candlelight, and the excitement of creating something spooky and sweet. My love for Ghost Meringue Cookies started years ago when my mom and I decided to whip up a batch for a neighborhood Halloween party. I remember how amazed I was at how something so simple – egg whites, sugar, and a touch of vanilla – could transform into these light, airy little ghosts that practically floated off the plate. They’re not only adorable but also incredibly easy to make, even if you’re not a baking pro. Trust me, once you try these melt-in-your-mouth treats, they’ll become a Halloween tradition in your home too!
Why You’ll Love Ghost Meringue Cookies
These little spooky treats have stolen my heart (and my kids’ too!), and here’s why they’ll be your new Halloween favorite:
- So simple – just 4 basic ingredients you probably already have in your pantry
- Adorably spooky – piping those little ghost shapes never gets old, and the faces you can create are endless (my 6-year-old loves making silly ones!)
- Light as air – that melt-in-your-mouth crispness makes them impossible to stop eating
- Perfect party treat – they look fantastic on a Halloween dessert table but won’t weigh guests down
- Kid-approved activity – my little monsters love helping pipe the ghosts and decorate the faces (messy fingers and all)
Seriously, these are the happiest little haunters you’ll ever bake – sweet, fun, and totally addictive!
Ingredients for Ghost Meringue Cookies
One of the best things about these little ghosts? You likely have everything you need already! Here’s what you’ll grab:
- 4 large egg whites (room temperature works best – save those yolks for custard!)
- 1 cup granulated sugar (the fine crystals dissolve perfectly)
- 1/4 teaspoon cream of tartar (our secret stabilizer)
- 1 teaspoon vanilla extract (pure gives the best flavor)
- Black icing gel or melted chocolate (for those spooky faces – I like gel for precision)
That’s it! Five simple ingredients transform into something magical.
How to Make Ghost Meringue Cookies
Alright, let’s get spooky! Making these ghostly treats is easier than you think, but there are a few tricks to getting them just right. I’ve learned through trial and error (and maybe a few collapsed ghosts!) so follow along for perfect results every time.
Preparing the Meringue
First things first – grab a spotlessly clean bowl! Any grease will sabotage your meringue (trust me, I’ve cried over flat meringues before). Beat your room-temperature egg whites with cream of tartar on medium until you get soft peaks that curl over when you lift the beaters. Now the fun part – slowly add sugar one tablespoon at a time while beating. This gradual addition creates that magical stiff, glossy peak stage. The meringue should hold sharp peaks and feel smooth between your fingers – no gritty sugar!
Shaping and Baking
Pipe time! Fit a large piping bag with a round tip (about 1/2 inch works great). Hold the bag straight up about an inch above your parchment-lined baking sheet. Pipe a fat little mound, then pull up quickly to create the ghost’s “tail.” Leave about 2 inches between ghosts – they’ll puff slightly as they dry. Now the patience test – bake them low and slow at 200°F for 1.5 to 2 hours until they lift off the parchment easily. The oven’s basically just drying them out!
Decorating the Ghosts
This is where personalities shine! Once completely cooled, use black gel icing or melted chocolate to dot on eyes and mouths. Go classic with simple ovals, or get creative – wavy mouths, wink eyes, or even little fangs! Pro tip: If using chocolate, let it set completely before stacking your little spirits.
Tips for Perfect Ghost Meringue Cookies
After many batches (and a few ghostly disasters!), I’ve learned these secrets for foolproof meringue cookies every time:
- Fight humidity – Rainy days make sticky meringues. If it’s damp out, bake them longer or wait for drier weather.
- Scrub everything – Wipe bowls and beaters with lemon juice or vinegar to banish any grease ghosts!
- Patience pays – Leave them in the turned-off oven longer for extra crispiness (overnight is magic!).
- Room temp eggs – They whip up fluffier than cold ones straight from the fridge.
Slow and low – That 200°F temp isn’t a suggestion. Higher heat = cracked, weeping ghosts.
Follow these tricks, and your little spookies will be hauntingly perfect!
Storage and Serving Suggestions
Here’s the spooktacular thing about these ghosts – they keep hauntingly well! Store them in an airtight container at room temperature (no fridge!) and they’ll stay crisp for up to 2 weeks – if they last that long! They make the perfect addition to Halloween party platters, or package them in clear bags with orange ribbons for ghoulishly good party favors. My kids love finding them packed in their lunchboxes as a sweet surprise too!
FAQ About Ghost Meringue Cookies
Over the years, I’ve gotten so many questions about these little ghosties! Here are the ones that pop up most often:
“Can I make these ahead of time?” Absolutely! These keep beautifully for up to 2 weeks in an airtight container. In fact, they might even get crispier after a day or two – just don’t decorate them until you’re ready to serve.
“Can I swap the vanilla extract?” You bet! Almond extract gives them a lovely marzipan flavor, or try peppermint for a winter ghost twist. Just stick to 1 teaspoon total – extracts are powerful!
“Why did my meringues collapse?” Oh honey, I’ve been there! Usually it’s either grease in the bowl (wipe everything down with lemon juice first!) or adding sugar too fast. Slow and steady wins the meringue race!
“Help! My ghosts spread!” If your piped shapes flatten, your meringue might have been underbeaten. Stiff peaks should hold their shape when you lift the beater – no drooping allowed!
“Can I color them?” For sure! Add a tiny bit of gel food coloring (not liquid!) when you mix in the vanilla. Pale purple ghosts? Spooky green? Go wild!
Nutritional Information
Each little ghost cookie comes in at about 25 calories – practically weightless! Remember, these numbers are estimates and may vary slightly based on your exact ingredients. But hey, when they’re this light and airy, who’s counting?
Share Your Spooky Creations
I’d love to see your ghostly masterpieces! Snap a photo of your hauntingly cute cookies and tag me – I always get such a kick out of seeing everyone’s creative ghost faces. Happy baking, my fellow spooky bakers!
PrintEasy Ghost Meringue Cookies Haunt with 4 Simple Ingredients
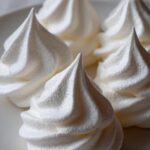
Ghost Meringue Cookies are light, airy, and slightly sweet treats perfect for Halloween or any spooky occasion. They are easy to make with just a few ingredients and bake into crisp, melt-in-your-mouth cookies.
- Prep Time: 20 minutes
- Cook Time: 2 hours
- Total Time: 3 hours 20 minutes
- Yield: 24 cookies 1x
- Category: Dessert
- Method: Baking
- Cuisine: International
- Diet: Vegetarian
Ingredients
- 4 large egg whites
- 1 cup granulated sugar
- 1/4 teaspoon cream of tartar
- 1 teaspoon vanilla extract
- Black icing gel or melted chocolate (for decorating)
Instructions
- Preheat oven to 200°F (95°C) and line a baking sheet with parchment paper.
- In a clean, dry bowl, beat egg whites and cream of tartar until soft peaks form.
- Gradually add sugar, 1 tablespoon at a time, while continuing to beat until stiff peaks form.
- Gently fold in vanilla extract.
- Transfer meringue to a piping bag fitted with a round tip.
- Pipe ghost shapes onto the prepared baking sheet, leaving space between each.
- Bake for 1.5 to 2 hours, until meringues are dry and crisp.
- Turn off the oven and let meringues cool inside for 1 hour.
- Use black icing gel or melted chocolate to draw ghost faces.
- Store in an airtight container.
Notes
- Make sure all utensils are completely grease-free for best results.
- Humidity can affect meringue, so bake on a dry day if possible.
- For extra crispness, leave meringues in the turned-off oven longer.
Nutrition
- Serving Size: 1 cookie
- Calories: 25
- Sugar: 5g
- Sodium: 5mg
- Fat: 0g
- Saturated Fat: 0g
- Unsaturated Fat: 0g
- Trans Fat: 0g
- Carbohydrates: 6g
- Fiber: 0g
- Protein: 0.5g
- Cholesterol: 0mg