4-Ingredient Poached Pears Recipe: Irresistible Dessert

There’s something magical about a dessert that looks like it belongs in a fancy restaurant but comes together in your own kitchen with just a handful of ingredients. Poached pears are exactly that—simple, elegant, and utterly delicious. I’ll never forget the first time I served them at a dinner party. My guests were convinced I’d spent hours in the kitchen, but little did they know, it’s one of the easiest desserts you can make. The pears soak up a fragrant syrup of cinnamon, vanilla, and lemon, turning into tender, sweet perfection. Whether it’s a holiday gathering or just a cozy night in, poached pears always feel special. Trust me, once you try them, they’ll become your go-to showstopper dessert.
Why You’ll Love These Poached Pears
Oh, where do I even start? These poached pears are the kind of dessert that makes you feel like a kitchen wizard—effortless but impressive. Here’s why they’re a must-try:
- Elegance on a plate: They look like they came straight from a Parisian patisserie, but guess what? No fancy skills required.
- Simplicity wins: Just a few ingredients and one pot—minimal cleanup, maximum flavor.
- Versatility queen: Dress them up for a dinner party or keep it casual for a weeknight treat. They’re perfect warm, cold, or even with a scoop of vanilla ice cream melting over the top.
Seriously, once you see how easy and stunning these are, you’ll want to make them all season long.
Ingredients for Poached Pears
Gather these simple ingredients—you probably have most in your pantry already! The magic happens when they all come together:
- 4 firm pears (Bosc or Anjou work best, peeled but stems left on for that pretty look)
- 2 cups water (just regular tap water is fine)
- 1 cup sugar (white granulated—but you can cut back to ¾ cup if you like it less sweet)
- 1 cinnamon stick (or ½ teaspoon ground cinnamon in a pinch)
- 1 vanilla bean (split lengthwise to release those gorgeous seeds—or 1 teaspoon vanilla extract if you’re out)
- 1 lemon (you’ll need both the peel—just the yellow part!—and a big squeeze of juice)
That’s it! See? Fancy dessert, totally unfancy shopping list.
How to Make Poached Pears
Okay, let’s get these beauties cooking! Don’t worry—it’s way easier than you think. Just follow these simple steps, and you’ll have restaurant-worthy poached pears in no time.
Preparing the Syrup
First, grab your favorite medium-sized saucepan—something deep enough to submerge those pears. Toss in the water, sugar, cinnamon stick, vanilla bean (scrape those seeds in too!), and lemon peel. Now, heat it up over medium-low, stirring gently until every last grain of sugar dissolves. You’ll know it’s ready when the syrup looks clear and glossy, like liquid gold. Oh, and that smell? Heavenly already.
Cooking the Pears
Carefully lower your peeled pears into the syrup—stems up if you’re feeling fancy! Cover the pan and let them simmer gently for about 15-20 minutes. No peeking too often! You’ll know they’re done when a knife slides into the thickest part with just a little resistance. They should be tender but not mushy—think “perfectly ripe avocado” texture.
Reducing the Syrup (Optional)
Want that syrup extra luxurious? Remove the pears and crank the heat to medium-high. Let it bubble away for 5-10 minutes until it thickens slightly—it’ll coat the back of a spoon when it’s ready. Drizzle this over your pears when serving, and watch everyone’s eyes light up!
Tips for Perfect Poached Pears
After making these dozens of times (yes, I’m obsessed), here are my foolproof tips:
- Pick the right pears: They should yield slightly when pressed near the stem—too hard won’t soften nicely, too soft will turn to mush.
- Taste as you go: The syrup should be sweeter than you think—the pears will balance it out.
- Keep the heat low: A gentle simmer prevents the pears from breaking apart.
- Save that syrup! It’s liquid gold for cocktails, oatmeal, or even drizzling over pancakes.
Trust me—these little tricks make all the difference between good and “wow!” poached pears.
Variations for Poached Pears
The best part about this recipe is how easily you can make it your own! Swap the cinnamon stick for a star anise or a few cardamom pods for a totally different vibe. Or try using red wine instead of water for a deep, rich color and flavor. I love serving mine with a scoop of vanilla bean ice cream—the warm pears and cold cream are just magic together.
Serving Suggestions for Poached Pears
Oh, the fun part—dressing these beauties up! I love plating them still warm with a dollop of barely-sweetened whipped cream melting lazily down the sides. For crunch, a handful of toasted almonds or hazelnuts adds the perfect contrast. Feeling fancy? A drizzle of that reduced syrup and a tiny scoop of vanilla bean ice cream turns them into pure elegance. And if you really want to impress, serve with a glass of Sauternes or Moscato—the wine’s honeyed notes make the pears sing. Honestly? Sometimes I eat them straight from the fridge at midnight with a spoon. No judgment here!
Storing and Reheating Poached Pears
Here’s the great news—these poached pears actually get better after sitting in their syrup overnight! Just transfer them (with their liquid) to an airtight container in the fridge, where they’ll keep happily for up to 4 days. To reheat, gently warm them in a saucepan over low heat with a splash of water to loosen the syrup. Or my lazy trick? Microwave individual servings for 20-30 seconds until just cozy. Either way, they’ll taste like you just made them!
Poached Pears Nutritional Information
Nutritional values are estimates per serving (1 pear): 180 calories, 35g sugar, 0g fat, 4g fiber. Adjustments may vary based on syrup reduction or added toppings. Enjoy guilt-free indulgence!
Frequently Asked Questions
Can I use canned pears?
Oh honey, I get this one a lot! Fresh is definitely best here—canned pears are already too soft and will turn to mush when poached. But in a pinch? Try peeled, very firm fresh apples instead!
How long do poached pears keep?
They’re superstars in the fridge! Stored in their syrup in an airtight container, they’ll stay perfect for up to 4 days. Honestly? The flavors get even better after a night’s rest.
Can I freeze poached pears?
You bet! Freeze them in their syrup for up to 2 months. Thaw overnight in the fridge, then gently rewarm—though I’ll warn you, the texture gets slightly softer.
What if my syrup is too sweet?
No worries! Just add an extra squeeze of lemon juice to balance it out. Next time, you can reduce the sugar to ¾ cup—the pears will still soak up plenty of flavor.
Help! My pears aren’t tender yet!
Patience, friend! Some pears are stubborn. Just keep simmering (covered!) in 5-minute increments until that knife slides in smoothly. They’ll get there!
4-Ingredient Poached Pears Recipe: Irresistible Dessert
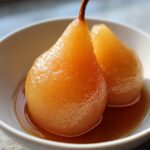
A simple and elegant dessert featuring pears poached in a sweet syrup.
- Prep Time: 10 mins
- Cook Time: 20 mins
- Total Time: 30 mins
- Yield: 4 servings 1x
- Category: Dessert
- Method: Poaching
- Cuisine: French
- Diet: Vegetarian
Ingredients
- 4 firm pears
- 2 cups water
- 1 cup sugar
- 1 cinnamon stick
- 1 vanilla bean
- 1 lemon (peel and juice)
Instructions
- Peel the pears, leaving stems intact.
- In a saucepan, combine water, sugar, cinnamon stick, vanilla bean, and lemon peel.
- Bring mixture to a simmer, stirring until sugar dissolves.
- Add pears to the syrup.
- Cover and simmer for 15-20 minutes until tender.
- Remove pears and reduce syrup if desired.
- Serve pears warm or chilled with syrup.
Notes
- Use ripe but firm pears.
- Adjust sweetness by reducing sugar.
- Add spices like star anise for variation.
Nutrition
- Serving Size: 1 pear
- Calories: 180
- Sugar: 35g
- Sodium: 5mg
- Fat: 0g
- Saturated Fat: 0g
- Unsaturated Fat: 0g
- Trans Fat: 0g
- Carbohydrates: 45g
- Fiber: 4g
- Protein: 0g
- Cholesterol: 0mg