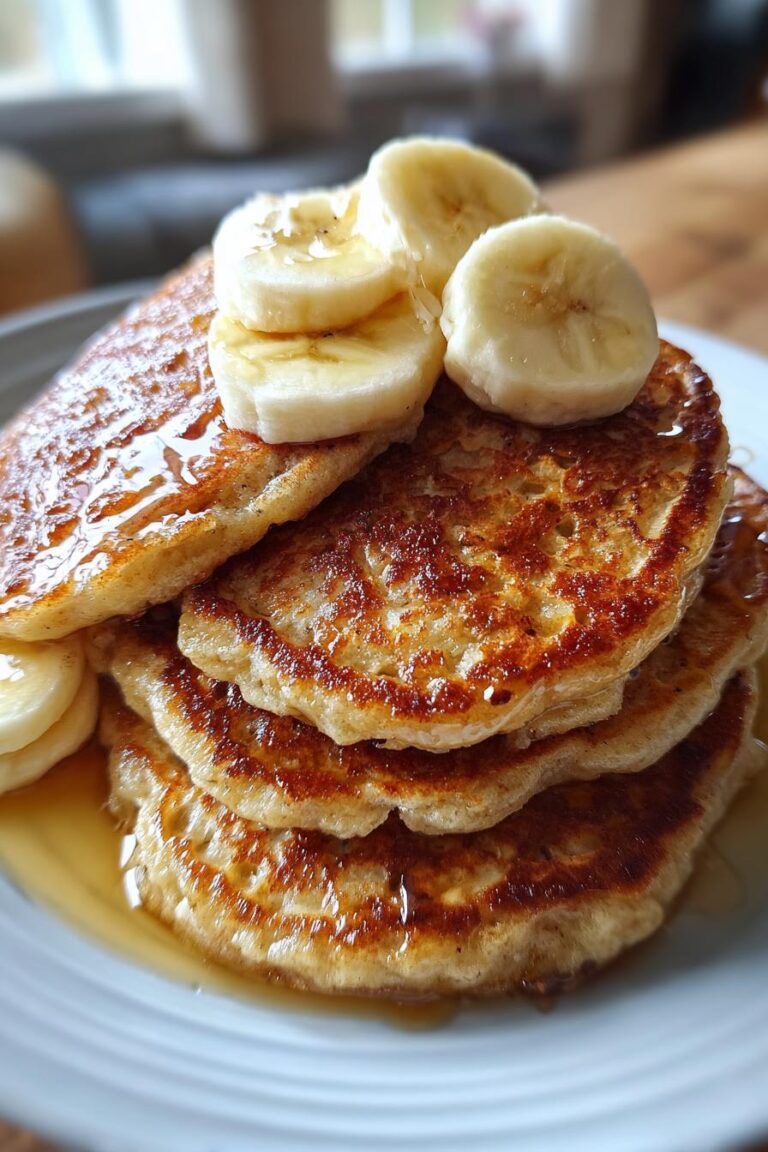
Fluffy Almond Flour Pancakes: 5 Secrets for Perfect Fluff
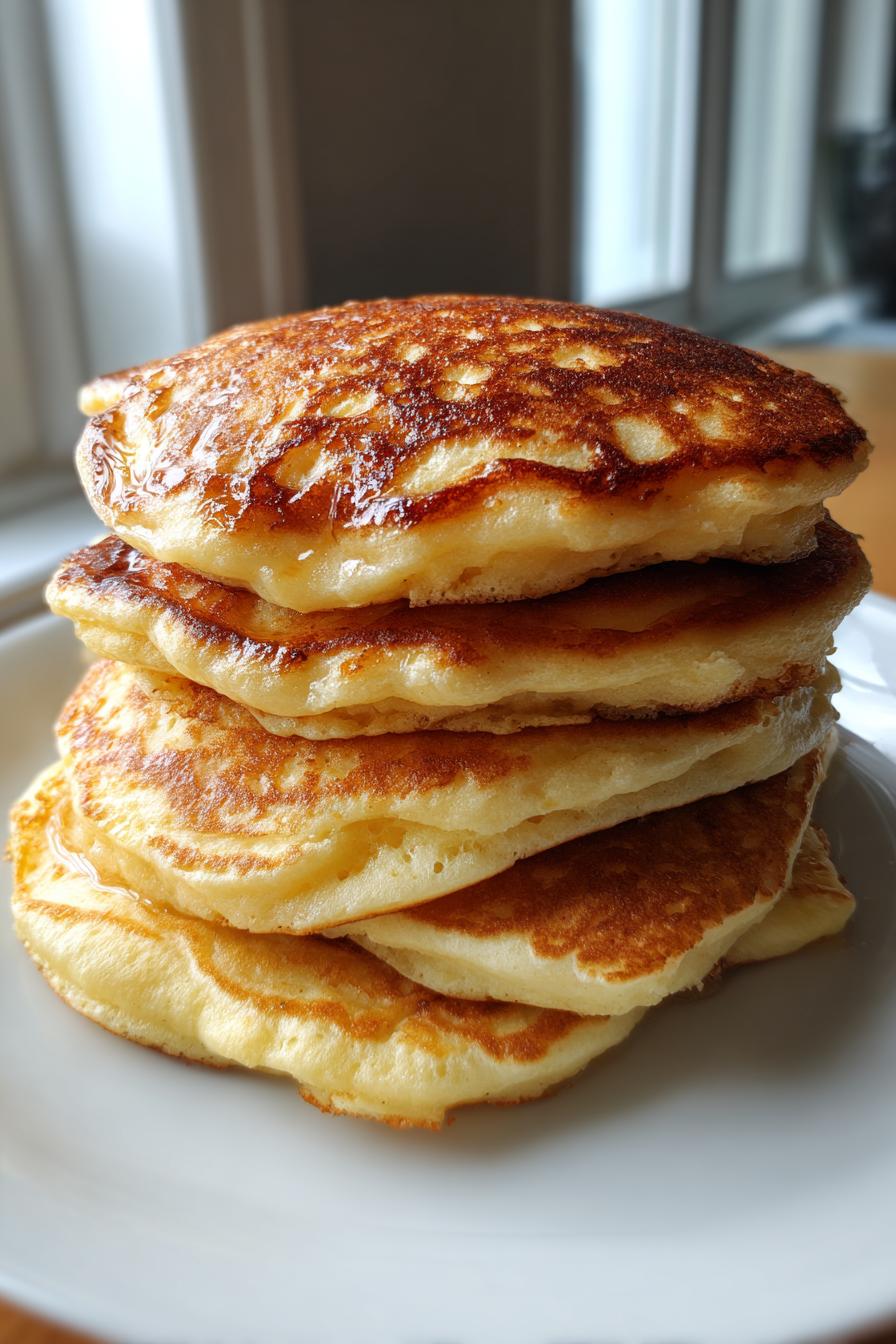
Okay, I’ll admit it—I used to think gluten-free pancakes were doomed to be dense little hockey pucks. Then I discovered the magic of fluffy almond flour pancakes, and wow, was I wrong! These golden little clouds are my go-to weekend treat now—light, protein-packed, and ridiculously easy to whip up. The almond flour gives them this subtly nutty flavor that’s just *chef’s kiss* with a drizzle of honey. Plus, they’re so forgiving—no stressing over exact measurements like with traditional flour. My kids devour them (especially when I sneak in some blueberries), and honestly? I don’t miss regular pancakes one bit.
Why You’ll Love These Fluffy Almond Flour Pancakes
Let me count the ways these pancakes will become your new breakfast obsession. First off, they’re gluten-free but don’t taste like cardboard—trust me, I’ve suffered through enough bad GF recipes to know the difference. The almond flour gives them this beautiful tenderness that regular pancakes just can’t match. Plus, each bite packs a protein punch that’ll keep you full till lunch (no 10:30 stomach growling here!).
But here’s my favorite part: they’re stupid easy to make. Five minutes of mixing, ten minutes of cooking, and boom—you’ve got a stack of golden, nutty perfection. No fancy techniques, no weird ingredients hiding in your pantry. Just simple, wholesome goodness that even picky eaters adore. Oh, and did I mention they’re basically begging to be smothered in maple syrup?
Ingredients for Fluffy Almond Flour Pancakes
Okay, let’s talk ingredients – and I mean the good stuff that makes these pancakes so darn fluffy and delicious. I’ve made this recipe a zillion times, and here’s what I’ve learned: quality matters, but you don’t need anything fancy. Just grab these simple staples from your kitchen:
- 1 cup almond flour (blanched, finely ground) – This is our MVP! The finer the grind, the better the texture. I always keep an extra bag in my freezer for pancake emergencies (yes, those exist in my house).
- 2 large eggs – Room temperature works best, but I’ve used cold eggs straight from the fridge in a pinch – still turns out great!
- ¼ cup unsweetened almond milk – Any nut milk works, but almond keeps the flavor consistent. If you’re out, water does the trick in a crunch.
- 1 tablespoon honey – The perfect touch of sweetness. When I’m feeling fancy, I’ll use maple syrup instead – just reduce the almond milk by a teaspoon since it’s thinner.
- 1 teaspoon baking powder – Our fluffy-maker! Make sure yours is fresh, or your pancakes might not rise to their full potential.
- ½ teaspoon vanilla extract – The secret background flavor that makes everyone say “what’s that delicious taste?”
- Pinch of salt – Don’t skip this! It balances all the flavors beautifully.
See? Nothing weird or hard-to-find. I love that I can whip these up without a special grocery run. Pro tip: measure your almond flour by spooning it into the cup and leveling it off – packing it down too much makes the batter too thick. Now let’s get mixing!
How to Make Fluffy Almond Flour Pancakes
Alright, let’s get cooking! I’ve burned my fair share of pancakes over the years (who hasn’t?), but I’ve nailed down the perfect method for these almond flour beauties. The secret? Patience and medium heat – don’t rush it! Here’s exactly how I make them every Saturday morning while still half-asleep.
Step 1: Mix Wet Ingredients
Grab your favorite mixing bowl – I use my grandma’s old yellow Pyrex one because it makes me happy. Crack in those two eggs and whisk them like you mean it until they’re nice and frothy. Then pour in the almond milk, honey, and vanilla. Keep whisking until everything’s completely smooth and the honey isn’t sticking to the bottom anymore. You’ll know it’s ready when it looks like liquid gold and smells like breakfast heaven.
Step 2: Combine Dry Ingredients
Now for the magic dust! Sprinkle in your almond flour, baking powder, and salt. Here’s my trick: I gently fold everything together with a rubber spatula instead of whisking. Why? Because overmixing almond flour batter can make your pancakes dense – and we want fluffy clouds, remember? Mix just until you don’t see any dry patches, but don’t stress about a few tiny lumps. Let the batter sit for about 2 minutes while your pan heats up – this gives the baking powder time to work its magic.
Step 3: Cook to Perfection
Heat your non-stick pan over medium heat – not high, not low, but right in that sweet spot. Test it by flicking a drop of water – if it sizzles gently, you’re golden. Pour about ¼ cup of batter for each pancake (I use my trusty ice cream scoop for perfect circles). Now here comes the hard part: don’t touch them! Wait until you see bubbles forming across the surface and the edges look set – about 2-3 minutes. Then flip with confidence! They’ll need another minute or so on the second side until they’re that perfect golden brown. If your first pancake isn’t perfect, don’t worry – it’s the chef’s snack while you perfect the rest!
Pro tip: Keep finished pancakes warm in a 200°F oven while you cook the rest. And whatever you do, resist the urge to press them down with the spatula – we want them tall and proud!
Tips for the Best Fluffy Almond Flour Pancakes
Listen, I’ve made every pancake mistake in the book – from hockey-puck disasters to burnt offerings – so you don’t have to! Here are my hard-earned secrets for perfect almond flour pancakes every single time:
The 2-minute patience rule
After mixing the batter, let it sit for 2 minutes before cooking. I know, I know – waiting is torture when you’re hungry, but trust me! This gives the baking powder time to activate and the almond flour a chance to absorb liquid. The difference is night and day – you’ll get pancakes that rise like little golden pillows instead of sad, flat discs.
Your pan is your best friend
That non-stick pan isn’t just a suggestion – it’s essential. Almond flour loves to stick, so I either use my well-seasoned cast iron or a quality non-stick. No pan grease needed if your surface is good, but if you’re nervous, a tiny swipe of coconut oil works wonders. And remember – medium heat is the sweet spot! Too hot and they’ll burn before cooking through; too low and they won’t get that perfect golden crust.
The flip test you need to know
Here’s how I know exactly when to flip: wait until bubbles form across the entire surface and the edges look matte instead of shiny. If you try to flip too early, you’ll have a gooey mess. Too late? Well, let’s just say I’ve sacrificed many pancakes to the over-browning gods. The first flip is always the trickiest – consider it your warm-up pancake!
Freeze like a pro
These pancakes freeze amazingly for busy mornings! I lay cooled pancakes in a single layer on a baking sheet, freeze until solid (about an hour), then stack them with parchment paper between each one in a freezer bag. To reheat? Just pop them straight in the toaster – they come out tasting fresh as the day I made them. My kids think I’m a morning wizard when I “magically” produce pancakes on school days!
Fluffy Almond Flour Pancakes Variations
Now for the fun part—let’s get creative! One of my favorite things about this recipe is how easily you can switch it up. Some mornings call for classic pancakes, others need a little pizzazz. Here are all the ways I’ve tweaked these over the years (and lived to tell the tasty tale):
Mix-in madness
When my kids are feeling adventurous, we turn pancake-making into a choose-your-own-adventure breakfast. Try folding in:
- Blueberries (fresh or frozen – just pat dry first!) – my daughter calls these “purple surprise pancakes”
- Chocolate chips (because who doesn’t love chocolate for breakfast?) – I use mini chips so they distribute evenly
- Mashed banana (about half a ripe one) – makes them extra moist and slightly sweet
- Chopped nuts (pecans or walnuts are my faves) – adds the best crunch
- Pumpkin spice (1 tsp cinnamon + pinch each of nutmeg, ginger, cloves) – autumn in pancake form
Liquid swaps that work
Ran out of almond milk? No panic! I’ve successfully used:
- Coconut milk (the canned kind, shaken well) – gives a subtle tropical vibe
- Regular dairy milk (if you’re not strictly dairy-free) – works like a charm
- Cold brew coffee (for grown-up pancakes!) – pair with chocolate chips for mocha magic
- Orange juice (cut with a little water) – makes them taste like a creamsicle
Flavor boosters
Sometimes I’ll add one of these to the batter for an extra flavor kick:
- Lemon zest (about 1 tsp) + poppy seeds – so bright and fresh
- Almond extract (just ¼ tsp) – doubles down on that nutty goodness
- Cinnamon (½ tsp) – classic comfort flavor
- Cocoa powder (1 tbsp) – for chocolate lovers (reduce flour by 1 tbsp)
The best part? You can mix and match these ideas! Last Sunday I made cinnamon-blueberry with coconut milk pancakes, and my husband still talks about them. Just remember – the more add-ins you use, the thicker your batter gets, so you might need to add an extra splash of liquid. Now go forth and pancake creatively!
Serving Suggestions
Oh, the topping possibilities! I love setting up a little pancake topping bar on lazy weekends – it makes breakfast feel like a party. My absolute must-haves? A drizzle of warm maple syrup (the real stuff, please!), a dollop of almond butter that melts into the nooks and crannies, and a handful of fresh berries for that pop of color and tartness.
But don’t stop there! Sliced bananas with a sprinkle of cinnamon, coconut flakes toasted to golden perfection, or even a scoop of Greek yogurt with honey make these pancakes feel extra special. My kids go wild when I make “pancake tacos” – fold them in half with peanut butter and banana slices inside. Breakfast just got way more fun!
Storing and Reheating Fluffy Almond Flour Pancakes
Okay, confession time – I always make a double batch of these pancakes because they’re even better the next day! Here’s exactly how I store and revive them so they taste freshly made:
Fridge storage (short-term)
For pancakes you’ll eat within 2 days (ha – like they last that long in my house!), stack them with parchment paper between each one in an airtight container. This keeps them from sticking together like glue. Pro tip: let them cool completely first – trapping steam makes them soggy. I usually pop the container in the fridge and then sneak pieces cold as midnight snacks (don’t judge me!).
Freezer magic (long-term)
Freezing is where these pancakes really shine! Lay them in a single layer on a baking sheet (not touching) and freeze until solid – about 1 hour. Then transfer to a freezer bag with parchment dividers. They’ll keep for up to 3 months this way – perfect for emergency breakfasts when you oversleep!
Reheating like a pro
My favorite methods:
- Toaster: Straight from freezer to toaster – the edges get delightfully crisp while the middle stays fluffy. Watch them closely though – almond flour browns faster than regular pancakes!
- Oven: 350°F for 5-8 minutes on a baking sheet (great for bigger batches). I sometimes brush them with a tiny bit of melted butter first for extra yum.
- Skillet: Medium heat with a pat of butter – gives them that fresh-off-the-griddle taste again.
Microwave works in a pinch (15-20 seconds per pancake), but they’ll lose some crispness. No matter how you reheat, I recommend adding toppings after warming – nobody wants melty syrup all over their toaster!
Fluffy Almond Flour Pancakes FAQs
Can I use coconut flour instead of almond flour?
Oh boy, I learned this one the hard way! Coconut flour does not work as a 1:1 substitute – it’s a thirsty flour that soaks up way more liquid. If you must use it, try replacing just ¼ cup of the almond flour with coconut flour and add an extra egg. But honestly? The texture won’t be nearly as fluffy. Stick with almond flour if you can – your pancakes will thank you!
Why did my pancakes fall apart when flipping?
This happened to me constantly until I figured out two things: temperature and patience. If your pan’s too hot, they’ll brown before setting properly. Wait until you see bubbles across the entire surface (not just the edges!) before flipping. And here’s my secret weapon – slide your spatula all the way under the pancake with confidence! A wimpy flip is a recipe for disaster.
Can I make these pancakes vegan?
I’ve experimented with flax eggs (1 tbsp ground flax + 3 tbsp water per egg), and while they work okay, the texture’s not quite as light. The pancakes will still taste good but might be a bit denser. If you try it, let the batter rest for 5 minutes to thicken. For best results, stick with eggs – but I totally get if dietary needs require substitutions!
Why are my pancakes so dense?
Three likely culprits: 1) You overmixed the batter (fold gently, don’t beat it!), 2) Your baking powder’s expired (test it by mixing ½ tsp with hot water – it should bubble), or 3) You packed the almond flour when measuring (always spoon it lightly into the cup). My first batch was like eating tasty bricks until I figured this out!
Can I make the batter ahead of time?
You can, but I don’t recommend it. Almond flour batter thickens a lot as it sits – after 30 minutes, you’ll need to thin it with extra milk. If you must prep ahead, mix just the dry and wet ingredients separately, then combine them right before cooking. Fresh batter = fluffiest pancakes!
Nutritional Information
Let’s talk numbers – but don’t worry, these pancakes are still totally guilt-free! Here’s the scoop on what you’re getting in each delicious bite (based on 2 pancakes, because let’s be real – who stops at one?). Keep in mind these are estimates – your exact numbers might vary depending on the brands you use:
- 240 calories – Perfect fuel to start your day without weighing you down
- 18g healthy fats – Mostly from the almond flour (the good kind of fat!)
- 10g protein – Thanks to those eggs and almond flour – way more than regular pancakes!
- 12g carbs – With 4g coming from fiber, so it’s not all sugar
- 6g sugar – Mostly from the honey (you can reduce this if you prefer)
A quick disclaimer: Nutritional values are estimates and vary based on brands used. For example, different almond flours can have slightly different fat contents, and your honey might be sweeter than mine. But here’s what I love – even with variations, these pancakes are always packed with better-for-you ingredients than traditional flour pancakes. No sugar crashes here!
Pro tip: If you’re watching carbs, try swapping the honey for a sugar-free maple syrup in the batter – just reduce the almond milk by a teaspoon since it’s thinner. And for extra protein? Stir in a scoop of vanilla protein powder (reduce almond flour by 2 tablespoons). Breakfast just got a whole lot smarter!
PrintFluffy Almond Flour Pancakes: 5 Secrets for Perfect Fluff

Fluffy almond flour pancakes are a nutritious and delicious alternative to traditional pancakes. They are gluten-free and packed with protein, making them a great breakfast option.
- Prep Time: 5 mins
- Cook Time: 10 mins
- Total Time: 15 mins
- Yield: 6 pancakes 1x
- Category: Breakfast
- Method: Stovetop
- Cuisine: American
- Diet: Gluten Free
Ingredients
- 1 cup almond flour
- 2 eggs
- 1/4 cup almond milk
- 1 tbsp honey
- 1 tsp baking powder
- 1/2 tsp vanilla extract
- Pinch of salt
Instructions
- Whisk eggs, almond milk, honey, and vanilla in a bowl.
- Add almond flour, baking powder, and salt. Mix well.
- Heat a non-stick pan over medium heat.
- Pour 1/4 cup batter for each pancake.
- Cook until bubbles form, then flip and cook the other side.
- Serve warm with your favorite toppings.
Notes
- Use a non-stick pan for best results.
- Adjust sweetness by adding more or less honey.
- Store leftovers in the fridge for up to 2 days.
Nutrition
- Serving Size: 2 pancakes
- Calories: 240
- Sugar: 6g
- Sodium: 180mg
- Fat: 18g
- Saturated Fat: 2g
- Unsaturated Fat: 14g
- Trans Fat: 0g
- Carbohydrates: 12g
- Fiber: 4g
- Protein: 10g
- Cholesterol: 93mg