Spooky 12-Minute Ghoulish Marshmallow Cookies Kids Love
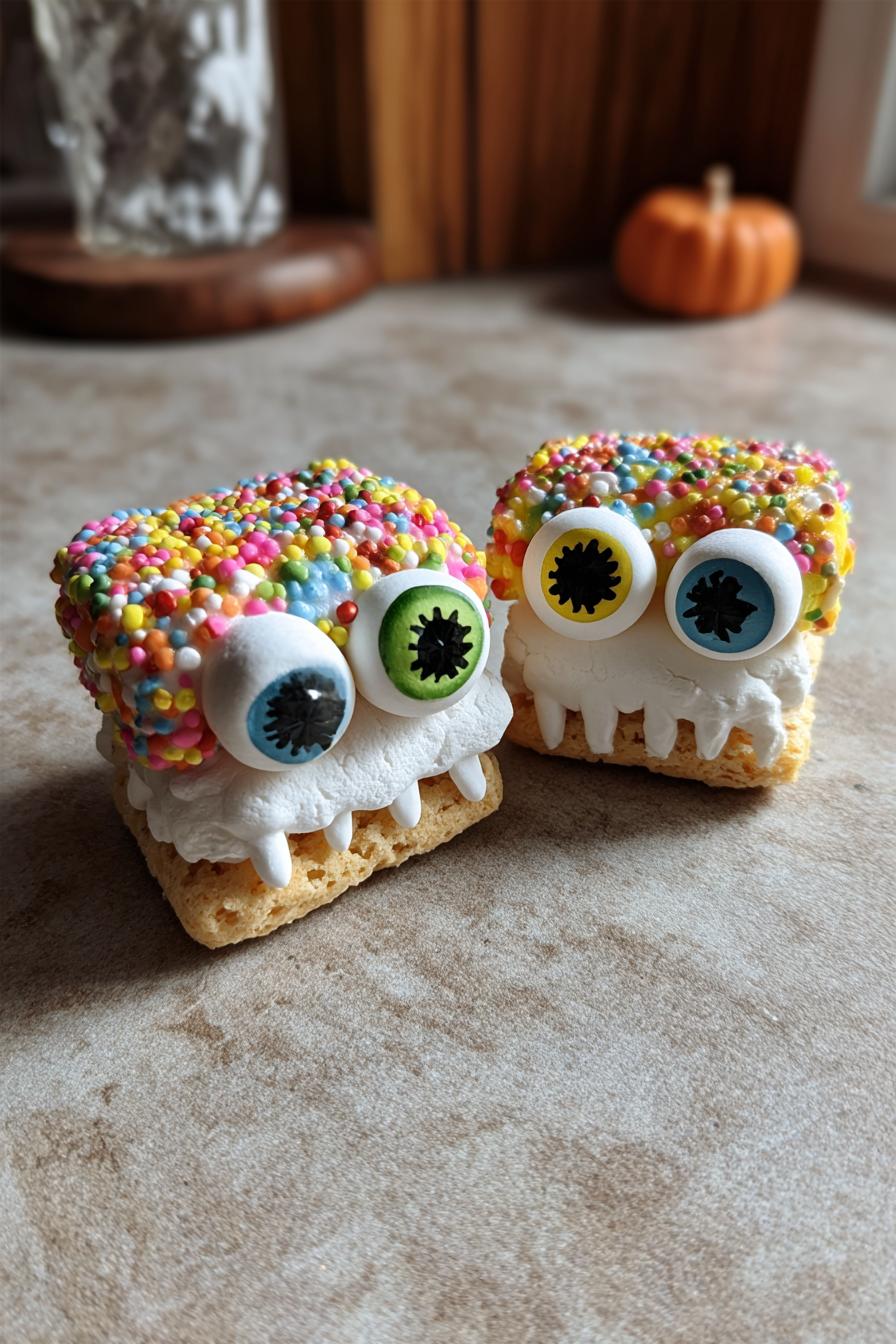
Picture this: It’s Halloween night, the air smells like cinnamon and mischief, and you’re pulling a tray of screamingly cute ghoulish marshmallow cookies from the oven. That marshmallow topping? Pure edible magic – it puffs up slightly in the oven, just waiting for you to drizzle melted chocolate “veins” and stick on those creepy edible eyeballs (always my kids’ favorite part).
I’ve been making these spooky treats every October since my niece was tall enough to reach the counter. What started as a messy kitchen experiment (oh, the melted marshmallow disasters we survived!) became our can’t-miss Halloween tradition. The best part? They’re shockingly easy – no fancy piping skills needed, just sticky fingers and a love for all things haunted.
These cookies disappear faster than ghosts at sunrise at our neighborhood parties. Last year, I caught three grown adults sneaking extras when they thought no one was looking. That’s when you know you’ve got a keeper recipe!
Why You’ll Love These Ghoulish Marshmallow Cookies
These cookies are more than just a treat – they’re a Halloween experience! Here’s why they’ll become your new go-to spooky dessert:
- Perfectly spooky: The marshmallow “ghosts” and chocolate drizzle make them a hit at parties. Kids go wild for the edible eyeballs!
- Super easy: No fancy skills needed. Just mix, bake, and decorate. Even the messiest bakers can nail these.
- Kid-approved: Little hands love pressing marshmallows onto the cookies and adding decorations. It’s a fun activity and dessert in one.
- Deliciously simple: The soft cookie base with gooey marshmallow topping is pure comfort food with a creepy twist.
- Crowd-pleaser: They disappear fast at Halloween gatherings. Trust me, you’ll want to make a double batch!
Ingredients for Ghoulish Marshmallow Cookies
Here’s what you’ll need to whip up these spooky treats. Trust me, most of this is probably already in your pantry – just grab some marshmallows, and you’re halfway there!
- 1 cup all-purpose flour: The base of our cookie dough. No need to sift, just measure and go!
- 1/2 cup unsalted butter, softened: Leave it out for about 30 minutes before baking. It should be soft but not melted.
- 1/2 cup granulated sugar: Just enough sweetness to balance the marshmallow and chocolate.
- 1 egg: Room temperature works best – it helps everything mix smoothly.
- 1 tsp vanilla extract: A splash of vanilla makes the cookies taste extra cozy.
- 1/2 tsp baking powder: Just a little lift to keep the cookies tender.
- 1/4 tsp salt: Don’t skip this! It balances the sweetness and makes the flavors pop.
- 12 large marshmallows, halved: These are your “ghosts.” Cut them carefully with clean scissors for the best results.
- 1/2 cup chocolate chips, melted: Perfect for drizzling those spooky “veins.” Milk or dark chocolate both work great.
- Edible eyeball decorations (optional): These are the finishing touch! You can find them at baking supply stores or online.
See? Nothing too fancy – just simple ingredients that come together in the most deliciously creepy way. Let’s get baking!
How to Make Ghoulish Marshmallow Cookies
Ready to turn your kitchen into a haunted bakery? These cookies come together faster than you can say “Boo!” Just follow these simple steps – I’ve made every mistake so you don’t have to!
Preparing the Dough
First things first: Preheat your oven to 350°F (175°C). Line your baking sheet with parchment paper – trust me, you’ll thank me later when cleanup takes two seconds!
Now grab your mixing bowl and let’s cream that butter and sugar together. Beat them until they’re light and fluffy – about 2 minutes with a mixer, or 3-4 if you’re going old-school with a wooden spoon like I sometimes do. The mixture should look pale yellow and leave trails when you lift the spoon.
Crack in your egg and add that vanilla extract. Mix until just combined – don’t overdo it! In another bowl, whisk together your flour, baking powder, and salt. Slowly add these dry ingredients to your butter mixture, stirring gently until a soft dough forms. It should pull away from the sides of the bowl but still feel slightly sticky.
Roll the dough into 12 equal balls (about 1 tablespoon each) and place them on your prepared baking sheet. Gently flatten each one slightly – these aren’t sugar cookies, so perfect circles aren’t necessary!
Baking and Decorating
Slide those cookie dough balls into your preheated oven and bake for 8-10 minutes. You’ll know they’re ready when the edges turn golden but the centers still look slightly soft. Here comes the fun part!
Pull the baking sheet out and immediately press a marshmallow half onto each cookie, sticky side down. Work quickly – the residual heat helps them stick! Return the tray to the oven for just 2 more minutes. Watch closely – the marshmallows should puff up slightly but not melt completely (been there, done that – not cute!).
Let them cool for 5 minutes before the final decorating touches. Melt your chocolate chips (30 seconds in the microwave, stirring halfway) and drizzle it over the marshmallows with a spoon or piping bag. Immediately add edible eyeballs while the chocolate’s still wet if you’re using them. Now try not to eat them all before they cool completely – I dare you!
Tips for Perfect Ghoulish Marshmallow Cookies
After countless batches (and a few hilarious marshmallow mishaps), I’ve learned all the tricks to make these cookies scream-worthy every time:
- Underbake slightly: Pull the cookies at 8 minutes if you love chewiness – they’ll firm up as they cool.
- White chocolate magic: Swap dark chocolate for white chocolate drizzle with black food coloring for extra-spooky “cobwebs.”
- Scissor trick: Spray kitchen scissors with cooking spray before cutting marshmallows – no sticking!
- Chill the dough: If your kitchen’s warm, refrigerate dough balls for 15 minutes before baking to prevent spreading.
- Double the eyeballs: Buy extra decorations – trust me, half will “mysteriously disappear” before decorating!
Remember – imperfect cookies taste just as good (maybe better)!
Storing and Serving Ghoulish Marshmallow Cookies
These cookies are best enjoyed fresh, but if you miraculously have leftovers (trust me, it’s rare!), store them in an airtight container at room temperature for up to 3 days. The marshmallows might lose their puffiness, but they’ll still taste delicious. For serving, arrange them on a creepy platter with some fake spider webs or Halloween-themed napkins – they’re a total showstopper at parties. Pro tip: make them the day of your Halloween bash for maximum marshmallow gooeyness. Your guests will be screaming for seconds!
Ghoulish Marshmallow Cookies Variations
Want to put your own spooky spin on these cookies? Try these fun twists! Add a few drops of orange food coloring to the dough for pumpkin-colored ghosts. Swap regular marshmallows for strawberry-flavored ones to make “bloody” ghosts – kids go crazy for these! For a nutty crunch, press chopped pecans around the marshmallow edges before baking. My personal favorite? Using black cocoa powder in the dough for “graveyard” cookies that look eerily delicious. The haunting possibilities are endless!
Ghoulish Marshmallow Cookies Nutritional Information
Okay, let’s be real – nobody eats Halloween treats for their health benefits! But since you asked (or maybe your conscience did), here’s the scoop: Each ghoulish marshmallow cookie clocks in at about 150 calories, with 6g fat and 22g carbs. These are estimates – your eyeball decorations might add a few more! Enjoy in spooky moderation.
FAQs About Ghoulish Marshmallow Cookies
Got questions about these spooky treats? I’ve got answers – straight from my years of marshmallow mishaps and cookie catastrophes!
Can I use mini marshmallows instead?
Absolutely! Use 2-3 minis per cookie – they’ll melt together into one adorable ghost. Just watch them closely in the oven since they toast faster.
How do I prevent the marshmallows from sticking to everything?
Lightly spray your fingers with cooking spray before pressing marshmallows onto the cookies. For cutting, use kitchen shears dusted with powdered sugar.
Can I make these ahead of time?
The dough balls keep great in the fridge for 2 days or freezer for a month. But decorate the day you’ll serve them for the freshest “boo-tiful” ghosts!
Why did my marshmallows melt completely?
Too long in the oven! Stick to exactly 2 minutes after adding them. If they over-melt, call them “ghost puddles” – still tasty!
No edible eyeballs – what can I use instead?
Get creative! Chocolate chips, mini M&Ms, or even raisins make great makeshift monster eyes in a pinch.
Share Your Spooky Creations
I want to see your ghoulish masterpieces! Tag me on Instagram @SpookyBaker when you post photos of your marshmallow ghosts – I’ll feature my favorites in my stories! Nothing makes me happier than seeing how you put your own creepy spin on these cookies. Did your little monsters add extra eyeballs? Make rainbow ghosts? I’m dying to see!
PrintSpooky 12-Minute Ghoulish Marshmallow Cookies Kids Love
Spooky and delicious ghoulish marshmallow cookies perfect for Halloween.
- Prep Time: 15 minutes
- Cook Time: 12 minutes
- Total Time: 27 minutes
- Yield: 12 cookies 1x
- Category: Dessert
- Method: Baking
- Cuisine: American
- Diet: Vegetarian
Ingredients
- 1 cup all-purpose flour
- 1/2 cup unsalted butter, softened
- 1/2 cup granulated sugar
- 1 egg
- 1 tsp vanilla extract
- 1/2 tsp baking powder
- 1/4 tsp salt
- 12 large marshmallows, halved
- 1/2 cup chocolate chips, melted
- Edible eyeball decorations (optional)
Instructions
- Preheat oven to 350°F (175°C). Line a baking sheet with parchment paper.
- In a bowl, cream butter and sugar until light and fluffy.
- Add egg and vanilla extract. Mix well.
- In a separate bowl, whisk flour, baking powder, and salt.
- Gradually add dry ingredients to the wet mixture. Mix until combined.
- Roll dough into small balls and place on the baking sheet. Flatten slightly.
- Bake for 8-10 minutes until edges are golden.
- Remove from oven and press a marshmallow half onto each cookie.
- Return to oven for 2 minutes to soften marshmallows.
- Drizzle melted chocolate over marshmallows and add edible eyeballs if desired.
- Let cool before serving.
Notes
- Store in an airtight container for up to 3 days.
- For a chewier texture, slightly underbake the cookies.
- Use white chocolate for a spookier effect.
Nutrition
- Serving Size: 1 cookie
- Calories: 150
- Sugar: 10g
- Sodium: 50mg
- Fat: 6g
- Saturated Fat: 3.5g
- Unsaturated Fat: 2g
- Trans Fat: 0g
- Carbohydrates: 22g
- Fiber: 0.5g
- Protein: 2g
- Cholesterol: 25mg