Gluten Free Artisan Bread: Enjoy Deliciously Healthy Loaves!
Introduction to Gluten Free Artisan Bread
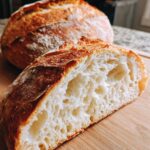
Welcome to the world of gluten free artisan bread, where deliciousness meets health! As a busy mom, I know how challenging it can be to whip up something that everyone will love, especially when gluten sensitivities are in play. This recipe is a lifesaver, offering a quick solution for those hectic days when you want to impress your loved ones without spending hours in the kitchen. Imagine the aroma of freshly baked bread wafting through your home, bringing smiles to your family’s faces. Let’s dive into this delightful journey of baking together!
Why You’ll Love This Gluten Free Artisan Bread
This gluten free artisan bread is not just easy to make; it’s a game changer for busy lives. With just a few simple steps, you can create a warm, crusty loaf that’s perfect for sandwiches or toasting. The taste? Oh, it’s heavenly! You’ll savor every bite, and your family will be begging for more. Plus, it’s a healthy option that everyone can enjoy, making it a win-win for your kitchen!
Ingredients for Gluten Free Artisan Bread
Gathering the right ingredients is the first step to creating your gluten free artisan bread masterpiece. Here’s what you’ll need:
- Gluten-free all-purpose flour: This is the star of the show! It provides the structure and texture you crave in bread. Look for a blend that includes xanthan gum for better results.
- Warm water: This helps activate the yeast. Make sure it’s not too hot; think of it as a cozy bath for the yeast!
- Olive oil: Adds moisture and a lovely flavor. You can substitute it with melted coconut oil or avocado oil if you prefer.
- Honey: A touch of sweetness that balances the flavors. Maple syrup or agave nectar can work as alternatives.
- Salt: Essential for enhancing the bread’s flavor. Don’t skip this step; it’s like the seasoning in a good soup!
- Active dry yeast: This is what makes your bread rise and gives it that delightful texture. Make sure it’s fresh for the best results.
- Apple cider vinegar: This adds a subtle tang and helps with the bread’s rise. You can use lemon juice if you’re out of vinegar.
For exact measurements, check the bottom of the article where you can find everything listed for easy printing. Happy baking!
How to Make Gluten Free Artisan Bread
Now that you have your ingredients ready, let’s get to the fun part—making your gluten free artisan bread! Follow these simple steps, and you’ll be on your way to enjoying a warm, crusty loaf in no time.
Step 1: Prepare the Yeast Mixture
Start by combining warm water, honey, and active dry yeast in a small bowl. Stir gently and let it sit for about 5 minutes. You want to see it become frothy, like a bubbly potion! This means your yeast is alive and ready to work its magic.
Step 2: Mix Dry Ingredients
In a large mixing bowl, combine your gluten-free all-purpose flour and salt. Whisk them together until they’re well blended. This step is crucial because it ensures that the salt is evenly distributed, enhancing the flavor of your bread.
Step 3: Combine Mixtures
Now, it’s time to bring everything together! Pour the frothy yeast mixture into the bowl with the flour and salt. Add the olive oil and apple cider vinegar. Mix everything until a dough forms. It should be slightly sticky, like a friendly hug that’s just a bit too tight!
Step 4: Form the Dough
Continue mixing until the dough comes together. You can use a spatula or your hands for this. Don’t worry if it feels a bit different from traditional bread dough; gluten-free dough has its own personality!
Step 5: Let It Rise
Cover the bowl with a damp cloth and place it in a warm spot. Let it rise for about 1 hour. This is when the dough will puff up, thanks to the yeast working hard. It’s like giving your dough a cozy nap!
Step 6: Preheat the Oven
While your dough is rising, preheat your oven to 375°F (190°C). This step is important because a hot oven helps create that beautiful crust we all love. Think of it as warming up the stage for your bread’s big performance!
Step 7: Shape the Dough
Once the dough has risen, transfer it to a greased loaf pan. Shape it as desired—whether you want a classic loaf or a rustic round shape, it’s up to you! Just remember, a little love goes a long way in shaping your bread.
Step 8: Bake the Bread
Pop the loaf into the preheated oven and bake for 30-35 minutes. Keep an eye on it; you want the top to turn a lovely golden brown. The aroma will fill your kitchen, making it hard to resist sneaking a taste!
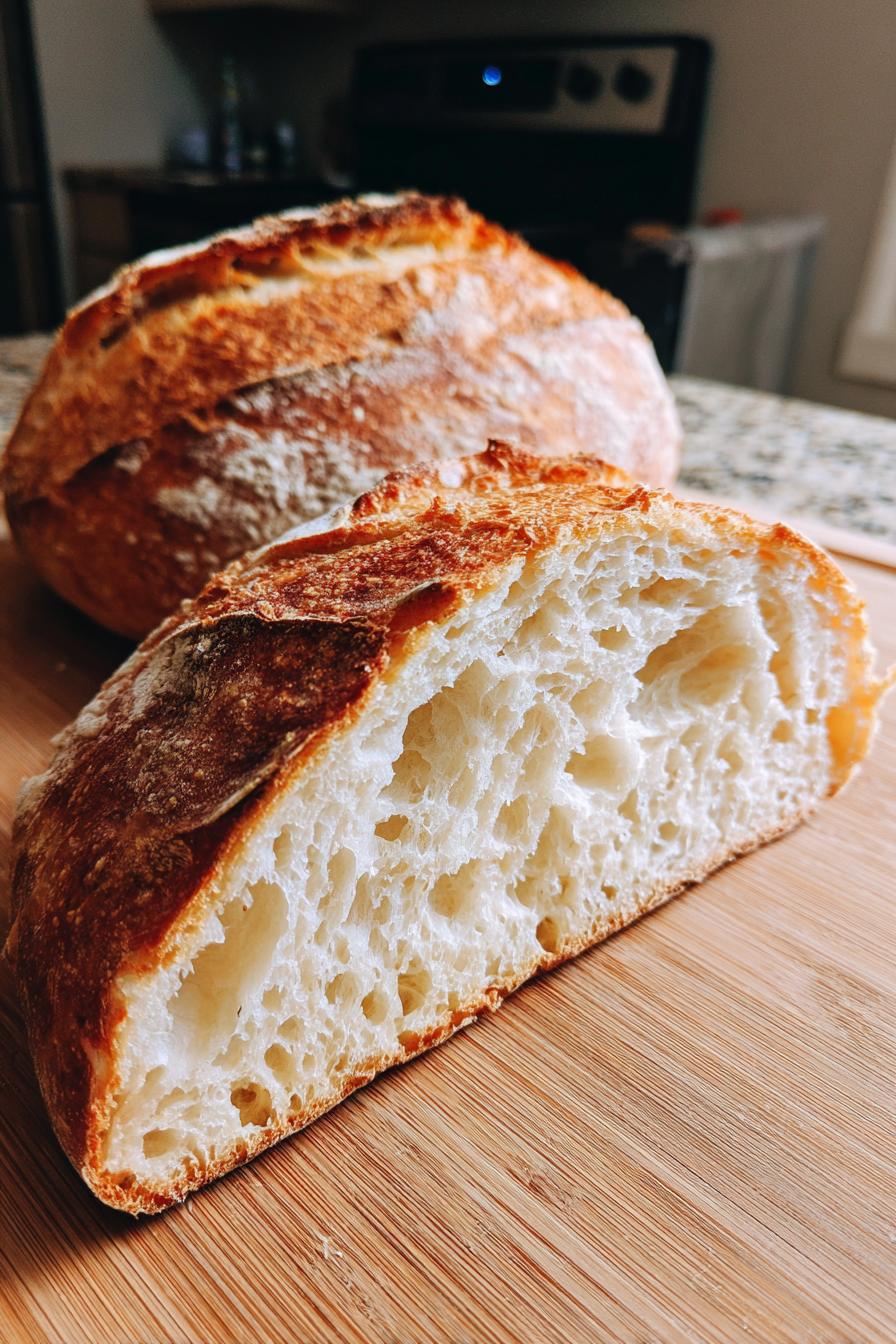
Step 9: Cool and Slice
Once baked, remove the bread from the oven and let it cool in the pan for a few minutes. Then, transfer it to a wire rack to cool completely. Patience is key here—let it cool before slicing to avoid a crumbly mess. Trust me, it’s worth the wait!
Tips for Success
- Always check the expiration date on your yeast for the best rise.
- For a crustier loaf, place a small pan of water in the oven while baking.
- Experiment with adding herbs or spices to the dough for extra flavor.
- Use a kitchen scale for precise measurements, especially with gluten-free flour.
- Let the bread cool completely before slicing to maintain its structure.
Equipment Needed
- Mixing bowls: A large bowl for mixing and a small one for the yeast. Any size will do!
- Whisk or spatula: For mixing ingredients. A fork can work in a pinch!
- Loaf pan: A standard loaf pan is ideal, but you can use any oven-safe dish.
- Measuring cups and spoons: Essential for accuracy. A kitchen scale is a great alternative.
- Wire rack: For cooling the bread. If you don’t have one, a plate will suffice!
Variations of Gluten Free Artisan Bread
- Herb-Infused Bread: Add dried herbs like rosemary, thyme, or oregano to the dough for a fragrant twist.
- Cheesy Delight: Mix in shredded cheese, such as cheddar or mozzarella, for a savory, cheesy loaf.
- Nutty Flavor: Incorporate chopped nuts or seeds, like walnuts or sunflower seeds, for added texture and nutrition.
- Sweet Twist: Add cinnamon and raisins for a delightful sweet bread that’s perfect for breakfast.
- Spicy Kick: Mix in a pinch of cayenne pepper or red pepper flakes for a bread with a bit of heat.
Serving Suggestions for Gluten Free Artisan Bread
- Pair with Soups: This bread is perfect alongside a warm bowl of tomato or vegetable soup.
- Sandwiches: Use it for delicious sandwiches filled with your favorite meats and veggies.
- Toast it Up: Enjoy slices toasted with avocado and a sprinkle of salt for a quick snack.
- Presentation: Serve warm, sliced on a wooden board for a rustic touch.
- Drinks: Complement with a glass of red wine or herbal tea for a cozy meal.
FAQs about Gluten Free Artisan Bread
Can I use regular flour instead of gluten-free flour?
No, this recipe is specifically designed for gluten free artisan bread. Regular flour contains gluten, which is essential for traditional bread but not suitable for those with gluten sensitivities. Stick to gluten-free flour for the best results!
How can I store leftover gluten free artisan bread?
To keep your bread fresh, store it in an airtight container at room temperature for up to three days. For longer storage, slice the bread and freeze it. Just pop it in the toaster when you’re ready to enjoy!
Can I add other ingredients to the dough?
Absolutely! Feel free to experiment with herbs, spices, or even cheese. Just remember to adjust the moisture slightly if you add dry ingredients. This way, you can create a unique flavor profile for your gluten free artisan bread!
Why is my bread dense?
A dense loaf can result from using old yeast or not allowing the dough to rise long enough. Make sure your yeast is fresh and give the dough ample time to puff up. Patience is key to achieving that light, airy texture!
Can I make this bread in advance?
Yes! You can prepare the dough ahead of time and let it rise in the fridge overnight. Just bring it back to room temperature before baking. This method can enhance the flavor, making your gluten free artisan bread even more delicious!
Final Thoughts
Baking gluten free artisan bread is more than just a recipe; it’s an experience filled with warmth and joy. The process of mixing, rising, and baking transforms simple ingredients into a delightful loaf that brings the family together. Each slice is a testament to your effort and love, perfect for sharing at the dinner table or enjoying with a cup of tea. I hope this recipe inspires you to create your own delicious moments in the kitchen. Remember, every loaf tells a story, and I can’t wait for you to share yours!
PrintGluten Free Artisan Bread: Enjoy Deliciously Healthy Loaves!
A delightful recipe for gluten-free artisan bread that is both healthy and delicious, perfect for those with gluten sensitivities.
- Prep Time: 15 minutes
- Cook Time: 35 minutes
- Total Time: 1 hour 50 minutes
- Yield: 1 loaf 1x
- Category: Bread
- Method: Baking
- Cuisine: American
- Diet: Gluten Free
Ingredients
- 2 cups gluten-free all-purpose flour
- 1 cup warm water
- 1/4 cup olive oil
- 1 tablespoon honey
- 1 teaspoon salt
- 1 tablespoon active dry yeast
- 1 teaspoon apple cider vinegar
Instructions
- In a small bowl, combine warm water, honey, and yeast. Let it sit for about 5 minutes until frothy.
- In a large mixing bowl, combine gluten-free flour and salt.
- Add the yeast mixture, olive oil, and apple cider vinegar to the flour mixture.
- Mix until a dough forms. It should be slightly sticky.
- Cover the bowl with a damp cloth and let it rise in a warm place for about 1 hour.
- Preheat the oven to 375°F (190°C).
- Transfer the dough to a greased loaf pan and shape it as desired.
- Bake for 30-35 minutes or until the top is golden brown.
- Let it cool before slicing.
Notes
- For added flavor, consider adding herbs or spices to the dough.
- Store leftovers in an airtight container to maintain freshness.
- This bread can be frozen for longer storage.
Nutrition
- Serving Size: 1 slice
- Calories: 120
- Sugar: 1g
- Sodium: 150mg
- Fat: 5g
- Saturated Fat: 0.5g
- Unsaturated Fat: 4g
- Trans Fat: 0g
- Carbohydrates: 15g
- Fiber: 2g
- Protein: 3g
- Cholesterol: 0mg