3-Ingredient Gluten-Free Donuts That Taste Too Good
Oh, let me tell you about these gluten-free donuts—they’re the little miracles that changed my mornings! When my niece was diagnosed with celiac disease, I started experimenting in the kitchen, determined to make treats she could enjoy without missing out. After what felt like a hundred batches (and more than a few hockey-puck failures), I finally nailed it. These gluten-free donuts are so tender, so perfectly sweet, you’d never guess they’re missing traditional flour. The secret? A simple blend of pantry staples that come together in minutes. Whether you’re gluten-free by necessity or just curious, trust me, this recipe’s a game-changer.
Why You’ll Love These Gluten-Free Donuts
Listen, these aren’t just *any* gluten-free donuts—they’re the kind that’ll make you do a happy dance at first bite. Here’s why:
- They’re stupid easy: No fancy techniques or weird ingredients. Just mix, bake, and devour.
- Texture magic: Fluffy inside with a tender crumb (no cardboard vibes here!).
- Allergy-friendly: Safe for gluten-sensitive folks, but tasty enough for everyone.
- Weekend vibes on a weekday: Fresh donuts in under 30 minutes? Yes, please.
Seriously, even my gluten-loving husband sneaks these when he thinks I’m not looking.
Ingredients for Gluten-Free Donuts
Grab these simple ingredients—I promise your pantry probably has most of them already! The key here is using a good gluten-free flour blend (I swear by the 1:1 baking mixes—they behave just like regular flour). Here’s what you’ll need:
- 2 cups gluten-free flour (look for one with xanthan gum already added)
- 1/2 cup granulated sugar (or coconut sugar for a deeper flavor)
- 1 tsp baking powder (make sure it’s fresh!)
- 1/4 tsp salt (balances the sweetness perfectly)
- 1/2 cup milk (dairy or almond both work great)
- 1 large egg, room temperature (seriously, cold eggs don’t mix as well)
- 2 tbsp melted butter (or coconut oil for dairy-free)
- 1 tsp vanilla extract (the real stuff—imitation vanilla cries in the corner)
See? Nothing weird or hard-to-find. Just good stuff that makes magical donuts.
Equipment You’ll Need
Gather just a few basics—no fancy gadgets required! Here’s what’s on my counter every time I whip these up:
- Donut pan: The star of the show! A standard 6-cavity nonstick pan works like a charm.
- Mixing bowls: One for dry stuff, one for wet—keeps life simple.
- Whisk: A trusty old wire whisk beats the batter just right (no overmixing, please!).
- Measuring cups/spoons: Precision matters—especially with gluten-free baking.
That’s it! Well, besides a spoon for licking the bowl—but that’s optional (not really).
How to Make Gluten-Free Donuts
Alright, let’s get to the fun part—making these little rings of joy! Don’t let the word “gluten-free” intimidate you; this process couldn’t be simpler. Just follow these easy steps, and you’ll be biting into warm, fluffy donuts before you know it.
Mixing the Dry Ingredients
First things first—turn that oven to 350°F (175°C) so it’s ready when you are. Now, grab your biggest mixing bowl (you know, the one with the slightly chipped rim—we’ve all got one). Dump in the gluten-free flour, sugar, baking powder, and salt. Here’s the key: whisk them together like you mean it! You want every speck of baking powder fully distributed—no sneaky clumps hiding in the corners. This step takes maybe 30 seconds, but it makes all the difference.
Combining Wet Ingredients
In your second bowl (or hey, reuse your measuring cup—I won’t judge), crack in that room-temperature egg. Add the milk, melted butter, and vanilla, then whisk until it’s silky smooth. Pro tip: if your butter’s too hot, it’ll scramble the egg—yuck! Let it cool just enough that you can comfortably dip your finger in. Pour this liquid gold into your dry ingredients and gently stir until just combined. A few lumps? Totally fine! Overmixing is the enemy of fluffy donuts.
Baking the Gluten-Free Donuts
Spoon that beautiful batter into your greased donut pan, filling each cavity only 3/4 full. Trust me, they puff up like proud little clouds! Slide them into the oven and set a timer for 10-12 minutes. They’re done when the tops spring back lightly when touched, or when a toothpick comes out clean. No peeking before 10 minutes—oven doors are not windows! Let them cool in the pan for 5 minutes, then transfer to a rack. Resist eating them immediately (okay, maybe just one… for quality control).
Tips for Perfect Gluten-Free Donuts
Listen, I’ve made every mistake so you don’t have to—here are my hard-earned secrets:
- Gentle hands win: Stir batter just until combined—overmixing makes donuts tough.
- Grease like you mean it: Even nonstick pans need love—brush every crevice!
- Patience is tasty: Let donuts cool completely before dunking in glaze (or it’ll slide right off).
- Fresh is best: These taste amazing warm, but leftovers toast up beautifully.
Oh, and hide a few—they disappear faster than you’d think!
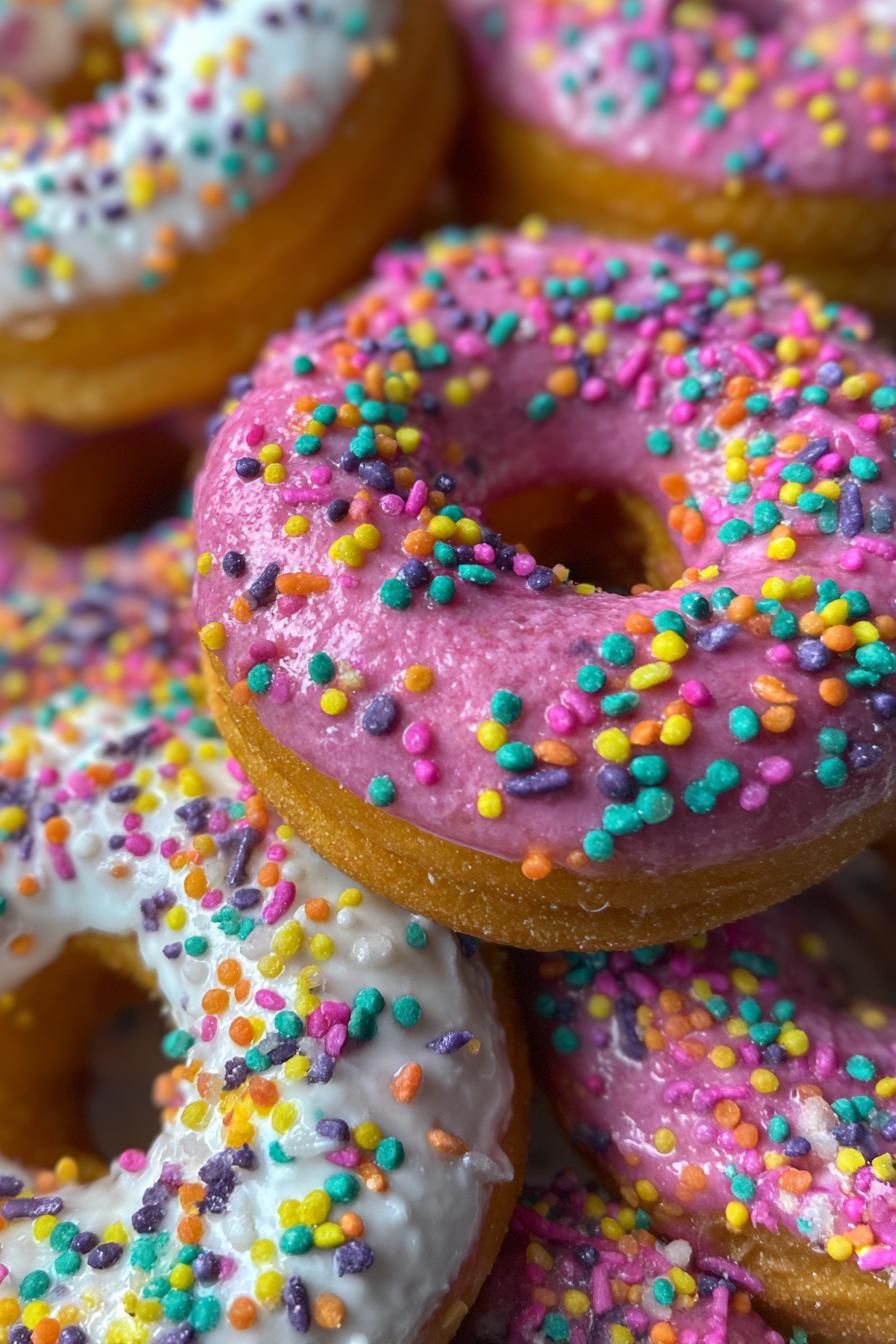
Gluten-Free Donut Variations
Now for the best part—playing dress-up with your donuts! My niece calls this “donut art time,” and honestly, she’s not wrong. Here are our favorite ways to jazz them up:
- Cinnamon sugar dust: Roll warm donuts in melted butter, then a mix of cinnamon and sugar—instant classic!
- Chocolate glaze: Melt dark chocolate with a splash of coconut milk for dairy-free magic.
- Lemon zest glaze: Whisk powdered sugar with lemon juice and zest—bright and tangy perfection.
Pro tip: Let kids decorate with sprinkles—messy fingers mean happy memories!
Serving and Storing Gluten-Free Donuts
Okay, here’s the hard part—not eating them all straight from the pan! For the best experience, let your gluten-free donuts cool completely on a wire rack before diving in. Warm is fine, but room temp lets all those flavors really sing. Leftovers? Pop them in an airtight container—they’ll stay fresh for 2 days at room temp or up to a week in the fridge. Pro tip: 10 seconds in the microwave brings back that fresh-baked magic. If they somehow last longer (who are you?), freeze them in a ziplock bag for up to 3 months—just thaw and toast for a quick treat!
Nutritional Information
Here’s the skinny on these gluten-free donuts—each one clocks in at about 200 calories, with just 10g of sugar. But remember, folks, these numbers are estimates (your favorite brands might tweak them slightly). Whether you’re counting or just indulging, enjoy every bite!
Frequently Asked Questions
Can I use almond flour instead of gluten-free flour?
Oh, I’ve tried—and bless almond flour’s heart, it makes these donuts way too dense. Stick with a trusty gluten-free blend (the ones with xanthan gum work miracles!). Almond flour’s better for cookies, in my opinion.
How long do these gluten-free donuts stay fresh?
They’re best the day you make them (like most good things!), but stored airtight, they’ll stay tasty for 2-3 days. Pro tip: Pop ’em in the toaster for 30 seconds—it’s like magic!
Can I make these dairy-free?
Absolutely! Swap the butter for coconut oil and use almond milk. My dairy-free friends rave about them—just check your gluten-free flour blend doesn’t contain milk powders.
Why do mine turn out gummy?
Overmixing’s usually the culprit! Remember: stir just until combined, then walk away. Gluten-free batters need gentle love.
Made these? Tag me @MyKitchenChaos or leave a comment—I wanna see your donut masterpieces!
Print3-Ingredient Gluten-Free Donuts That Taste Too Good

Enjoy these delicious gluten-free donuts that are perfect for any time of the day.
- Prep Time: 10 minutes
- Cook Time: 12 minutes
- Total Time: 22 minutes
- Yield: 6 donuts 1x
- Category: Dessert
- Method: Baking
- Cuisine: American
- Diet: Gluten Free
Ingredients
- 2 cups gluten-free flour
- 1/2 cup sugar
- 1 tsp baking powder
- 1/4 tsp salt
- 1/2 cup milk
- 1 egg
- 2 tbsp melted butter
- 1 tsp vanilla extract
Instructions
- Preheat your oven to 350°F (175°C).
- In a large bowl, mix the gluten-free flour, sugar, baking powder, and salt.
- In another bowl, whisk together the milk, egg, melted butter, and vanilla extract.
- Combine the wet and dry ingredients until just mixed.
- Spoon the batter into a donut pan, filling each cavity about 3/4 full.
- Bake for 10-12 minutes or until a toothpick inserted comes out clean.
- Let the donuts cool before serving.
Notes
- Ensure all ingredients are gluten-free.
- You can add toppings like glaze or sprinkles after baking.
Nutrition
- Serving Size: 1 donut
- Calories: 200
- Sugar: 10g
- Sodium: 150mg
- Fat: 8g
- Saturated Fat: 4g
- Unsaturated Fat: 3g
- Trans Fat: 0g
- Carbohydrates: 30g
- Fiber: 1g
- Protein: 3g
- Cholesterol: 35mg