Halloween Grilled Cheese: A Spooktacular Meal Idea!
Introduction to Halloween Grilled Cheese
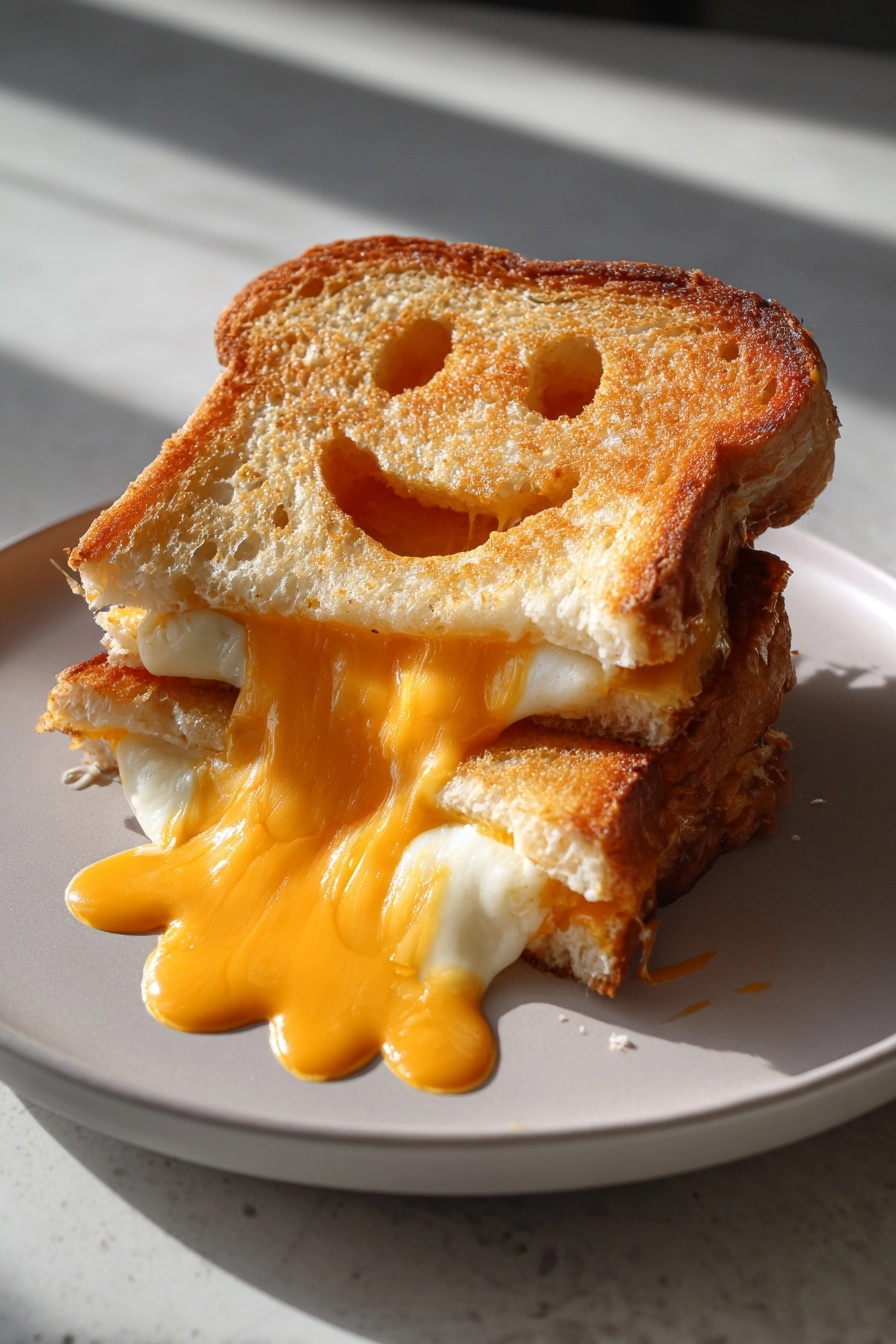
As the leaves turn and the air gets crisp, it’s time to embrace the magic of Halloween! What better way to celebrate than with a fun and spooky twist on a classic favorite? This Halloween Grilled Cheese is not just a meal; it’s a delightful experience that brings smiles to the table. Whether you’re a busy mom juggling work and family or a professional looking to impress your loved ones, this quick and easy recipe is perfect for you. In just 15 minutes, you can whip up a delicious, festive sandwich that’s sure to be a hit!
Why You’ll Love This Halloween Grilled Cheese
This Halloween Grilled Cheese is a lifesaver for busy days. It’s quick to make, taking only 15 minutes from start to finish. The gooey, melty cheese paired with crispy, buttery bread is a taste sensation that everyone will adore. Plus, the spooky shapes add a fun twist that makes mealtime exciting. It’s a simple way to create lasting memories with your family while enjoying a delicious meal together!
Ingredients for Halloween Grilled Cheese
Gathering the right ingredients is the first step to creating your Halloween Grilled Cheese masterpiece. Here’s what you’ll need:
- Bread: Choose your favorite type, whether it’s classic white, whole grain, or even sourdough. The bread is the canvas for your spooky creation!
- Cheese: I love using cheddar for its rich flavor, but feel free to experiment with mozzarella, gouda, or any cheese that melts beautifully. The gooeyness is key!
- Butter: This is essential for grilling. It gives the sandwich that golden, crispy crust we all crave. You can also use olive oil for a lighter option.
- Food Coloring: Optional, but oh-so-fun! A few drops can transform your cheese or bread into vibrant colors, adding to the Halloween spirit.
- Cookie Cutter: A bat or pumpkin-shaped cutter will help you create those adorable spooky shapes. If you don’t have one, a knife works too—just be creative!
For exact measurements, check the bottom of the article where you can find everything you need for printing. Now, let’s get cooking!
How to Make Halloween Grilled Cheese
Now that you have your ingredients ready, let’s dive into the fun part—making your Halloween Grilled Cheese! Follow these simple steps, and you’ll have a spooktacular meal in no time.
Step 1: Preheat the Skillet
Start by preheating your skillet over medium heat. This step is crucial for even cooking. A hot skillet ensures that your bread gets that perfect golden crust while the cheese melts beautifully. Trust me, there’s nothing worse than a soggy sandwich!
Step 2: Butter the Bread
Next, grab your butter and spread it generously on one side of each slice of bread. Butter is your best friend here! It creates that irresistible crispy texture we all love. If you’re feeling adventurous, try using garlic butter for an extra kick!
Step 3: Assemble the Sandwich
Now it’s time to layer your sandwich. Place one slice of bread, butter side down, in the skillet. Add your cheese slices on top, making sure to cover the bread completely. Then, place the second slice of bread on top, butter side up. This layering technique helps the cheese melt evenly, creating that gooey goodness we crave.
Step 4: Grill the Sandwich
It’s grilling time! Cook the sandwich for about 3-4 minutes until the bottom is golden brown. Then, carefully flip it over and grill the other side. Keep an eye on it to avoid burning. You want that cheese to be melty and the bread to be perfectly crispy. If you’re feeling fancy, press down gently with a spatula for an even better texture!
Step 5: Cut into Spooky Shapes
Once your sandwich is grilled to perfection, it’s time for the fun part! Use your cookie cutter to cut the sandwich into spooky shapes. Whether it’s bats or pumpkins, this step adds a festive touch that kids (and adults!) will love. If you don’t have a cookie cutter, a sharp knife can work too—just let your creativity shine!
Tips for Success
- Use a non-stick skillet for easy flipping and cleanup.
- Don’t rush the grilling; patience leads to a perfectly crispy sandwich.
- Experiment with different cheeses for unique flavors—mix and match!
- For extra fun, add toppings like sliced olives or peppers to create spooky faces.
- Serve immediately for the best melty experience—no one likes a cold grilled cheese!
Equipment Needed
- Skillet: A non-stick skillet works best, but any frying pan will do.
- Spatula: A flat spatula is perfect for flipping your sandwich. A fork can work in a pinch!
- Cookie Cutter: Use a bat or pumpkin shape, or a knife for custom designs.
- Butter Knife: For spreading butter on the bread. Any knife will suffice!
Variations of Halloween Grilled Cheese
- Spicy Twist: Add jalapeños or pepper jack cheese for a kick that’ll wake up your taste buds!
- Veggie Delight: Layer in some spinach, tomatoes, or roasted red peppers for a nutritious boost.
- Sweet and Savory: Try adding a thin layer of apple slices or fig jam for a delightful contrast to the cheese.
- Gluten-Free Option: Use gluten-free bread to make this Halloween Grilled Cheese suitable for everyone.
- Vegan Version: Substitute dairy cheese with vegan cheese and use plant-based butter for a delicious alternative.
Serving Suggestions for Halloween Grilled Cheese
- Tomato Soup: A classic pairing that complements the cheesy goodness perfectly.
- Side Salad: A fresh green salad adds a healthy crunch to your meal.
- Spooky Drinks: Serve with a fun Halloween-themed drink, like a pumpkin spice latte or a spooky punch.
- Presentation: Use Halloween-themed plates or napkins to enhance the festive vibe.
FAQs about Halloween Grilled Cheese
Can I use different types of cheese for my Halloween Grilled Cheese?
Absolutely! While cheddar is a classic choice, feel free to experiment with mozzarella, gouda, or even pepper jack for a spicy kick. Each cheese brings its own unique flavor and texture to your spooky sandwich!
How can I make my Halloween Grilled Cheese healthier?
To lighten things up, consider using whole grain or gluten-free bread. You can also add veggies like spinach or tomatoes for extra nutrition. Opt for low-fat cheese or a vegan alternative to keep it healthy while still delicious!
What can I serve with my Halloween Grilled Cheese?
Pair your Halloween Grilled Cheese with a warm bowl of tomato soup for a classic combo. A fresh side salad or some spooky-themed snacks can also elevate your meal. Don’t forget a fun drink to match the Halloween spirit!
Can I prepare the Halloween Grilled Cheese ahead of time?
While it’s best enjoyed fresh, you can prep the ingredients in advance. Assemble the sandwich and store it in the fridge for a few hours. Just grill it right before serving for that melty goodness!
What’s the best way to store leftovers?
If you have any leftovers, store them in an airtight container in the fridge. Reheat in a skillet for a few minutes to regain that crispy texture. Microwaving can make it soggy, so I recommend sticking to the skillet!
Final Thoughts
Creating this Halloween Grilled Cheese is more than just making a meal; it’s about crafting memories with your loved ones. The joy of watching your kids’ faces light up as they bite into a spooky-shaped sandwich is priceless. This recipe is a delightful way to celebrate the season while keeping things simple and fun. Plus, it’s a fantastic opportunity to get creative in the kitchen! So, gather your ingredients, unleash your inner chef, and enjoy the laughter and love that comes with every cheesy bite. Happy Halloween cooking!
PrintHalloween Grilled Cheese: A Spooktacular Meal Idea!
A fun and spooky twist on a classic grilled cheese sandwich, perfect for Halloween celebrations.
- Prep Time: 5 minutes
- Cook Time: 10 minutes
- Total Time: 15 minutes
- Yield: 1 serving 1x
- Category: Lunch
- Method: Grilling
- Cuisine: American
- Diet: Vegetarian
Ingredients
- 2 slices of bread
- 2 slices of cheese (cheddar or your choice)
- Butter (for grilling)
- Food coloring (optional, for spooky effects)
- Cookie cutter (bat or pumpkin shape)
Instructions
- Preheat a skillet over medium heat.
- Butter one side of each slice of bread.
- Place one slice of bread, butter side down, in the skillet.
- Add cheese slices on top of the bread in the skillet.
- Place the second slice of bread on top, butter side up.
- Grill until golden brown, then flip and grill the other side until the cheese is melted.
- Use a cookie cutter to cut the sandwich into spooky shapes.
Notes
- For added fun, use food coloring to dye the cheese or bread.
- Serve with tomato soup for a classic pairing.
- Experiment with different types of cheese for varied flavors.
Nutrition
- Serving Size: 1 sandwich
- Calories: 350
- Sugar: 2g
- Sodium: 600mg
- Fat: 20g
- Saturated Fat: 10g
- Unsaturated Fat: 8g
- Trans Fat: 0g
- Carbohydrates: 30g
- Fiber: 2g
- Protein: 15g
- Cholesterol: 40mg