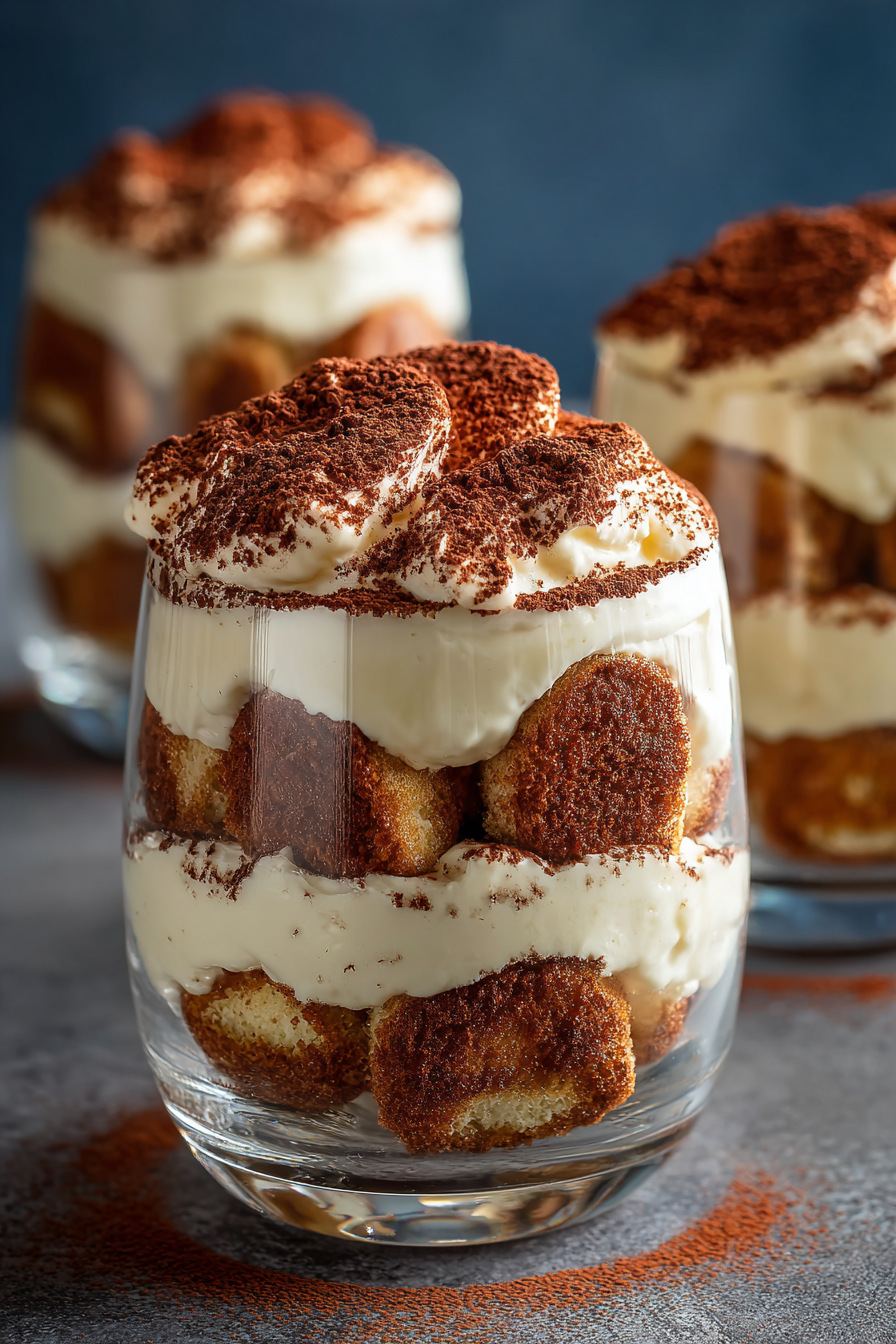
Mini tiramisu cups that will delight your taste buds!
Introduction to Mini Tiramisu Cups
As a busy mom, I know how precious time can be, especially when it comes to whipping up something special for my family. That’s why I absolutely adore these mini tiramisu cups! They’re not just a quick solution for a hectic day; they’re a delightful treat that can impress anyone. Imagine layers of coffee-soaked ladyfingers and creamy mascarpone, all beautifully presented in individual cups. It’s like a little piece of Italy right in your kitchen! Plus, they’re no-bake, making them perfect for those warm evenings when you want dessert without heating up the house.
Why You’ll Love This Mini Tiramisu Cups
These mini tiramisu cups are a dream come true for busy lives! They come together in just 20 minutes, making them a perfect last-minute dessert. The rich, creamy layers are a delightful treat that will have your family and friends raving. Plus, they can be made ahead of time, so you can enjoy the moment without the stress. Who doesn’t love a dessert that’s both easy and impressive?
Ingredients for Mini Tiramisu Cups
Gathering the right ingredients is key to creating these delightful mini tiramisu cups. Here’s what you’ll need:
- Strong brewed coffee: This is the heart of the dessert, providing that rich flavor we all love. Make sure it’s cooled before using.
- Coffee liqueur (optional): A splash of this adds depth to the coffee flavor. If you prefer a non-alcoholic version, feel free to skip it!
- Mascarpone cheese: This creamy Italian cheese is essential for that luscious texture. It’s what makes the dessert feel indulgent.
- Heavy cream: Whipping this up gives the dessert its light and airy quality. It balances the richness of the mascarpone beautifully.
- Powdered sugar: This sweetens the mascarpone mixture without adding graininess. It’s perfect for achieving that smooth finish.
- Vanilla extract: A touch of vanilla enhances the overall flavor, making each bite even more delightful.
- Ladyfingers: These delicate cookies soak up the coffee and provide structure to the dessert. They’re a must-have for authentic tiramisu.
- Cocoa powder: A dusting of cocoa on top adds a beautiful finish and a hint of bitterness that complements the sweetness.
For exact measurements, check the bottom of the article where you can find everything listed for easy printing. Happy cooking!
How to Make Mini Tiramisu Cups
Now that you have all your ingredients ready, let’s dive into the fun part—making these mini tiramisu cups! Follow these simple steps, and you’ll have a delightful dessert that’s sure to impress.
Step 1: Prepare the Coffee Mixture
Start by brewing a cup of strong coffee. Once it’s cooled, pour it into a shallow dish. If you’re using coffee liqueur, add it to the coffee now. This mixture is where the magic begins, soaking the ladyfingers and infusing them with rich flavor.
Step 2: Whip the Cream
In a mixing bowl, combine heavy cream, powdered sugar, and vanilla extract. Using a hand mixer or a whisk, whip the mixture until soft peaks form. This step is crucial for achieving that light, airy texture that makes mini tiramisu cups so delightful. Just be careful not to over-whip!
Step 3: Fold in Mascarpone
Now, gently fold in the mascarpone cheese into the whipped cream mixture. Use a spatula and be gentle to maintain the fluffiness. You want everything to be well combined without losing that lovely volume. This creamy blend is what makes your dessert so indulgent.
Step 4: Dip the Ladyfingers
Take each ladyfinger and quickly dip it into the coffee mixture. Make sure they’re soaked but not soggy. A quick dip is all you need! This step is essential for that perfect balance of flavor and texture in your mini tiramisu cups.
Step 5: Layer the Ingredients
In your serving cups, start by placing a layer of the soaked ladyfingers at the bottom. Then, spoon a layer of the mascarpone mixture over the ladyfingers. This creates a beautiful contrast of textures and flavors that will have everyone coming back for more.
Step 6: Repeat Layers
Continue layering until your cups are filled, finishing with a generous layer of the mascarpone mixture on top. This final layer is your canvas, so make it smooth and inviting. It’s the perfect base for that cocoa dusting later!
Step 7: Chill and Serve
Now, it’s time to chill! Place your mini tiramisu cups in the refrigerator for at least 2 hours. This allows the flavors to meld beautifully. Just before serving, dust the tops with cocoa powder for that classic finish. Your mini tiramisu cups are now ready to be enjoyed!
Tips for Success
- Use freshly brewed coffee for the best flavor.
- Don’t soak the ladyfingers too long; a quick dip is all you need.
- Chill the cups for at least 2 hours to enhance the flavors.
- For a fun twist, try adding a layer of chocolate shavings.
- Dust with cocoa powder just before serving for a beautiful presentation.
Equipment Needed
- Mixing bowls: Use any size you have on hand; a large bowl works best for whipping cream.
- Hand mixer or whisk: A hand mixer makes whipping easier, but a whisk works just fine if you’re up for a workout!
- Shallow dish: Perfect for soaking ladyfingers; a pie dish or plate will do.
- Serving cups: Any small cups or glasses will showcase your mini tiramisu beautifully.
Variations
- Chocolate Mini Tiramisu: Add cocoa powder to the mascarpone mixture for a rich chocolate flavor.
- Fruit-Infused Tiramisu: Layer in fresh berries or sliced bananas between the ladyfingers for a fruity twist.
- Vegan Version: Substitute mascarpone with coconut cream and use a plant-based whipped cream for a dairy-free delight.
- Nutty Tiramisu: Incorporate crushed hazelnuts or almonds into the layers for added crunch and flavor.
- Spiced Tiramisu: Add a pinch of cinnamon or nutmeg to the coffee mixture for a warm, spiced flavor.
Serving Suggestions
- Pair your mini tiramisu cups with a shot of espresso for a delightful coffee experience.
- Serve alongside fresh berries for a pop of color and freshness.
- Garnish with mint leaves for an elegant touch.
- Present in clear cups to showcase the beautiful layers.
- Consider a drizzle of chocolate sauce for an extra indulgent treat.
FAQs about Mini Tiramisu Cups
As you embark on your mini tiramisu cups adventure, you might have a few questions. Here are some common queries I’ve encountered, along with helpful answers to guide you.
Can I make mini tiramisu cups ahead of time?
Absolutely! These delightful cups can be made a day in advance. Just keep them covered in the refrigerator. This allows the flavors to meld beautifully, making them even more delicious!
What can I substitute for mascarpone cheese?
If you can’t find mascarpone, cream cheese mixed with a bit of heavy cream can work in a pinch. It won’t be quite the same, but it will still yield a tasty dessert.
How do I store leftover mini tiramisu cups?
Store any leftovers in an airtight container in the refrigerator. They should stay fresh for up to three days, but I doubt they’ll last that long!
Can I use decaf coffee for this recipe?
Of course! If you prefer a caffeine-free option, decaf coffee works just as well. You’ll still get that rich flavor without the jitters.
What’s the best way to serve mini tiramisu cups?
Serve them chilled, dusted with cocoa powder, and perhaps topped with a few chocolate shavings or fresh berries. Presentation is key, and these cups are sure to impress!
Final Thoughts
Creating these mini tiramisu cups is more than just making a dessert; it’s about bringing joy to your table. Each layer tells a story of rich flavors and delightful textures, making every bite a little celebration. Whether you’re sharing them with family after dinner or impressing friends at a gathering, these cups are sure to spark smiles. Plus, the ease of preparation means you can focus on what truly matters—enjoying the moment. So, roll up your sleeves, dive into this recipe, and let the magic of mini tiramisu cups brighten your day!
PrintMini tiramisu cups that will delight your taste buds!
Mini tiramisu cups are a delightful and elegant dessert that combines layers of coffee-soaked ladyfingers, creamy mascarpone cheese, and a dusting of cocoa powder, perfect for any occasion.
- Prep Time: 20 minutes
- Cook Time: 0 minutes
- Total Time: 2 hours 20 minutes
- Yield: 4-6 servings 1x
- Category: Dessert
- Method: No-bake
- Cuisine: Italian
- Diet: Vegetarian
Ingredients
- 1 cup strong brewed coffee, cooled
- 2 tablespoons coffee liqueur (optional)
- 1 cup mascarpone cheese
- 1 cup heavy cream
- 1/2 cup powdered sugar
- 1 teaspoon vanilla extract
- 12–15 ladyfingers
- Cocoa powder for dusting
Instructions
- In a shallow dish, combine the brewed coffee and coffee liqueur.
- In a mixing bowl, whip the heavy cream, powdered sugar, and vanilla extract until soft peaks form.
- Gently fold in the mascarpone cheese until well combined.
- Quickly dip each ladyfinger into the coffee mixture, ensuring they are soaked but not soggy.
- Layer the soaked ladyfingers in the bottom of serving cups.
- Add a layer of the mascarpone mixture over the ladyfingers.
- Repeat the layers until the cups are filled, finishing with the mascarpone mixture on top.
- Chill in the refrigerator for at least 2 hours before serving.
- Dust with cocoa powder just before serving.
Notes
- For a non-alcoholic version, omit the coffee liqueur.
- Make sure the coffee is cooled before dipping the ladyfingers.
- These can be made a day in advance for convenience.
Nutrition
- Serving Size: 1 cup
- Calories: 250
- Sugar: 15g
- Sodium: 50mg
- Fat: 18g
- Saturated Fat: 10g
- Unsaturated Fat: 8g
- Trans Fat: 0g
- Carbohydrates: 20g
- Fiber: 1g
- Protein: 4g
- Cholesterol: 50mg