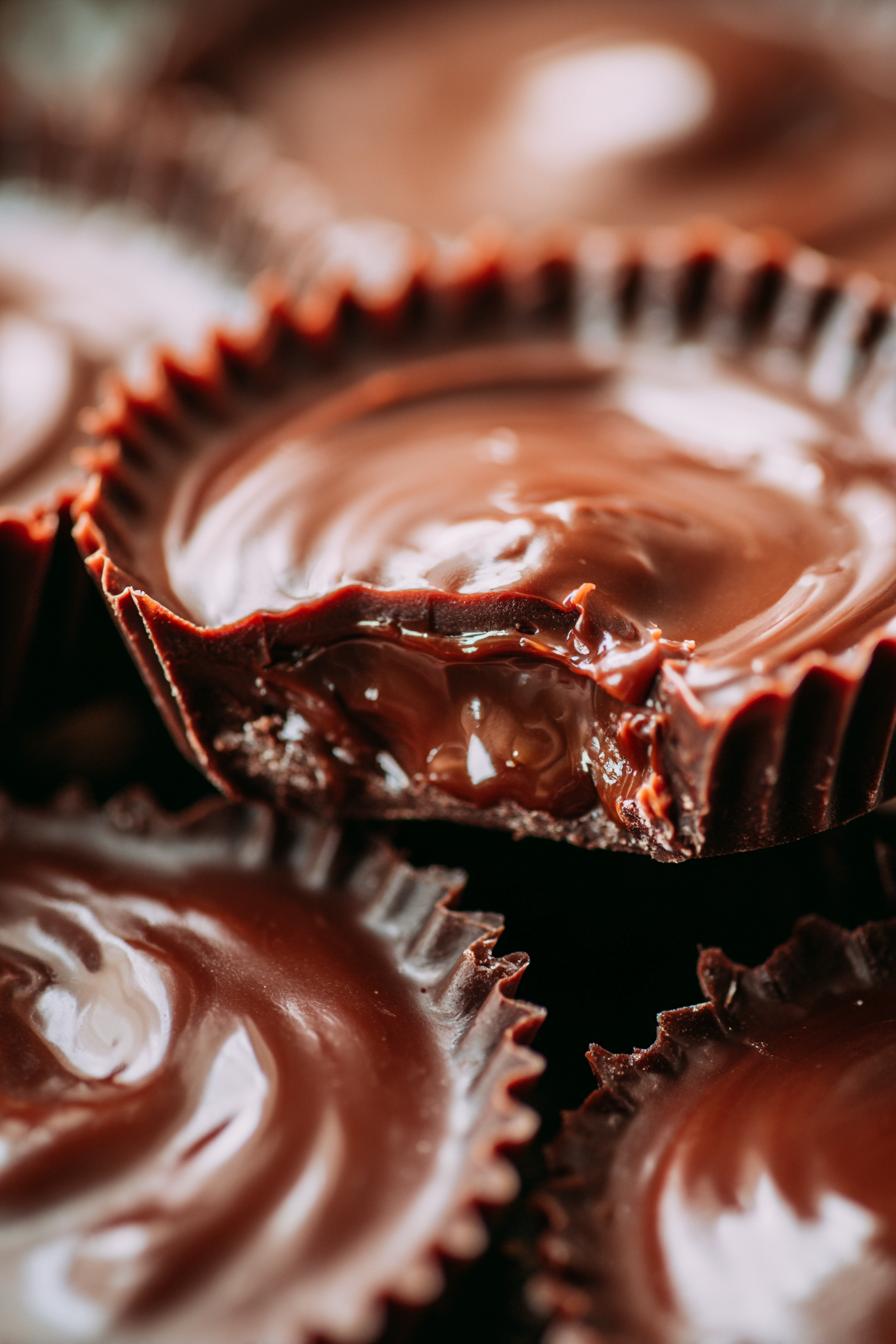
No bake chocolate cups that melt in your mouth!
Introduction to No Bake Chocolate Cups
As a busy mom, I know how precious time can be, especially when it comes to whipping up something sweet. That’s why I absolutely adore these no bake chocolate cups! They’re not just a quick solution for a hectic day; they’re a delightful treat that melts in your mouth. Imagine indulging in rich, creamy chocolate without the fuss of baking. Whether you’re looking to impress your loved ones or simply satisfy a sweet craving, these little cups are the perfect answer. Trust me, once you try them, you’ll be hooked!
Why You’ll Love This No Bake Chocolate Cups
These no bake chocolate cups are a dream come true for anyone short on time but big on flavor. They come together in just 15 minutes, making them perfect for busy days. Plus, the combination of rich chocolate and creamy peanut butter is simply irresistible. You can whip them up with your kids or surprise your friends at a gathering. Trust me, they’ll be the star of any dessert table!
Ingredients for No Bake Chocolate Cups
Gathering the right ingredients is half the fun! Here’s what you’ll need to create these delightful no bake chocolate cups:
- Dark chocolate chips: The star of the show! They provide a rich, decadent flavor that pairs beautifully with the other ingredients.
- Creamy peanut butter: This adds a smooth texture and nutty taste. You can use any brand you love, or even try almond butter for a twist!
- Honey: A natural sweetener that binds everything together. If you prefer, maple syrup works great for a vegan option.
- Crushed graham crackers: These give a delightful crunch and a hint of sweetness. You can substitute with crushed cookies if you’re feeling adventurous!
- Mini marshmallows: They add a fun, chewy texture. If you’re not a fan, feel free to skip them or use larger marshmallows cut into smaller pieces.
For exact measurements, check the bottom of the article where you can find everything listed for easy printing. Happy cooking!
How to Make No Bake Chocolate Cups
Now that you have all your ingredients ready, let’s dive into the fun part—making these no bake chocolate cups! Follow these simple steps, and you’ll have a delicious treat in no time.
Step 1: Melt the Chocolate
Start by placing your dark chocolate chips in a microwave-safe bowl. Microwave them in 30-second intervals. After each interval, give them a good stir. This helps the chocolate melt evenly and prevents burning. Keep going until it’s smooth and glossy. The aroma will be heavenly!
Step 2: Prepare the Peanut Butter Mixture
In a separate bowl, combine your creamy peanut butter and honey. Use a spatula or a whisk to mix them together until they’re well blended. This mixture should be smooth and creamy, making it easy to spread later. If you’re using maple syrup, the process is the same!
Step 3: Combine with Graham Crackers and Marshmallows
Now, it’s time to add some crunch! Toss in the crushed graham crackers and mini marshmallows into the peanut butter mixture. Stir gently until everything is evenly distributed. The marshmallows will add a delightful chewiness that complements the creamy peanut butter.
Step 4: Layer the Chocolate
Grab your muffin tin and line it with cupcake liners. Pour a layer of the melted chocolate into each liner, just enough to cover the bottom. This layer is like a cozy blanket for the other ingredients. Make sure it’s even, so every bite is delicious!
Step 5: Add the Peanut Butter Mixture
Next, take your peanut butter mixture and spoon it on top of the chocolate layer. Spread it out gently, making sure it covers the chocolate. Then, pour more melted chocolate on top to seal everything in. This creates a beautiful, layered effect that’s as pleasing to the eye as it is to the taste buds!
Step 6: Chill and Set
Now comes the hardest part—waiting! Place the muffin tin in the refrigerator for at least 1 hour. This allows the chocolate to set and the flavors to meld together. You can use this time to clean up or sneak a taste of the leftover chocolate!
Step 7: Enjoy Your Treats
Once they’re set, carefully remove the no bake chocolate cups from the muffin tin. Peel off the liners, and there you have it—your delicious treats are ready to be enjoyed! Whether you share them or keep them all to yourself, I won’t judge!
Tips for Success
- Make sure to stir the chocolate well to avoid any lumps.
- Use a spatula to scrape down the sides of the bowl for a smooth mixture.
- Chill the cups longer if they’re not fully set after an hour.
- Experiment with different nut butters for unique flavors.
- Keep an eye on the chocolate while melting to prevent burning.
Equipment Needed
- Microwave-safe bowl: Any heatproof bowl will do if you don’t have one.
- Spatula or whisk: A spoon works too for mixing ingredients.
- Muffin tin: You can use silicone molds or even small cups as alternatives.
- Cupcake liners: If you’re out, just grease the muffin tin well.
Variations of No Bake Chocolate Cups
- Nutty Delight: Add chopped nuts like almonds or walnuts for an extra crunch and flavor boost.
- Fruit Fusion: Incorporate dried fruits such as cranberries or raisins for a chewy, fruity twist.
- Minty Fresh: Mix in a few drops of peppermint extract for a refreshing mint chocolate experience.
- Spicy Kick: Add a pinch of cayenne pepper or chili powder for a surprising heat that complements the chocolate.
- Vegan Version: Use dairy-free chocolate chips and substitute honey with agave syrup or maple syrup for a completely plant-based treat.
Serving Suggestions for No Bake Chocolate Cups
- Pair with a scoop of vanilla ice cream for a delightful contrast in temperature and texture.
- Serve alongside fresh berries for a pop of color and a refreshing bite.
- Drizzle with caramel or chocolate sauce for an extra indulgent touch.
- Garnish with a sprinkle of sea salt to enhance the chocolate flavor.
- Present on a decorative platter for a stunning dessert display at gatherings.
FAQs about No Bake Chocolate Cups
As you embark on your journey to create these delightful no bake chocolate cups, you might have a few questions. Here are some common queries I’ve encountered, along with helpful answers to guide you along the way!
Can I use milk chocolate instead of dark chocolate?
Absolutely! While dark chocolate gives a rich flavor, milk chocolate will create a sweeter treat. Just keep in mind that the texture might be a bit different.
How long do these no bake chocolate cups last?
Stored in an airtight container in the refrigerator, they can last up to a week. But trust me, they’ll likely be gone much sooner!
Can I make these no bake chocolate cups ahead of time?
Yes! They’re perfect for meal prep. Just make them a day or two in advance, and you’ll have a delicious dessert ready to go.
What can I substitute for peanut butter?
If you have nut allergies or simply prefer something different, try sunflower seed butter or tahini. They’ll still provide that creamy texture!
Can I freeze these no bake chocolate cups?
Yes, you can! Just make sure to wrap them well. When you’re ready to enjoy, let them thaw in the fridge for a few hours.
Final Thoughts
Creating these no bake chocolate cups is more than just making a dessert; it’s about sharing joy and sweetness with those you love. The process is simple, yet the results are nothing short of delightful. Each bite is a little piece of heaven, melting in your mouth and bringing smiles all around. Whether you’re enjoying them after a long day or serving them at a gathering, these treats are sure to impress. So, roll up your sleeves, gather your ingredients, and let the magic happen. You’ll find that these no bake chocolate cups are a true celebration of flavor and fun!
PrintNo bake chocolate cups that melt in your mouth!
Delicious no bake chocolate cups that are rich, creamy, and melt in your mouth.
- Prep Time: 15 minutes
- Cook Time: 0 minutes
- Total Time: 1 hour 15 minutes
- Yield: 12 cups 1x
- Category: Dessert
- Method: No Bake
- Cuisine: American
- Diet: Vegetarian
Ingredients
- 1 cup dark chocolate chips
- 1/2 cup creamy peanut butter
- 1/4 cup honey
- 1/2 cup crushed graham crackers
- 1/4 cup mini marshmallows
Instructions
- Melt the dark chocolate chips in a microwave-safe bowl in 30-second intervals, stirring until smooth.
- In a separate bowl, mix together the peanut butter and honey until well combined.
- Add the crushed graham crackers and mini marshmallows to the peanut butter mixture and stir until evenly distributed.
- Line a muffin tin with cupcake liners and pour a layer of melted chocolate into each liner.
- Top the chocolate layer with the peanut butter mixture, then pour more melted chocolate on top to cover.
- Refrigerate for at least 1 hour or until set.
- Remove from the muffin tin and enjoy!
Notes
- For a vegan option, use dairy-free chocolate chips and maple syrup instead of honey.
- Store in an airtight container in the refrigerator for up to a week.
- Feel free to add nuts or other toppings for extra texture.
Nutrition
- Serving Size: 1 cup
- Calories: 150
- Sugar: 10g
- Sodium: 50mg
- Fat: 8g
- Saturated Fat: 3g
- Unsaturated Fat: 5g
- Trans Fat: 0g
- Carbohydrates: 15g
- Fiber: 1g
- Protein: 3g
- Cholesterol: 0mg