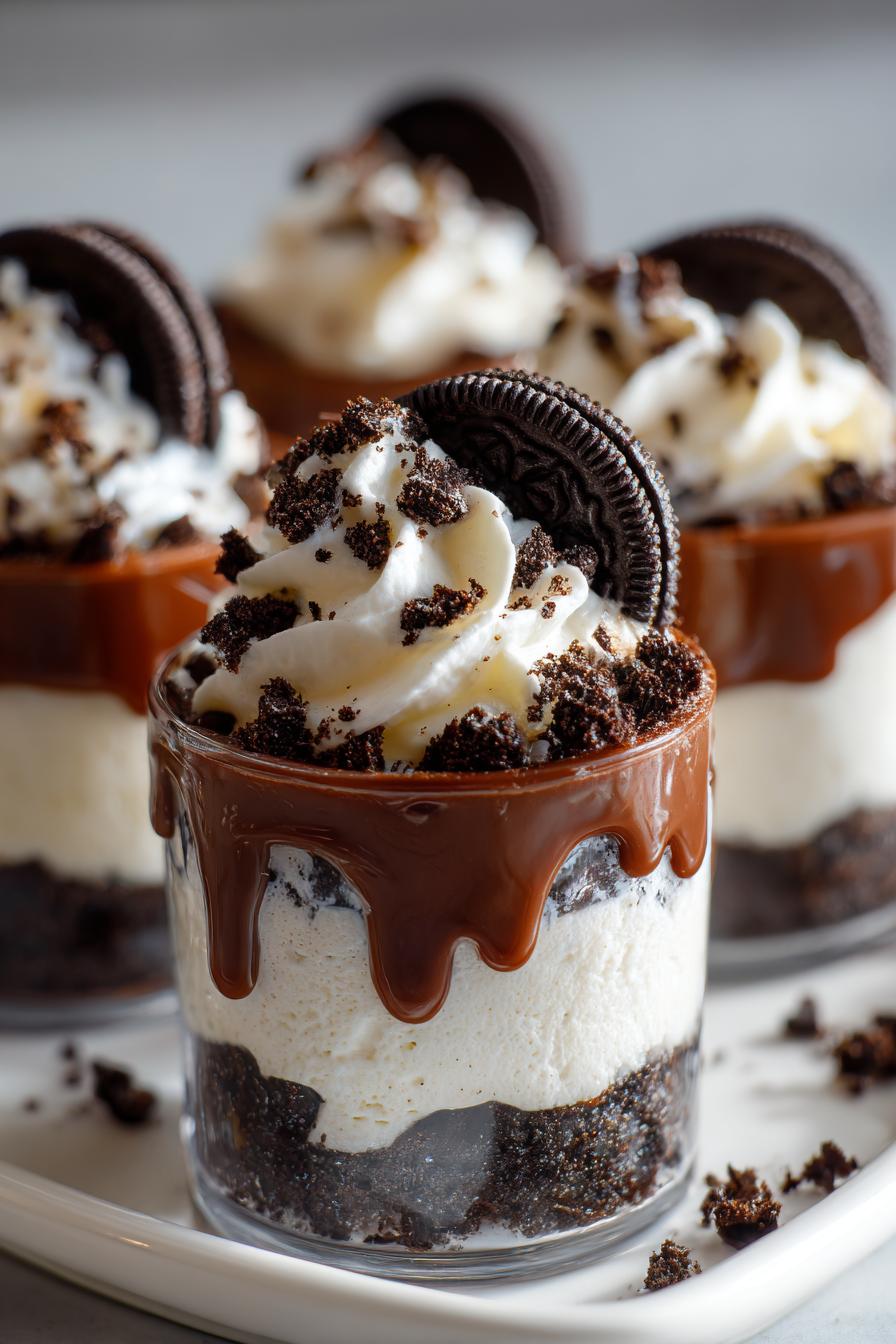
No Bake Oreo Dessert Cups You Can’t Resist Making!
Introduction to No Bake Oreo Dessert Cups
Hey there, fellow dessert lovers! If you’re anything like me, you know that life can get pretty hectic. Between juggling work, family, and everything in between, finding time to whip up a delicious treat can feel impossible. That’s where these No Bake Oreo Dessert Cups come to the rescue! They’re not just easy to make; they’re a delightful way to impress your loved ones without spending hours in the kitchen. Imagine serving up these creamy, chocolatey cups at your next gathering, and watching everyone’s faces light up. Trust me, you won’t be able to resist making them!
Why You’ll Love This No Bake Oreo Dessert Cups
These No Bake Oreo Dessert Cups are a dream come true for busy moms and professionals alike. They come together in just 20 minutes, making them a quick solution for unexpected guests or a sweet treat after dinner. Plus, the rich, creamy layers of Oreo goodness are simply irresistible! You’ll love how they satisfy your sweet tooth without the fuss of baking. It’s dessert made easy!
Ingredients for No Bake Oreo Dessert Cups
Let’s gather our ingredients for these delightful No Bake Oreo Dessert Cups. Each one plays a crucial role in creating that creamy, dreamy dessert we all crave. Here’s what you’ll need:
- Oreo cookies: The star of the show! These chocolatey cookies provide the perfect base and flavor.
- Unsalted butter: This helps bind the crushed Oreos together, creating a rich crust. Unsalted is best to control the saltiness.
- Cream cheese: Softened cream cheese adds a luscious, creamy texture to the filling. Make sure it’s at room temperature for easy mixing.
- Powdered sugar: This sweetens the cream cheese mixture and gives it a smooth consistency. It dissolves easily, making it perfect for no-bake recipes.
- Whipped topping: Light and fluffy, this adds volume and a delightful creaminess to the dessert. You can use store-bought or homemade.
- Chocolate chips (optional): For those who want an extra chocolatey kick, sprinkle some on top! They add a nice texture and flavor contrast.
For exact measurements, check the bottom of the article where you can find everything listed for easy printing. Now, let’s get ready to create some magic in the kitchen!
How to Make No Bake Oreo Dessert Cups
Now that we have our ingredients ready, let’s dive into the fun part—making these No Bake Oreo Dessert Cups! Follow these simple steps, and you’ll have a delicious dessert that’s sure to impress.
Step 1: Crush the Oreo Cookies
First things first, we need to crush those Oreo cookies into fine crumbs. You can use a food processor for a quick job, or if you’re feeling a bit old-school, grab a ziplock bag and a rolling pin. Just toss the cookies in the bag, seal it tight, and roll away! Aim for a fine crumb texture, like sand on a beach. This will be the base of our dessert.
Step 2: Prepare the Crust
Next, let’s create that delicious crust. In a mixing bowl, combine the crushed Oreos with melted butter. Stir until everything is well mixed and resembles wet sand. Now, take this mixture and press it firmly into the bottom of your serving cups. Make sure it’s packed tightly; this will hold everything together beautifully!
Step 3: Make the Cream Cheese Mixture
Now, it’s time to whip up the creamy filling! In a separate bowl, beat the softened cream cheese and powdered sugar together until smooth. This step is crucial—make sure your cream cheese is at room temperature. It’ll blend much easier, giving you that velvety texture we all love.
Step 4: Fold in the Whipped Topping
Once your cream cheese mixture is smooth, gently fold in the whipped topping. Use a spatula and be careful not to deflate the mixture. We want to keep it light and airy! This step adds that fluffy texture that makes these No Bake Oreo Dessert Cups so delightful.
Step 5: Layer the Mixture
Now comes the fun part—layering! Spoon the cream cheese mixture over the Oreo crust in each cup. Don’t be shy; fill them up! You want those layers to be generous and inviting. The contrast of the creamy filling against the crunchy crust is simply divine.
Step 6: Add Toppings
To make these cups even more irresistible, it’s time to add some toppings. Sprinkle additional crushed Oreos on top for that extra crunch. If you’re a chocolate lover, toss on some chocolate chips too! This is your chance to get creative and make them your own.
Step 7: Refrigerate
Finally, we need to let these beauties set. Pop them in the refrigerator for at least 2 hours. This step is essential; it allows the flavors to meld and the dessert to firm up. Trust me, the wait will be worth it when you take that first bite!
Tips for Success
- Use double stuffed Oreos for an extra creamy flavor.
- Make sure your cream cheese is softened to avoid lumps.
- Press the crust firmly to keep it from crumbling when serving.
- Chill the dessert overnight for even better flavor.
- Experiment with toppings like caramel sauce or nuts for a twist!
Equipment Needed
- Mixing bowls: Any size will do, but a medium bowl is perfect for mixing the cream cheese.
- Food processor or rolling pin: Use a food processor for quick cookie crushing, or a rolling pin for a hands-on approach.
- Spatula: Essential for folding in the whipped topping and layering the mixture.
- Serving cups: Clear cups are great for showcasing those beautiful layers!
Variations of No Bake Oreo Dessert Cups
- Peanut Butter Delight: Add a layer of creamy peanut butter to the cream cheese mixture for a nutty twist.
- Mint Chocolate: Use mint-flavored Oreos and add a few drops of peppermint extract to the cream cheese mixture for a refreshing flavor.
- Fruit Fusion: Layer in some fresh berries like strawberries or raspberries between the Oreo crust and cream cheese mixture for a fruity burst.
- Gluten-Free Option: Substitute regular Oreos with gluten-free Oreos to make this dessert suitable for gluten-sensitive friends.
- Vegan Version: Use vegan cream cheese and whipped topping, along with dairy-free Oreos for a plant-based treat.
Serving Suggestions for No Bake Oreo Dessert Cups
- Pair with a scoop of vanilla ice cream for a delightful contrast in temperature.
- Serve alongside fresh fruit like strawberries or raspberries for a pop of color.
- Drizzle with chocolate or caramel sauce for an extra indulgent touch.
- Garnish with mint leaves for a refreshing finish.
- Present in clear cups to showcase those beautiful layers!
FAQs about No Bake Oreo Dessert Cups
As you embark on your journey to create these delightful No Bake Oreo Dessert Cups, you might have a few questions. Don’t worry; I’ve got you covered! Here are some common queries that pop up:
Can I make these dessert cups in advance?
Absolutely! These No Bake Oreo Dessert Cups can be made a day ahead. Just keep them covered in the fridge until you’re ready to serve. This actually enhances the flavors!
What can I use instead of cream cheese?
If you’re looking for a substitute, try using mascarpone cheese or a dairy-free cream cheese alternative. Both will give you a creamy texture without compromising taste.
How long do these dessert cups last in the fridge?
They’ll stay fresh for about 3-4 days in the refrigerator. Just make sure they’re covered to keep them from drying out!
Can I freeze these dessert cups?
Yes, you can freeze them! Just be aware that the texture may change slightly once thawed. It’s best to enjoy them fresh, but freezing is a great option if you want to save some for later.
What other toppings can I add?
The sky’s the limit! You can add crushed nuts, sprinkles, or even a drizzle of caramel or chocolate sauce. Get creative and make them your own!
Final Thoughts
Creating these No Bake Oreo Dessert Cups is more than just whipping up a sweet treat; it’s about bringing joy to your kitchen and your loved ones. The simplicity of this recipe allows you to focus on what truly matters—sharing delicious moments together. Whether it’s a family gathering or a cozy night in, these cups are sure to spark smiles and happy memories. Plus, the versatility means you can customize them to fit any occasion. So, roll up your sleeves, get creative, and enjoy the delightful experience of making and sharing these irresistible dessert cups!
PrintNo Bake Oreo Dessert Cups You Can’t Resist Making!

Delicious and easy-to-make no bake Oreo dessert cups that are perfect for any occasion.
- Prep Time: 20 minutes
- Cook Time: 0 minutes
- Total Time: 2 hours 20 minutes
- Yield: 6 servings 1x
- Category: Dessert
- Method: No Bake
- Cuisine: American
- Diet: Vegetarian
Ingredients
- 24 Oreo cookies
- 1/2 cup unsalted butter, melted
- 1 cup cream cheese, softened
- 1 cup powdered sugar
- 2 cups whipped topping
- 1/2 cup chocolate chips (optional)
Instructions
- Crush the Oreo cookies into fine crumbs.
- Mix the crushed cookies with melted butter until well combined.
- Press the mixture into the bottom of serving cups to form a crust.
- In a bowl, beat the cream cheese and powdered sugar until smooth.
- Fold in the whipped topping until fully incorporated.
- Layer the cream cheese mixture over the Oreo crust in the cups.
- Top with additional crushed Oreos and chocolate chips if desired.
- Refrigerate for at least 2 hours before serving.
Notes
- For a richer flavor, use double stuffed Oreos.
- Can be made a day in advance for convenience.
- Feel free to add your favorite toppings like caramel or nuts.
Nutrition
- Serving Size: 1 cup
- Calories: 350
- Sugar: 25g
- Sodium: 150mg
- Fat: 20g
- Saturated Fat: 10g
- Unsaturated Fat: 8g
- Trans Fat: 0g
- Carbohydrates: 40g
- Fiber: 1g
- Protein: 3g
- Cholesterol: 30mg