Magical Potion Swirl Marble Cake: A 3-Ingredient Wonder
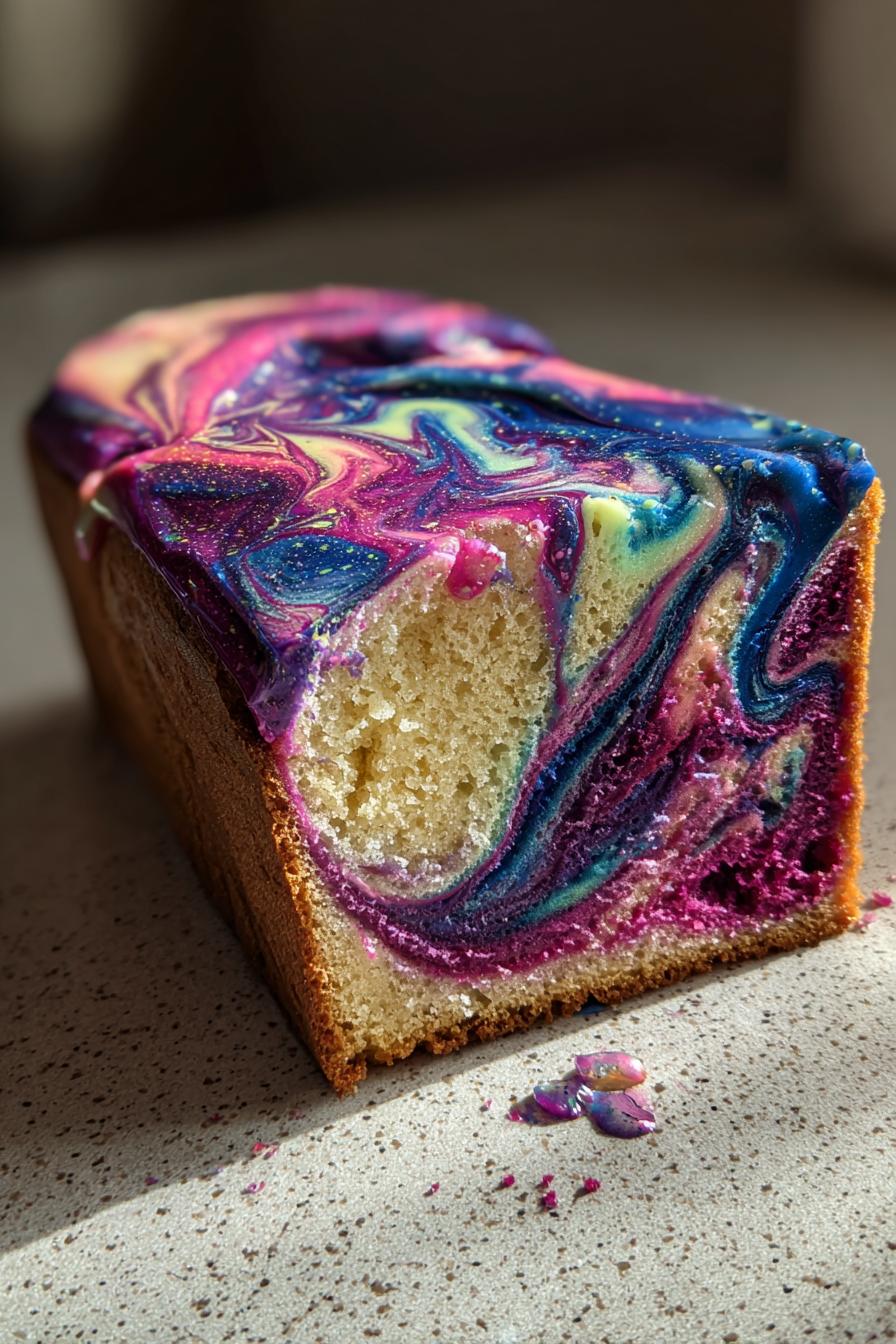
Oh, the magic of a potion swirl marble cake! I still remember the first time I made one—how the colors swirled together like some enchanted elixir straight out of a wizard’s kitchen. It’s not just a cake; it’s a showstopper, the kind of dessert that makes everyone at the table lean in for a closer look. Perfect for Halloween, fantasy-themed parties, or just when you want to add a little whimsy to your baking, this cake is as fun to make as it is to eat.
I’ve baked my fair share of marble cakes over the years, but there’s something extra special about this version. The way the blue and green hues mingle with the rich chocolate swirls feels almost alchemical. And trust me, the taste? Just as magical. The vanilla and cocoa balance each other beautifully, while the colors add a playful touch without overpowering the flavor. Whether you’re a seasoned baker or just starting out, this potion swirl marble cake is one of those recipes that’ll make you feel like a kitchen sorcerer.
Why You’ll Love This Potion Swirl Marble Cake
This potion swirl marble cake isn’t just delicious—it’s a total crowd-pleaser. Here’s why you’ll adore it:
- Visually stunning: The swirls of blue, green, and chocolate look like a magical potion, making it a showstopper at any event.
- Party perfect: Ideal for themed parties, Halloween, or just adding a bit of whimsy to your dessert table.
- Balanced flavors: The vanilla and cocoa combo is a classic, offering just the right mix of sweet and rich.
- Easy to customize: Swap colors, add extracts, or tweak the swirls to make it your own.
Trust me, this cake is as fun to make as it is to eat!
Ingredients for Potion Swirl Marble Cake
Alright, let’s gather our magical ingredients! Here’s what you’ll need to create this enchanting potion swirl marble cake:
- 2 cups all-purpose flour – spooned and leveled, please!
- 1 1/2 cups granulated sugar – because every potion needs sweetness
- 1/2 cup unsalted butter, softened – leave it out for 30 minutes first
- 3 large eggs – room temperature works best
- 1 cup milk – whole milk gives the richest texture
- 1 tsp vanilla extract – the pure stuff, not imitation
- 2 tsp baking powder – our rising charm
- 1/2 tsp salt – to balance all that sweetness
- 2 tbsp cocoa powder, sifted – no lumps in our potion!
- Blue and green gel food coloring – gel gives the most vibrant colors
See those notes about softened butter and room temp eggs? That’s not just me being fussy – it makes all the difference in creating that perfect magical batter consistency!
Equipment You’ll Need
Here’s what you’ll need to whip up this magical potion swirl marble cake:
- Bundt pan – for that perfect potion shape
- Stand mixer or hand mixer – to cream that butter and sugar
- Mixing bowls – for dividing and coloring the batter
- Knife or skewer – for swirling those colors just right
Simple tools, big magic!
How to Make Potion Swirl Marble Cake
Now comes the fun part – turning these simple ingredients into a magical potion swirl marble cake! Don’t let the swirling intimidate you. With these easy steps, you’ll be creating edible magic in no time.
Preparing the Batter
First things first – preheat that oven to 350°F (175°C) and give your bundt pan a good greasing. I like to use butter and a light dusting of flour to make sure our cake pops out perfectly later.
Now, let’s make that batter sing! Cream together the softened butter and sugar until it’s light and fluffy – about 3-4 minutes with a mixer. This is where the magic starts, creating tiny air pockets that’ll make our cake tender. Add the eggs one at a time, mixing well after each. Then splash in that vanilla extract – oh, that heavenly smell!
In another bowl, whisk together the flour, baking powder, and salt. Here’s my trick: alternate adding the dry ingredients and milk to the butter mixture, starting and ending with the dry. This keeps everything smooth and prevents overmixing. You’ll know it’s ready when the batter is just combined – no more streaks of flour, but still beautifully thick and creamy.
Creating the Potion Swirl Effect
Here’s where the real potion magic happens! Divide your batter evenly among three bowls. Leave one plain for the vanilla base – this is our “potion’s” neutral color. Mix cocoa powder into the second bowl for rich chocolate swirls. Now for the fun part: add blue and green gel food coloring to the third bowl until you get that perfect mystical hue – I usually do about 10 drops blue and 5 drops green, but adjust to your taste.
Now, the layering: pour half the vanilla batter into your prepared pan, then alternate spoonfuls of chocolate and colored batter. Repeat with remaining vanilla and the colored batters. Grab a knife or skewer and make one big, confident swirl through the batter – just one or two figure-eight motions is all you need! Overdo it, and your beautiful colors will muddle together.
Baking and Cooling
Pop that beauty into your preheated oven for 45-50 minutes. Resist opening the door for at least the first 30 minutes – we don’t want any temperature drops! The cake is done when a toothpick inserted comes out with just a few moist crumbs (no wet batter).
Here’s my golden rule: let it cool in the pan for 15 minutes before turning it out onto a wire rack. I know, the wait is torture, but trust me – this prevents the cake from breaking apart. Then, the hardest part – let it cool completely before slicing. I usually wait at least 2 hours (if I can resist that long!). This patience pays off in clean, beautiful slices that show off all those magical swirls.
Tips for the Perfect Potion Swirl Marble Cake
Want to nail this potion swirl marble cake every time? Here are my tried-and-true tips:
- Go for gel food coloring: It’s more vibrant and doesn’t thin out your batter like liquid coloring can.
- Don’t overmix the swirls: One or two confident swirls with a knife or skewer is all you need. Too much, and your colors will blend into a muddy mess.
- Grease that pan thoroughly: Use butter and a light dusting of flour, especially in all the nooks and crannies of your bundt pan. Trust me, you don’t want your cake to stick!
- Let it cool completely: I know it’s tempting to dig in, but waiting ensures clean slices that show off those magical swirls.
Follow these, and your cake will be pure kitchen magic!
Ingredient Substitutions and Variations
Want to put your own magical spin on this potion swirl marble cake? Here are some fun tweaks I’ve tried over the years:
- Milk swap: Out of milk? Plain yogurt or buttermilk works beautifully – they actually make the cake extra moist!
- Natural colors: Skip the food coloring and try matcha powder for green or blue spirulina for blue (just reduce other liquids slightly).
- Flavor boosts: Add a teaspoon of citrus zest to the vanilla batter or a pinch of cinnamon to the chocolate for extra depth.
- Dairy-free: Use plant-based butter and almond milk – the texture stays wonderfully tender.
The beauty of this recipe? It’s like a spellbook – feel free to experiment and make it your own!
Serving and Storing Potion Swirl Marble Cake
This potion swirl marble cake deserves a grand presentation! I love dusting mine with a little powdered sugar right before serving – it makes those magical swirls really pop. For extra flair, serve it on a cake stand surrounded by themed decorations or glowing LED tea lights.
Leftovers? (As if!) Store any uneaten cake in an airtight container at room temperature for 3–4 days. The flavors actually deepen slightly overnight, making it even more delicious the next day. Just be sure to keep it covered – we don’t want our magical potion drying out!
Potion Swirl Marble Cake FAQs
Got questions about your magical baking adventure? Here are answers to the ones I get asked most about this potion swirl marble cake:
Can I use liquid food coloring instead of gel?
You can, but gel works much better! Liquid coloring tends to thin out your batter and gives paler results. If it’s all you have, use less milk to compensate and add coloring drop by drop until you get the hue you want.
How do I keep my swirls from blending together?
The secret is restraint! One big, confident swirl with your knife or skewer is plenty. I like to make one figure-eight motion through the batter – any more and those beautiful separate colors start to muddle.
Can I make this gluten-free?
Absolutely! Swap the all-purpose flour for your favorite 1:1 gluten-free blend. Just be sure it contains xanthan gum, which helps mimic gluten’s structure. The texture might be slightly denser, but still delicious.
Why did my cake stick to the pan?
Bundt pans are tricky! I grease mine extra thoroughly with butter, getting into every nook, then dust with flour. Letting the cake cool for 15 minutes before turning it out also helps prevent sticking catastrophes.
Can I bake this in regular cake pans?
Of course! Two 9-inch rounds work great – just reduce baking time to 30-35 minutes. The swirl pattern might look different without the bundt’s ridges, but it’ll taste just as magical.
Nutritional Information
Here’s the magical breakdown per slice of this potion swirl marble cake (based on 12 servings):
- Calories: 280
- Sugar: 20g
- Fat: 10g (6g saturated)
- Carbs: 42g
- Protein: 4g
Remember, nutrition varies based on ingredients used – especially if you tweak the recipe with different milks or toppings. But hey, a little magic never hurt anyone!
PrintMagical Potion Swirl Marble Cake: A 3-Ingredient Wonder
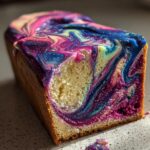
A visually stunning marble cake with a swirl pattern resembling a potion. Perfect for themed parties or as a showstopper dessert.
- Prep Time: 20 minutes
- Cook Time: 50 minutes
- Total Time: 1 hour 10 minutes
- Yield: 12 servings 1x
- Category: Dessert
- Method: Baking
- Cuisine: International
- Diet: Vegetarian
Ingredients
- 2 cups all-purpose flour
- 1 1/2 cups granulated sugar
- 1/2 cup unsalted butter, softened
- 3 large eggs
- 1 cup milk
- 1 tsp vanilla extract
- 2 tsp baking powder
- 1/2 tsp salt
- 2 tbsp cocoa powder
- Blue and green food coloring
Instructions
- Preheat oven to 350°F (175°C). Grease a bundt pan.
- Cream butter and sugar until light and fluffy.
- Add eggs one at a time, mixing well after each.
- Mix in vanilla extract.
- In a separate bowl, whisk flour, baking powder, and salt.
- Alternately add dry ingredients and milk to the butter mixture.
- Divide batter into three bowls.
- Leave one plain, mix cocoa into the second, and color the third with blue and green.
- Layer batters in the pan and swirl with a knife.
- Bake for 45-50 minutes until a toothpick comes out clean.
- Cool before serving.
Notes
- Use gel food coloring for vibrant colors.
- Don’t overmix the swirls to maintain definition.
- Let cake cool completely before slicing.
Nutrition
- Serving Size: 1 slice
- Calories: 280
- Sugar: 20g
- Sodium: 150mg
- Fat: 10g
- Saturated Fat: 6g
- Unsaturated Fat: 3g
- Trans Fat: 0g
- Carbohydrates: 42g
- Fiber: 1g
- Protein: 4g
- Cholesterol: 70mg