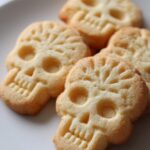
Spooky 5-Ingredient Skull-Shaped Shortbread Everyone Loves
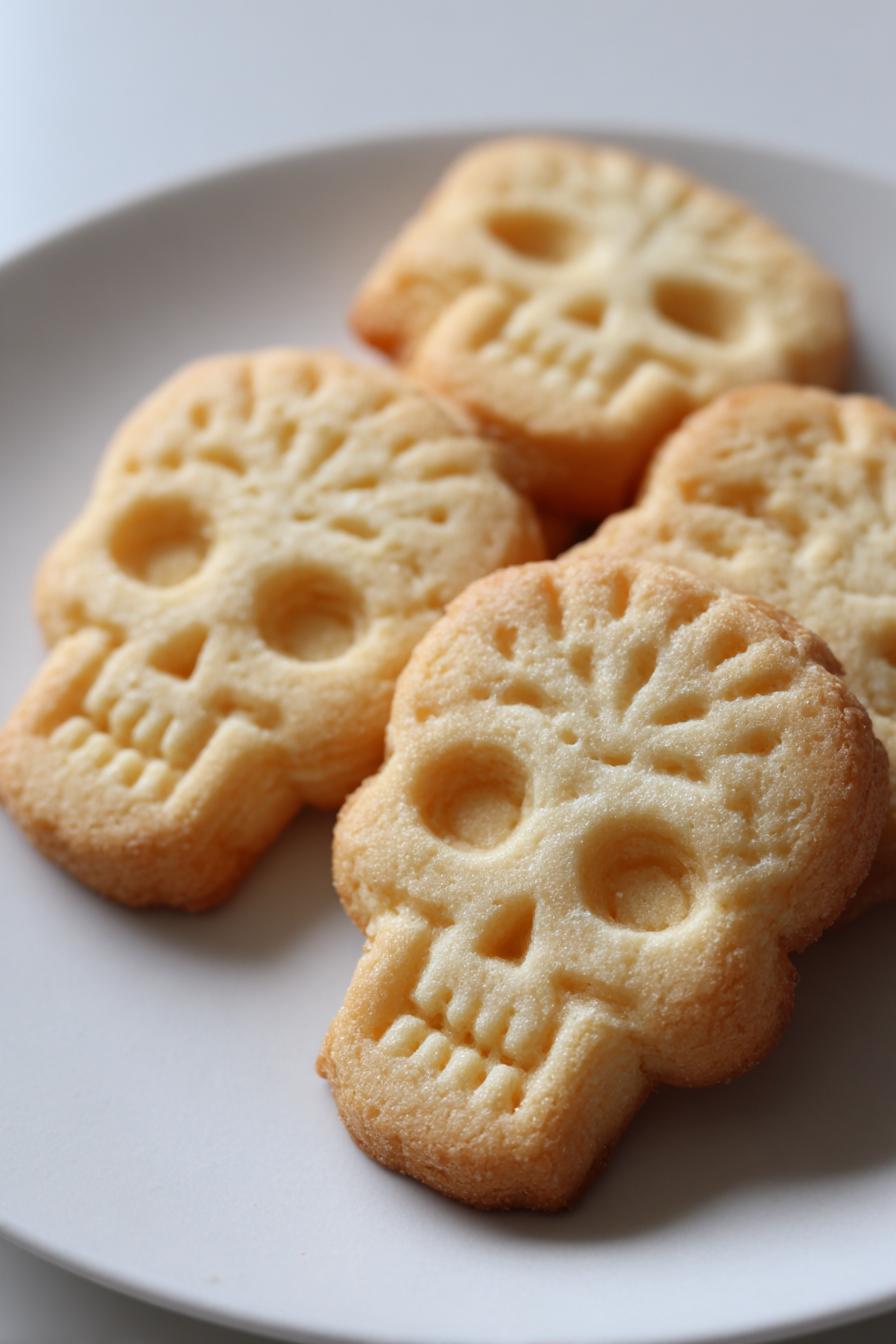
No heading needs to be written for the introduction. I’ll never forget the first time I made skull-shaped shortbread—it was for a last-minute Halloween party, and I needed something quick, impressive, and a little spooky. These buttery little cookies saved the day! Now, years later (and after hundreds of batches), they’re my go-to treat for Halloween parties, Día de los Muertos celebrations, or just when I want to creep out my kids’ lunchboxes. The best part? They’re foolproof. With just five simple ingredients and a skull cookie cutter, you can whip up cookies that look fancy but are seriously easy. Trust me, once you see how much fun these are to make—and how fast they disappear—you’ll be hooked.
Why You’ll Love This Skull-Shaped Shortbread
Oh my gosh, where do I even start with why these cookies are the best? Let me count the ways:
- Buttery perfection that melts in your mouth – That classic shortbread texture? Check. Rich, tender crumb? Double check. I swear people go wild for that simple, irresistible flavor.
- So easy a zombie could make them – No fancy skills needed! Just mix, roll, cut, and bake. Perfect for when you’re scrambling last-minute (we’ve all been there before a party).
- Works for any spooky occasion – Halloween? Obviously. But they’re also perfect for Dia de los Muertos, goth birthday parties, or just when you want to freak out your coworkers at lunch.
- Endless decorating fun – Go simple with powdered sugar “dust” or get fancy with piped icing details. Kids love helping with this part!
Seriously, these cookies are always the first to disappear at any gathering. That buttery, just-sweet-enough flavor gets people every time!
Skull-Shaped Shortbread Ingredients
Here’s everything you’ll need to whip up these deliciously spooky cookies:
- 1 cup unsalted butter, softened – Don’t rush this! Properly softened butter creams better (it should dent easily when pressed but not be melty)
- 2/3 cup granulated sugar – Plain white sugar works perfectly here
- 1/2 teaspoon vanilla extract – The real stuff makes all the difference
- 2 1/4 cups all-purpose flour – I always spoon and level mine to avoid dense cookies
- 1/4 teaspoon salt – Just enough to balance the sweetness
See? Nothing weird or complicated – just pantry staples transformed into something magical!
Equipment You’ll Need for Skull-Shaped Shortbread
You don’t need much to make these spooky cookies, but here are the essentials:
- Skull cookie cutters – The star of the show! I like having a few sizes for variety.
- Parchment paper – Keeps the cookies from sticking and makes cleanup a breeze.
- Rolling pin – A basic one works fine, but I love my French rolling pin for even thickness.
That’s it! No fancy gadgets required—just these basics and you’re ready to bake.
How to Make Skull-Shaped Shortbread
Okay, let’s get baking! First things first – preheat that oven to 325°F (165°C). Trust me, you want it nice and hot by the time your cookies are ready to go in. While that’s heating up, grab your softened butter and sugar. Cream them together until they’re light and fluffy – this is where the magic starts! I usually let my stand mixer run for a good 2-3 minutes. Then mix in that vanilla extract – just enough to add a whisper of flavor without overpowering the buttery goodness.
Now, gradually add your flour and salt. The dough will start to come together beautifully. If it feels too soft or sticky, don’t panic! Just wrap it in plastic and pop it in the fridge for 20-30 minutes. You want it firm enough to roll but not so cold it cracks. I’ve learned this the hard way after some late-night baking disasters!
Rolling and Cutting the Dough
Here’s where the fun begins! Lightly flour your work surface – just enough to prevent sticking but not so much your dough gets tough. Roll it out to about 1/4-inch thickness. Pro tip: use wooden dowels or guides on either side of your dough as thickness markers. Now press those skull cutters firmly into the dough. Wiggle them slightly if needed, but don’t twist – we want clean edges! If the dough sticks, dip your cutter in flour between cuts. Troubleshooting time: If your shapes tear when transferring, the dough might be too warm. No worries – just chill for 10 minutes and try again!
Baking and Cooling Skull-Shaped Shortbread
Slide those spooky shapes onto your parchment-lined baking sheets and into the oven they go! Bake for 15-18 minutes, watching for when the edges just start turning lightly golden. They’ll still look pale on top, and that’s perfect – shortbread shouldn’t get too dark. When they’re done, let them cool completely on the baking sheets. I know it’s tempting to decorate right away, but trust me, warm cookies plus icing equals messy disaster. Wait until they’re completely cool for picture-perfect decorating!
Decorating Skull-Shaped Shortbread
Now comes the best part—decorating! I love using royal icing for intricate details like “stitches” or “cracks” on the skulls. Just pipe it on with a small tip and let it set. For something quicker, melted chocolate works wonders—dip half the cookie in dark chocolate for a dramatic look. Want to keep it simple? A dusting of powdered sugar gives them a ghostly vibe. Get creative—edible glitter, colored icing, or even candy eyes can take these cookies to the next level!
Tips for Perfect Skull-Shaped Shortbread
Want to make your skull-shaped shortbread absolutely flawless? Here are my tried-and-true tips:
- Chill the dough if it’s sticky – If your dough feels too soft, wrap it in plastic and pop it in the fridge for 20-30 minutes. It’ll roll out like a dream!
- Keep the thickness uniform – Use wooden dowels or guides on either side of your dough to roll it out evenly. This ensures all your cookies bake at the same time.
- Rotate your baking sheets – Halfway through baking, switch the sheets from top to bottom racks for even browning. Ovens can be sneaky with hot spots!
Follow these simple tricks, and you’ll have spooky, show-stopping cookies every time!
Skull-Shaped Shortbread Variations
Once you’ve mastered the basic recipe, it’s time to get creative! Here are some of my favorite ways to mix things up:
- Zesty twist – Add the finely grated zest of one lemon or orange to the dough for a bright, fresh flavor that cuts through the buttery richness.
- Chocolate-dipped decadence – Melt some dark chocolate and dip half of each cooled cookie for an elegant (but still spooky) look.
- Edible glitter dust – Brush cookies with a thin layer of corn syrup or piping gel, then sprinkle with black or silver edible glitter for serious gothic glam.
The best part? You can mix and match these ideas to create your own signature spooky cookies!
Storing Skull-Shaped Shortbread
These cookies keep beautifully if you store them right! Once completely cooled, pop them in an airtight container with parchment between layers (that icing needs to stay pretty!). They’ll stay fresh at room temperature for about a week—if they last that long in your house! For longer storage, you can freeze the undecorated cookies for up to 3 months. Just thaw at room temperature before decorating. Pro tip: Wait to add any icing or chocolate until you’re ready to serve for the freshest look!
Skull-Shaped Shortbread Nutrition
Here’s the scoop on nutrition for these spooky treats (based on the basic recipe before decorating): Each cookie clocks in at about 120 calories with that perfect buttery shortbread texture we all love. Keep in mind that adding icing, chocolate, or other decorations will change these numbers. I always say – when it comes to Halloween cookies, the scariest thing should be how fast they disappear, not the nutrition facts!
Skull-Shaped Shortbread FAQs
Got questions? I’ve got answers! Here are the most common things people ask me about these cookies:
Can I use salted butter? Absolutely! Just skip the added salt in the recipe. The salted butter will give you that perfect sweet-salty balance we all love.
How do I prevent spreading? Chilling is your best friend here! If your dough feels at all soft or sticky after mixing, wrap it up and pop it in the fridge for 20-30 minutes before rolling. Cold dough holds its shape beautifully.
Can I make these ahead? You bet! The undecorated cookies freeze amazingly well for up to 3 months. Just thaw at room temperature before decorating. This makes them perfect for party planning!
Now I want to see YOUR creepy creations! Tag me with your spooky skull shortbread photos – I love seeing all the creative decorating ideas people come up with!
PrintSpooky 5-Ingredient Skull-Shaped Shortbread Everyone Loves
Skull-shaped shortbread is a fun and spooky treat perfect for Halloween or themed parties. These buttery cookies are easy to make and customizable.
- Prep Time: 20 minutes
- Cook Time: 18 minutes
- Total Time: 38 minutes
- Yield: 24 cookies 1x
- Category: Dessert
- Method: Baking
- Cuisine: International
- Diet: Vegetarian
Ingredients
- 1 cup unsalted butter, softened
- 2/3 cup granulated sugar
- 1/2 teaspoon vanilla extract
- 2 1/4 cups all-purpose flour
- 1/4 teaspoon salt
Instructions
- Preheat oven to 325°F (165°C). Line baking sheets with parchment paper.
- Cream butter and sugar together until light and fluffy.
- Mix in vanilla extract.
- Gradually add flour and salt until dough forms.
- Roll dough to 1/4-inch thickness on a floured surface.
- Cut out skull shapes using cookie cutters.
- Place cookies on prepared baking sheets.
- Bake for 15-18 minutes until edges are lightly golden.
- Cool on wire racks before decorating.
Notes
- Chill dough for 30 minutes if too soft.
- Use royal icing or melted chocolate for decoration.
- Store in airtight container for up to 1 week.
Nutrition
- Serving Size: 1 cookie
- Calories: 120
- Sugar: 6g
- Sodium: 25mg
- Fat: 7g
- Saturated Fat: 4g
- Unsaturated Fat: 3g
- Trans Fat: 0g
- Carbohydrates: 13g
- Fiber: 0g
- Protein: 1g
- Cholesterol: 20mg