Creepy Spiderweb Cheesecake Swirl in 6 Easy Steps
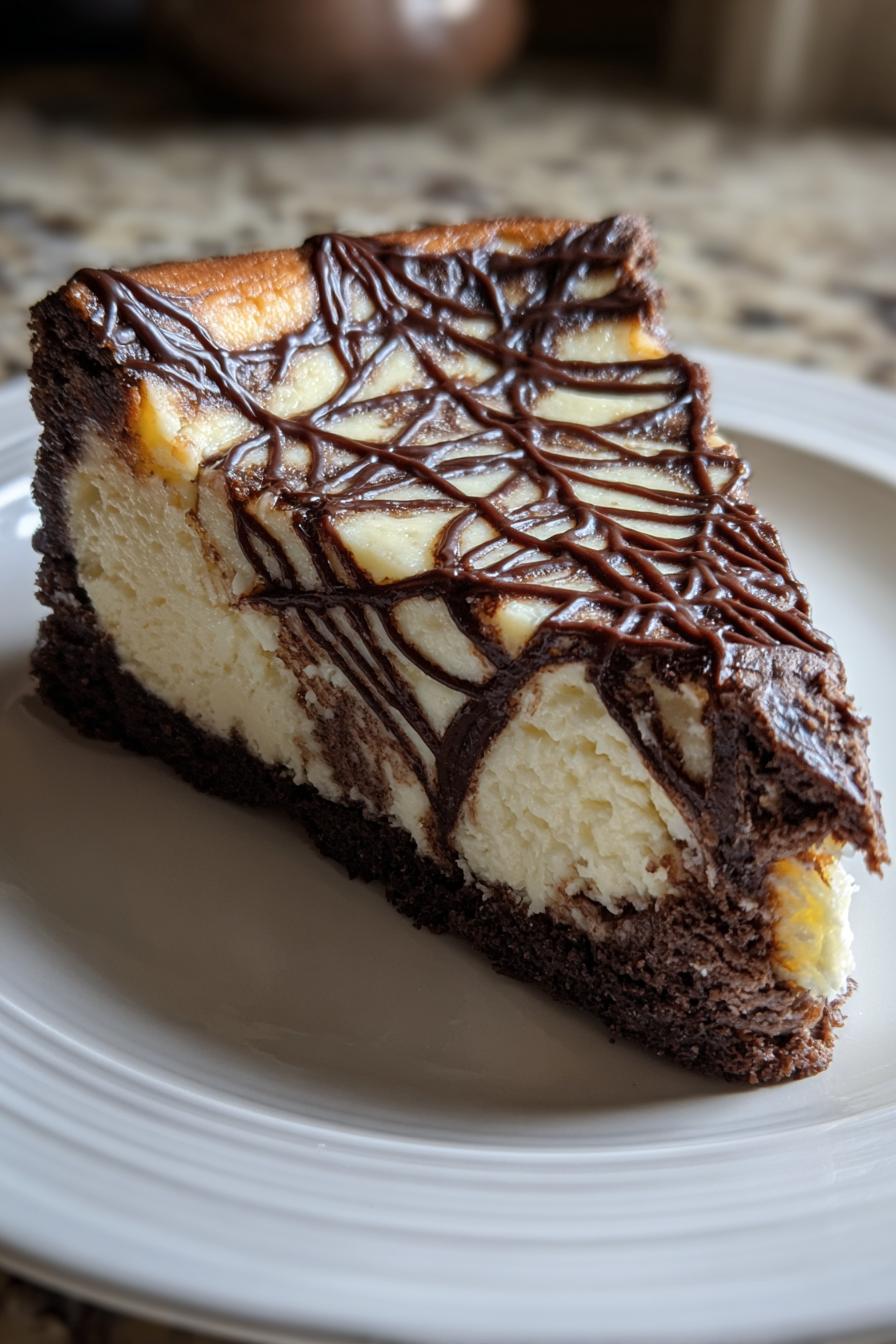
I still remember the first time I made my spiderweb cheesecake swirl for a Halloween party. My friends’ jaws literally dropped when I lifted the cake dome – it looked like something straight out of a witch’s kitchen! That dramatic black web swirling through creamy white cheesecake became my signature Halloween dessert, and now I’m sharing all my secrets with you.
This isn’t your ordinary cheesecake. The spiderweb design makes it a total showstopper, but here’s the best part – it’s way easier to create than it looks. Just wait until you see people’s reactions when you bring this to your next Halloween bash or spooky-themed party. The contrast between the vanilla cheesecake and inky black swirls is absolutely mesmerizing, and the texture? Pure creamy perfection.
What I love most is how this dessert combines that classic New York cheesecake richness with a playful, eerie twist. It’s become such a hit that my nieces and nephews now demand it every October. Trust me, once you try this spiderweb cheesecake swirl, you’ll want to make it every spooky season too!
Why You’ll Love This Spiderweb Cheesecake Swirl
This isn’t just another cheesecake – it’s pure Halloween magic in dessert form! Here’s why it’ll become your new favorite:
- Total showstopper: That dramatic spiderweb design gets gasps every time – wait till you see everyone reaching for their phones to snap pictures!
- Easier than it looks: The swirling technique is simple once you know the trick (hint: start from the center and pull outward).
- Creamy dreamy texture: The perfect balance of rich cheesecake and tangy sour cream makes every bite heavenly.
- Halloween hero: No more boring orange treats – this sophisticated black-and-white beauty steals the show at any spooky gathering.
- Make-ahead magic: Tastes even better after chilling overnight, so you can focus on costumes instead of last-minute baking.
Ingredients for Spiderweb Cheesecake Swirl
Gather these simple ingredients, and you’re halfway to spooky dessert perfection! Here’s exactly what you’ll need:
- 2 cups graham cracker crumbs – about 15 full crackers crushed (I like to use a zip-top bag and rolling pin – so therapeutic!)
- 1/2 cup melted butter – unsalted is best so you control the saltiness
- 24 oz cream cheese – 3 standard blocks, softened to room temp (this is crucial – no shortcuts!)
- 1 cup granulated sugar – I’ve tried reducing it, but trust me, this amount makes the texture just right
- 1 tsp vanilla extract – pure vanilla makes all the difference here
- 3 large eggs – at room temperature, please! Cold eggs can make the batter lumpy
- 1/2 cup sour cream – the secret to that velvety smooth texture
- 1/4 cup black food coloring – gel works best for that deep, dark spiderweb color (liquid can thin the batter)
Equipment You’ll Need
Don’t worry – you probably have most of these already in your kitchen! Here’s what you’ll grab:
- 9-inch springform pan – the sides come off so your beautiful spiderweb stays perfect
- Stand mixer or hand mixer – for that ultra-smooth cheesecake batter
- Mixing bowls – one for the crust, two for dividing the batter
- Thin knife or toothpick – your spiderweb-making magic wand!
- Measuring cups/spoons – because baking is a science, even when it’s spooky
How to Make Spiderweb Cheesecake Swirl
Okay, let’s make some edible magic! Don’t let the fancy look fool you – I’ll walk you through each step so your spiderweb comes out perfectly. Here’s exactly how I do it:
1. Preheat and Prep: First, crank that oven to 325°F (165°C). While it heats, make your crust by mixing graham cracker crumbs with melted butter until it feels like wet sand. Press it firmly into your springform pan – I use the bottom of a glass to get it nice and even.
2. Creamy Dreamy Base: Now for the fun part! Beat your softened cream cheese (seriously, don’t skip the softening – I’ve learned this the hard way) with sugar and vanilla until it’s completely smooth. Add eggs one at a time, mixing just until combined after each. Stir in the sour cream – this is what gives that luscious texture!
3. Black Magic: Scoop out about 1 cup of the batter into another bowl. Here’s where the gel food coloring comes in – add it gradually until you get that deep, inky black. I usually use about 1/4 cup, but add it slowly until you’re happy with the color.
4. The Big Pour: Pour the white batter over your crust. Now drop spoonfuls of black batter on top in concentric circles – think bullseye! I do about 5-6 dollops total.
5. Web Weaving: Take a thin knife or toothpick and start dragging from the center outward to create the web. Wipe your knife between swipes for clean lines. Don’t overdo it – 5-6 passes max keeps the design crisp.
6. Bake & Cool: Bake for 45-50 minutes until the edges are set but the center still jiggles slightly. Turn off the oven, crack the door, and let it cool slowly for an hour. This prevents cracks! Then refrigerate at least 4 hours (overnight is best) before serving.
See? Not nearly as scary as it looks! The hardest part is waiting for it to chill – but trust me, that first slice revealing your perfect spiderweb is worth every minute.
Tips for the Perfect Spiderweb Cheesecake Swirl
After making this cheesecake more times than I can count, I’ve picked up some tricks that make all the difference:
- Chill out: I know it’s tempting, but don’t skip the 4-hour chill time! Overnight is even better – the flavors develop and the texture becomes dreamier.
- Go gel: Liquid food coloring waters down the batter. Gel coloring gives that deep, rich black without changing the consistency.
- Room temp matters: Cold cream cheese = lumpy batter. Let everything sit out for at least an hour before mixing.
- Less is more: When swirling, make fewer passes with your knife for cleaner lines. Over-mixing makes a muddy web.
- Slow your roll: That gradual oven cool-down prevents cracks – patience makes perfect cheesecake!
Ingredient Notes and Substitutions
Let’s talk ingredients! Here’s the scoop on what works best and how you can tweak things if needed:
- Graham crackers: If you don’t have graham cracker crumbs, you can crush regular graham crackers (about 15 full sheets). For gluten-free, use gluten-free graham crackers or even crushed gluten-free cookies.
- Butter: Unsalted butter is ideal, but salted works in a pinch—just skip adding extra salt to the crust. For a dairy-free option, try vegan butter.
- Cream cheese: Full-fat cream cheese gives the best texture, but reduced-fat works if you’re cutting calories. Just avoid fat-free—it can make the cheesecake grainy.
- Food coloring: Gel food coloring is my go-to for that intense black. Liquid works in a pinch, but you’ll need more, and it might thin the batter slightly.
- Sour cream: Plain Greek yogurt is a great substitute if you’re out of sour cream—it adds the same tang and creaminess.
With these swaps, you can customize this cheesecake to fit your needs without sacrificing that spooky perfection!
Serving and Storing Spiderweb Cheesecake Swirl
This cheesecake deserves a dramatic reveal! I love serving it on a black cake stand with some plastic spiders crawling up the sides for extra Halloween flair. A dusting of powdered sugar makes the spiderweb pop even more – just tap a strainer lightly over the top before serving.
For storage, keep it covered in the fridge for up to 5 days (if it lasts that long!). The flavors actually improve after a day. You can also freeze slices wrapped tightly in plastic for up to 2 months – just thaw overnight in the fridge. No need to reheat – this beauty is meant to be enjoyed cold so the spiderweb design stays sharp!
Spiderweb Cheesecake Swirl FAQs
I get so many questions about this cheesecake every Halloween season! Here are the answers to the ones I hear most often:
Can I use liquid food coloring instead of gel?
You can, but gel works way better! Liquid coloring needs about 1/4 to 1/3 cup to get that deep black, which can make your batter a bit runny. Gel gives intense color with just a few tablespoons. If liquid’s all you have, add it slowly and stop when you’re happy with the shade.
How long does the cheesecake need to chill?
At least 4 hours, but overnight is magic. The texture firms up perfectly, and the flavors develop beautifully. I know it’s hard to wait when you’re excited to see your spiderweb design, but trust me – patience pays off here!
Why does my spiderweb look muddy instead of clean?
You might be over-swirling! Use a thin knife, make clean outward strokes from the center (5-6 passes max), and wipe the knife between strokes. Less is more when creating that perfect web effect.
Can I make this ahead for a party?
Absolutely! This cheesecake actually tastes best made 1-2 days in advance. Just keep it covered in the fridge until showtime. The spiderweb holds up beautifully!
Nutritional Information
While I’ve included a general idea of the nutrition per slice, please remember that values can vary based on specific ingredients and brands used. This is just an estimate to give you a rough idea—your exact nutritional content might differ slightly. Always check labels if you’re tracking closely!
PrintCreepy Spiderweb Cheesecake Swirl in 6 Easy Steps

A visually stunning cheesecake with a spiderweb swirl design, perfect for Halloween or themed parties.
- Prep Time: 20 minutes
- Cook Time: 50 minutes
- Total Time: 1 hour 10 minutes
- Yield: 12 servings 1x
- Category: Dessert
- Method: Baking
- Cuisine: American
- Diet: Vegetarian
Ingredients
- 2 cups graham cracker crumbs
- 1/2 cup melted butter
- 24 oz cream cheese, softened
- 1 cup granulated sugar
- 1 tsp vanilla extract
- 3 large eggs
- 1/2 cup sour cream
- 1/4 cup black food coloring
Instructions
- Preheat your oven to 325°F.
- Mix graham cracker crumbs with melted butter and press into a springform pan.
- Beat cream cheese, sugar, and vanilla until smooth.
- Add eggs one at a time, mixing well after each addition.
- Blend in sour cream.
- Divide the batter into two bowls. Add black food coloring to one bowl.
- Pour the white batter into the crust. Drop spoonfuls of black batter on top.
- Use a knife to create a spiderweb design by dragging it from the center outward.
- Bake for 45-50 minutes until set.
- Cool completely before serving.
Notes
- Chill the cheesecake for at least 4 hours for best results.
- Use gel food coloring for a more vibrant black color.
Nutrition
- Serving Size: 1 slice
- Calories: 350
- Sugar: 25g
- Sodium: 300mg
- Fat: 22g
- Saturated Fat: 12g
- Unsaturated Fat: 8g
- Trans Fat: 0g
- Carbohydrates: 30g
- Fiber: 1g
- Protein: 6g
- Cholesterol: 110mg