Tiny cream puff bites: Discover the perfect treat!
Introduction to Tiny Cream Puff Bites
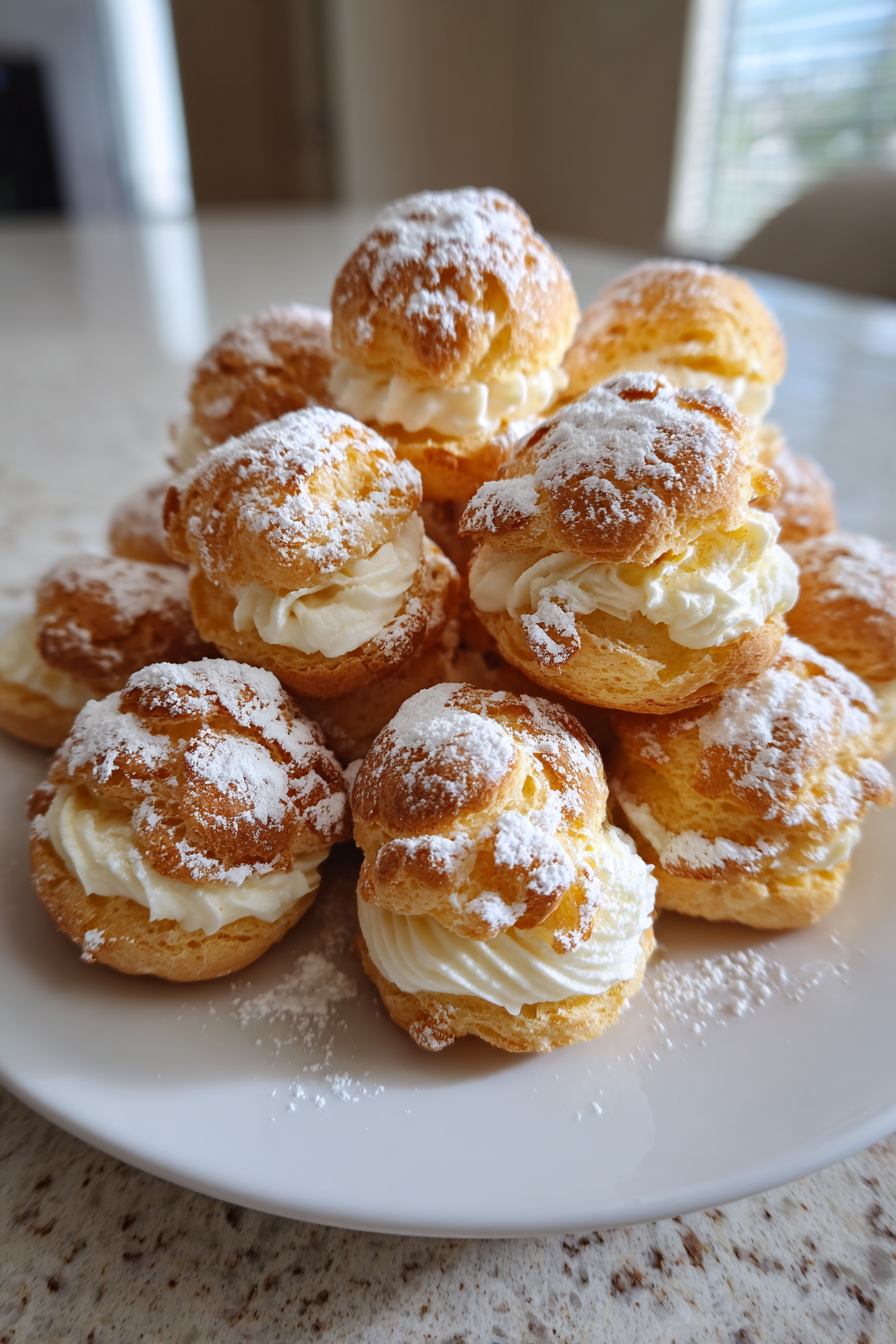
As a busy mom, I know how precious time can be, especially when it comes to whipping up something special for my family. That’s why I adore these tiny cream puff bites! They’re not just delightful little pastries; they’re a quick solution for a busy day or a charming treat to impress your loved ones. Imagine the joy on their faces when they take a bite of these airy, creamy delights! With just a handful of ingredients and a bit of love, you can create a dessert that feels fancy but is surprisingly easy to make.
Why You’ll Love This Tiny Cream Puff Bites
These tiny cream puff bites are a game-changer for any busy kitchen. They come together quickly, making them perfect for last-minute gatherings or a sweet surprise for your family. The light, airy texture paired with a rich, creamy filling creates a taste sensation that’s hard to resist. Plus, they’re versatile! You can customize the filling to suit any occasion or preference, ensuring everyone leaves with a smile.
Ingredients for Tiny Cream Puff Bites
Gathering the right ingredients is the first step to creating these delightful tiny cream puff bites. Here’s what you’ll need:
- Water: This is the base for your dough, helping to create steam that puffs up the pastries.
- Unsalted Butter: Adds richness and flavor. Using unsalted allows you to control the saltiness of your puffs.
- All-Purpose Flour: The backbone of the dough, it provides structure and helps the puffs rise beautifully.
- Salt: Just a pinch enhances the flavors and balances the sweetness of the cream filling.
- Large Eggs: These are crucial for binding the dough and giving it that airy texture. They also help with the rise.
- Heavy Cream: The star of the filling! It whips up beautifully to create a light and fluffy texture.
- Powdered Sugar: This sweetens the cream filling and gives it a smooth consistency.
- Vanilla Extract: A splash of this adds a warm, inviting flavor to the whipped cream.
Feel free to get creative! You can experiment with different fillings like chocolate ganache or fruit-flavored creams to suit your taste. For those with dietary restrictions, consider using dairy-free alternatives for the cream and butter. The exact quantities for each ingredient are listed at the bottom of the article, ready for printing!
How to Make Tiny Cream Puff Bites
Step 1: Preheat the Oven
Preheating your oven to 400°F (200°C) is crucial for baking tiny cream puff bites. This step ensures that the dough puffs up beautifully as soon as it hits the hot air. A properly preheated oven creates the perfect environment for those delightful pastries to rise and turn golden brown.
Step 2: Prepare the Dough
In a saucepan, combine 1 cup of water and 1/2 cup of unsalted butter. Bring this mixture to a rolling boil over medium heat. The boiling water is essential as it helps to melt the butter and creates steam, which is key for puffing up the dough. Once boiling, remove the saucepan from heat and let it cool slightly before moving on to the next step. This cooling period is important to avoid cooking the eggs prematurely when added later.
Step 3: Mix in Flour and Salt
Now, it’s time to add 1 cup of all-purpose flour and 1/4 teaspoon of salt to the saucepan. Stir vigorously with a wooden spoon until the mixture forms a ball and pulls away from the sides of the pan. This process is vital as it activates the gluten in the flour, giving your tiny cream puff bites the structure they need. Keep stirring until you see a smooth, cohesive dough. It should feel slightly sticky but not wet.
Step 4: Cool and Add Eggs
Let the dough cool for about 5 minutes. This step is crucial because adding eggs to a hot mixture can lead to scrambled eggs instead of a smooth batter. Once cooled, add 4 large eggs, one at a time, mixing well after each addition. This gradual incorporation helps to create that airy texture we love in cream puffs. The dough should become glossy and smooth, ready for shaping.
Step 5: Shape the Puffs
Using a tablespoon, drop mounds of dough onto a baking sheet lined with parchment paper. Space them about 2 inches apart to allow for expansion. If you want perfectly round puffs, you can use a piping bag fitted with a round tip. This method gives you more control and a professional look!
Step 6: Bake the Puffs
Bake your tiny cream puff bites in the preheated oven for 20-25 minutes. Keep an eye on them! They should puff up and turn a lovely golden brown. Avoid opening the oven door during baking, as this can cause them to deflate. You’ll know they’re done when they’re firm to the touch and have a hollow sound when tapped on the bottom.
Step 7: Cool Completely
Once baked, remove the puffs from the oven and let them cool completely on a wire rack. This step is essential! Filling them while they’re still warm can lead to soggy pastries. Patience is key here; let them cool down to room temperature for the best results.
Step 8: Prepare the Filling
In a mixing bowl, whip 1 cup of heavy cream with 1/4 cup of powdered sugar and 1 teaspoon of vanilla extract until stiff peaks form. This means the cream should hold its shape when you lift the whisk. Achieving stiff peaks is crucial for a light and fluffy filling that won’t collapse inside the puffs. Take your time with this step; it’s worth it!
Step 9: Fill the Puffs
To fill the puffs, use a piping bag or a small spoon. Gently insert the tip into the bottom of each puff and squeeze in the whipped cream until they feel full but not bursting. Be careful not to overfill, as this can lead to a messy situation. Enjoy the process; it’s the final touch that makes these tiny cream puff bites truly special!
Tips for Success
- Make sure your butter is unsalted for better control over flavor.
- Use a sturdy wooden spoon for mixing the dough; it makes a difference!
- Don’t skip the cooling step; it’s vital for the perfect texture.
- Experiment with fillings to keep things exciting and fresh.
- Store unfilled puffs in an airtight container to maintain their crispness.
Equipment Needed
- Medium saucepan: A sturdy pot for boiling water and butter. A small stockpot works too!
- Wooden spoon: Perfect for mixing the dough. A silicone spatula can also do the trick.
- Baking sheet: Essential for baking the puffs. A rimmed sheet pan is ideal.
- Parchment paper: Helps prevent sticking. You can use a silicone baking mat as an alternative.
- Piping bag: For filling the puffs. A resealable plastic bag with a corner cut off works just as well!
Variations of Tiny Cream Puff Bites
- Chocolate Cream Filling: Swap the vanilla for chocolate ganache for a rich, decadent twist.
- Fruit-Flavored Cream: Add pureed strawberries or raspberries to the whipped cream for a fruity burst.
- Matcha Cream: Mix in matcha powder for a unique green tea flavor that’s both trendy and tasty.
- Dairy-Free Option: Use coconut cream and dairy-free butter for a delicious vegan alternative.
- Nutty Delight: Incorporate almond or hazelnut extract into the filling for a nutty flavor profile.
Serving Suggestions for Tiny Cream Puff Bites
- Pair with a light fruit salad for a refreshing contrast.
- Serve alongside a rich chocolate sauce for dipping.
- Accompany with a cup of freshly brewed coffee or tea.
- Present on a beautiful platter, dusted with powdered sugar for elegance.
- Add fresh berries on the side for a pop of color.
FAQs about Tiny Cream Puff Bites
Can I make tiny cream puff bites ahead of time?
Absolutely! You can prepare the puffs a day in advance and store them in an airtight container. Just fill them with the whipped cream right before serving to keep them fresh and crisp.
What can I use instead of heavy cream for the filling?
If you’re looking for a lighter option, you can use whipped coconut cream or a dairy-free alternative. Just make sure it can hold its shape for filling the puffs.
How do I know when my tiny cream puff bites are done baking?
Your puffs are ready when they are golden brown and firm to the touch. They should also sound hollow when tapped on the bottom. Avoid opening the oven door too soon, as this can cause them to deflate.
Can I freeze tiny cream puff bites?
Yes, you can freeze unfilled puffs! Just make sure they are completely cool before placing them in a freezer-safe bag. When you’re ready to enjoy them, thaw and fill with cream.
What other fillings can I try for my tiny cream puff bites?
The possibilities are endless! You can try chocolate mousse, lemon curd, or even savory fillings like cheese or herb cream. Get creative and have fun with it!
Final Thoughts
Making tiny cream puff bites is more than just a cooking task; it’s a delightful experience that brings joy to both the cook and those who indulge in them. The process is simple yet rewarding, allowing you to create something that feels special without spending hours in the kitchen. Each bite is a little cloud of happiness, perfect for celebrations or just a sweet treat after a long day. I hope you find as much joy in making these delightful pastries as I do. So roll up your sleeves, and let’s create some delicious memories together!
PrintTiny cream puff bites: Discover the perfect treat!
Tiny cream puff bites are delightful, bite-sized pastries filled with a rich and creamy filling, perfect for any occasion.
- Prep Time: 20 minutes
- Cook Time: 25 minutes
- Total Time: 45 minutes
- Yield: 24 tiny cream puffs 1x
- Category: Dessert
- Method: Baking
- Cuisine: French
- Diet: Vegetarian
Ingredients
- 1 cup water
- 1/2 cup unsalted butter
- 1 cup all-purpose flour
- 1/4 teaspoon salt
- 4 large eggs
- 1 cup heavy cream
- 1/4 cup powdered sugar
- 1 teaspoon vanilla extract
Instructions
- Preheat the oven to 400°F (200°C).
- In a saucepan, combine water and butter; bring to a boil.
- Stir in flour and salt until the mixture forms a ball.
- Remove from heat and let cool slightly.
- Add eggs one at a time, mixing well after each addition.
- Drop tablespoon-sized mounds of dough onto a baking sheet.
- Bake for 20-25 minutes until golden brown and puffed.
- Let cool completely before filling.
- In a bowl, whip heavy cream with powdered sugar and vanilla until stiff peaks form.
- Fill each puff with the whipped cream mixture.
Notes
- Ensure the puffs are completely cool before filling to prevent sogginess.
- These can be made a day in advance and filled just before serving.
- Experiment with different fillings like chocolate or fruit-flavored cream.
Nutrition
- Serving Size: 1 cream puff
- Calories: 100
- Sugar: 5g
- Sodium: 50mg
- Fat: 7g
- Saturated Fat: 4g
- Unsaturated Fat: 2g
- Trans Fat: 0g
- Carbohydrates: 8g
- Fiber: 0g
- Protein: 2g
- Cholesterol: 30mg