Creamy Vegan Nut Cheese Board Appetizer in Just 5 Minutes

Oh, the panic I felt the first time my vegan sister-in-law came for dinner! I’d spent hours cooking, only to realize—too late—that my fancy cheese board was a total no-go. That’s when I discovered the magic of a vegan nut cheese board. It’s now my secret weapon for entertaining—simple, elegant, and always a hit. The best part? Even my dairy-loving friends can’t resist its creamy texture and rich flavor. With just soaked nuts, a few pantry staples, and some fresh herbs, you’ve got an appetizer that looks gorgeous and tastes even better. Trust me, once you try this, you’ll never go back to store-bought vegan cheeses again.
Why You’ll Love This Vegan Nut Cheese Board Appetizer
This isn’t just another vegan substitute—it’s honestly better than the real thing (and I don’t say that lightly!). Here’s why it’s become my go-to:
- Creamy dreaminess: Soaked nuts blend into the smoothest, most luxurious texture—no weird aftertaste!
- Five-minute magic: Literally toss everything in the blender while your guests are hanging up their coats.
- Crowd pleaser: Even skeptical cheese lovers sneak seconds—the nutritional yeast gives that irresistible umami punch.
- Zero cooking: Perfect for summer when you can’t bear to turn on the oven.
- Endless personality: Shape it fancy or keep it rustic—it always looks Instagram-worthy with fresh herbs.
Ingredients for Your Vegan Nut Cheese Board Appetizer
Here’s the beautiful part—you probably have most of this in your pantry right now! The key is using raw nuts (trust me, roasted ones change the flavor completely). Here’s what you’ll need:
- 1 cup raw cashews (soaked overnight—don’t skip this or your cheese won’t get creamy!)
- 1/2 cup raw almonds (also soaked—they add the perfect slightly nutty depth)
- 1 tbsp nutritional yeast (this is the magic that gives it that “cheesy” vibe)
- 1/2 tsp each garlic powder and onion powder (yes, powder—fresh would make it too strong)
- 1/2 tsp salt (I use flaky sea salt for extra dimension)
- 1 tbsp lemon juice (fresh squeezed makes all the difference)
- 2 tbsp water (just enough to get the blender going)
- Fresh rosemary or thyme (for that fancy-looking finish)
No cashews? Try macadamias for an ultra-rich version. Allergic to almonds? Just use all cashews—it’ll still be amazing.
How to Make the Perfect Vegan Nut Cheese Board Appetizer
Okay, ready for the easiest “cheese” you’ll ever make? First, drain those soaked nuts—this is crucial for that velvety texture. Toss everything into your blender (yes, even that sad-looking garlic powder at the back of your spice rack). Blend until it’s smoother than a jazz playlist, scraping down the sides as needed. Taste it! Need more tang? Add lemon. More savory? A pinch more nutritional yeast. Now the fun part—get your hands in there! Shape it into rustic rounds or a fancy log on parchment paper. Pop it in the fridge for at least an hour (I know, waiting’s torture) to let the flavors marry.
Shaping and Garnishing Your Vegan Nut Cheese Board
Presentation is everything! For a casual vibe, I roll little balls between my palms. Feeling fancy? Mold it into a wedge using plastic wrap. Press fresh rosemary sprigs or thyme leaves into the top—they’ll stick like magic. Pro tip: drizzle with olive oil and cracked pepper right before serving for that “artisanal” look.
Serving Your Vegan Nut Cheese Board Appetizer
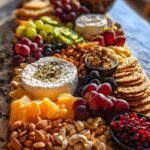
Arrange your masterpiece on a wooden board with colorful veggie sticks, crisp apple slices, and an assortment of crackers. I love adding marinated olives and fig jam for sweet-savory contrast. Watch how fast it disappears—I’ve seen guests double-dip without shame!
Tips for the Best Vegan Nut Cheese Board Appetizer
Want to take your nut cheese from good to “Can I get your recipe?” status? Here are my hard-won secrets:
- Soak those nuts extra long – If you’ve got time, let them soak 12+ hours for maximum creaminess (cashews get buttery soft!).
- Blend it warm – Cold nuts won’t blend as smoothly. Quick tip? Rinse them with warm water before blending.
- Play with flavors – Add a pinch of smoked paprika for depth or a dash of maple syrup for balance.
- Texture matters – For a firmer cheese, use less water. Too thick? Add liquid 1 tsp at a time.
- Herb hack – Roll your shaped cheese in chopped fresh herbs for instant elegance!
Trust me, these little tweaks make all the difference!
Storing and Reheating Your Vegan Nut Cheese Board Appetizer
Good news—this nut cheese actually gets more flavorful after a day in the fridge! Store any leftovers (if you’re lucky enough to have any) in an airtight container for up to 3 days. No reheating needed—just let it sit at room temperature for 10 minutes before serving to soften slightly. Pro tip: If it dries out, a quick stir with a teaspoon of water brings it right back to creamy perfection.
Vegan Nut Cheese Board Appetizer Variations
Once you’ve mastered the basic recipe, the fun begins! Try stirring in smoked paprika for a charcuterie-board vibe, or fold in finely chopped sun-dried tomatoes for bursts of tangy sweetness. Feeling adventurous? Blend in roasted garlic or a spoonful of miso paste—my friend swears it tastes like fancy brie. The best part? Every batch can be a delicious experiment!
Nutritional Information for Your Vegan Nut Cheese Board Appetizer
Here’s the scoop on what’s in each delicious serving (about ¼ of the recipe): roughly 180 calories, with 14g of healthy fats from those glorious nuts, 6g of plant-based protein to keep you satisfied, and just 10g of carbs. Of course, these numbers might wiggle a bit depending on your exact ingredients—especially if you go wild with those extra herb garnishes or jam pairings!
Frequently Asked Questions About Vegan Nut Cheese Board Appetizers
I get asked these all the time when serving this at parties—here’s the real scoop from my kitchen disasters and triumphs!
- “Can I skip soaking the nuts?” Please don’t! That soak water works miracles for creaminess. In a pinch? Pour boiling water over them for 1 hour—it’s not perfect, but it helps.
- “Will walnuts or pecans work?” They add great flavor but make the texture grainier. For first-timers, stick with cashews or macadamias—they’re the dream team for smoothness.
- “How long can it sit out?” About 2 hours max at room temp (food safety first!). I keep a chilled backup in the fridge and swap them out.
- “Can I freeze leftovers?” Surprisingly yes! Thaw overnight in the fridge—the texture changes slightly, but it’s still delicious spread on toast.
- “Why does mine taste bland?” You probably need more salt or lemon! Taste as you go—I always add an extra pinch of both at the end.
Share Your Vegan Nut Cheese Board Appetizer Creation
I’d love to see your masterpiece! Tag me on Instagram or drop a comment below—tell me how you personalized it or which herbs made your board pop. Happy hosting, cheese wizards!
PrintCreamy Vegan Nut Cheese Board Appetizer in Just 5 Minutes
A delicious vegan nut cheese board perfect for entertaining or as an appetizer. Simple, creamy, and packed with flavor.
- Prep Time: 15 minutes
- Cook Time: 0 minutes
- Total Time: 1 hour 15 minutes
- Yield: 4 servings 1x
- Category: Appetizer
- Method: No-cook
- Cuisine: Vegan
- Diet: Vegan
Ingredients
- 1 cup raw cashews (soaked overnight)
- 1/2 cup almonds (soaked overnight)
- 1 tbsp nutritional yeast
- 1/2 tsp garlic powder
- 1/2 tsp onion powder
- 1/2 tsp salt
- 1 tbsp lemon juice
- 2 tbsp water
- Fresh herbs (rosemary, thyme) for garnish
- Assorted crackers and sliced vegetables for serving
Instructions
- Drain and rinse soaked nuts.
- Blend cashews, almonds, nutritional yeast, garlic powder, onion powder, salt, lemon juice, and water until smooth.
- Adjust seasoning to taste.
- Shape the mixture into small rounds or a log.
- Chill in the fridge for 1 hour.
- Garnish with fresh herbs.
- Serve with crackers and vegetables.
Notes
- Soaking nuts ensures a creamier texture.
- Store leftovers in an airtight container for up to 3 days.
- Experiment with different herbs for variety.
Nutrition
- Serving Size: 1/4 of recipe
- Calories: 180
- Sugar: 1g
- Sodium: 150mg
- Fat: 14g
- Saturated Fat: 2g
- Unsaturated Fat: 10g
- Trans Fat: 0g
- Carbohydrates: 10g
- Fiber: 2g
- Protein: 6g
- Cholesterol: 0mg