Yogurt fruit dessert cups that delight your taste buds!
Introduction to Yogurt Fruit Dessert Cups
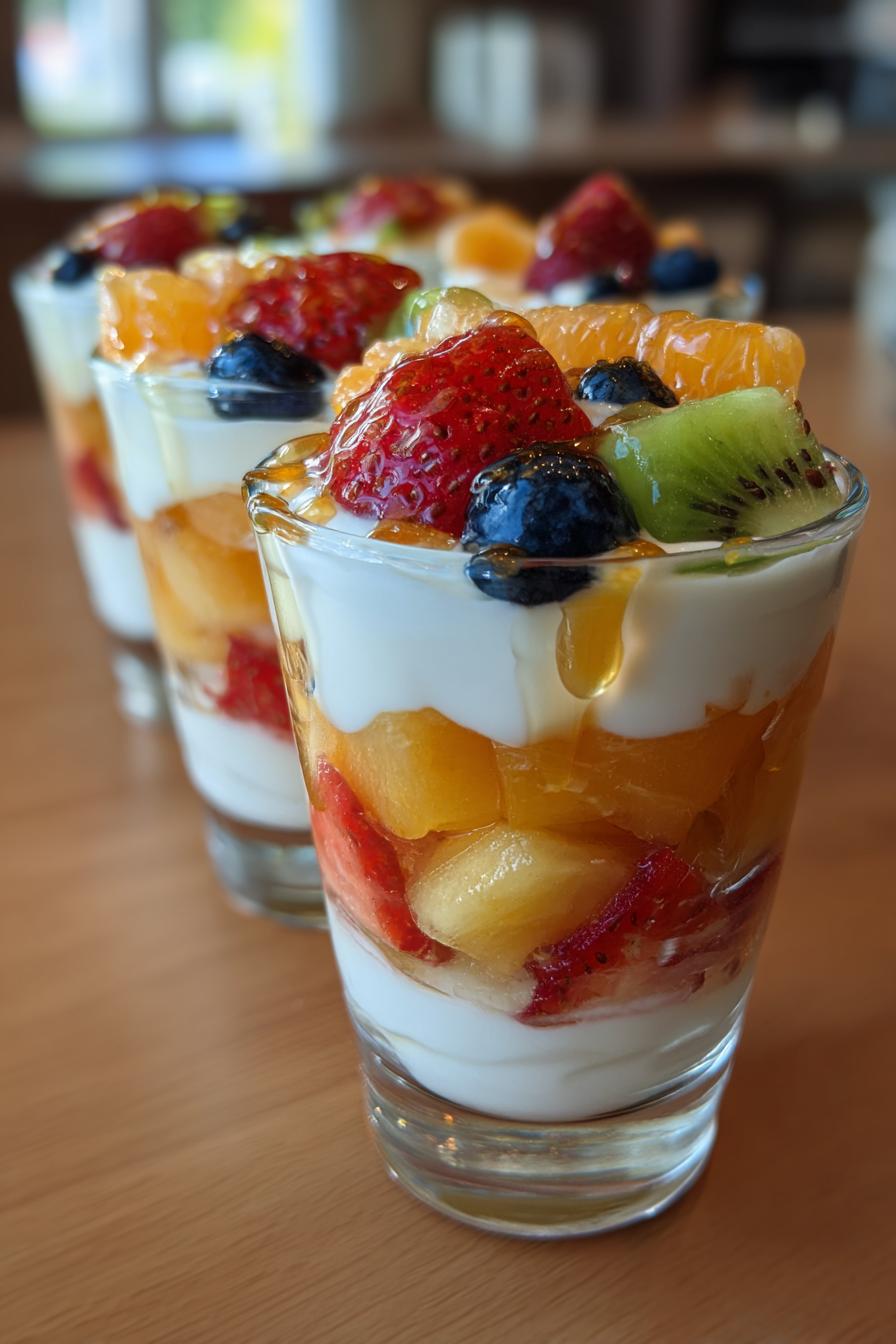
As a busy mom, I know how challenging it can be to find time for a sweet treat that’s both delicious and healthy. That’s where these yogurt fruit dessert cups come in! They’re a delightful way to satisfy your sweet cravings without the guilt. Imagine creamy yogurt layered with vibrant, fresh fruits, all topped with a crunchy finish. It’s like a mini celebration in a cup! Whether you need a quick solution for a hectic day or a dish to impress your loved ones, these dessert cups are sure to bring smiles all around.
Why You’ll Love This Yogurt Fruit Dessert Cups
These yogurt fruit dessert cups are a game-changer for anyone juggling a busy lifestyle. They come together in just 10 minutes, making them perfect for those last-minute cravings. The combination of creamy yogurt and fresh fruits creates a taste explosion that feels indulgent yet healthy. Plus, you can customize them to suit your family’s preferences, ensuring everyone gets a treat they’ll love. What’s not to adore?
Ingredients for Yogurt Fruit Dessert Cups
Creating these yogurt fruit dessert cups is a breeze, especially with the right ingredients. Here’s what you’ll need:
- Yogurt: You can use plain or flavored yogurt. Greek yogurt adds a rich creaminess, while flavored options bring extra sweetness.
- Mixed Fresh Fruits: Berries, bananas, and kiwi are fantastic choices. Feel free to use whatever fruits you have on hand for a colorful mix.
- Honey or Maple Syrup: These are optional sweeteners. They can enhance the flavor of plain yogurt, but you can skip them if you prefer a less sweet treat.
- Granola or Nuts: For that delightful crunch, sprinkle some granola or chopped nuts on top. They add texture and a nutty flavor that complements the creamy yogurt.
Remember, the exact quantities for these ingredients are listed at the bottom of the article, making it easy for you to print and follow along. Enjoy the flexibility of this recipe, and let your creativity shine!
How to Make Yogurt Fruit Dessert Cups
Making these yogurt fruit dessert cups is as easy as pie! Follow these simple steps, and you’ll have a delightful treat ready in no time. Let’s dive in!
Step 1: Mix the Yogurt
Start by taking your yogurt and placing it in a mixing bowl. If you’re using plain yogurt, this is the perfect time to sweeten it up! Drizzle in some honey or maple syrup, depending on your preference. Stir it well until everything is combined. The yogurt should be creamy and slightly sweet, just the way we like it!
Step 2: Layer the Yogurt
Now, grab your dessert cups or bowls. Using a spoon, scoop a generous layer of the yogurt mixture into the bottom of each cup. Don’t worry about being perfect; a little rustic charm adds to the fun! This creamy base is the foundation of your yogurt fruit dessert cups.
Step 3: Add Fresh Fruits
Next, it’s time to bring in the colors! Take your mixed fresh fruits and add a layer on top of the yogurt. You can use berries, banana slices, or kiwi chunks—whatever you fancy! The fruits not only add a pop of color but also a burst of flavor that pairs beautifully with the yogurt.
Step 4: Repeat Layers
Let’s keep building! Repeat the layers by adding another scoop of yogurt followed by more fresh fruits. Keep going until your cups are filled to the brim. The more layers, the more delightful surprises in every bite! Plus, it looks so pretty when you serve it.
Step 5: Top with Crunch
To finish off your yogurt fruit dessert cups, sprinkle some granola or chopped nuts on top. This adds a satisfying crunch that contrasts perfectly with the creamy yogurt and juicy fruits. It’s like the cherry on top, but even better!
Step 6: Serve or Refrigerate
Now, you can serve your delicious creations right away! If you want to prepare them ahead of time, just pop them in the fridge for a short while. They’ll stay fresh and tasty, making them a perfect grab-and-go snack for busy days. Enjoy every spoonful!
Tips for Success
- Use ripe fruits for the best flavor and sweetness.
- Experiment with different yogurt flavors to keep things exciting.
- Make a big batch and store them in the fridge for quick snacks.
- For a fun twist, add a sprinkle of cinnamon or cocoa powder.
- Involve your kids in the layering process; it’s a great way to bond!
Equipment Needed
- Mixing Bowl: A medium-sized bowl works best. You can also use a large measuring cup for easy pouring.
- Spoon: A regular spoon is perfect for mixing and layering. A spatula can help scrape every last bit of yogurt!
- Dessert Cups or Bowls: Any small cups or bowls will do. Mason jars add a fun touch!
Variations
- Vegan Option: Swap regular yogurt for plant-based yogurt made from almond, coconut, or soy for a delicious vegan treat.
- Flavor Infusions: Try adding a splash of vanilla extract or a sprinkle of cinnamon to the yogurt for an extra flavor boost.
- Nut-Free Version: Omit nuts and use seeds like pumpkin or sunflower seeds for a crunchy topping that’s safe for nut allergies.
- Chocolate Lovers: Mix in some cocoa powder with the yogurt or top with dark chocolate shavings for a decadent twist.
- Seasonal Fruits: Change up the fruits based on the season—think peaches in summer or apples in fall for a fresh take!
Serving Suggestions
- Pair your yogurt fruit dessert cups with a refreshing herbal tea for a light afternoon snack.
- Serve alongside whole-grain toast or muffins for a balanced breakfast.
- For a festive touch, garnish with mint leaves or edible flowers.
- Use clear cups to showcase the beautiful layers for a stunning presentation.
FAQs about Yogurt Fruit Dessert Cups
Can I make yogurt fruit dessert cups ahead of time?
Absolutely! You can prepare these yogurt fruit dessert cups a few hours in advance. Just keep them in the fridge until you’re ready to serve. They’ll stay fresh and delicious!
What fruits work best for this recipe?
Almost any fruit can be used! I love using berries, bananas, and kiwi, but feel free to get creative. Seasonal fruits like peaches or apples can add a delightful twist!
Can I use flavored yogurt?
Yes, flavored yogurt is a fantastic option! It adds extra sweetness and flavor to your yogurt fruit dessert cups. Just be mindful of the sugar content if you’re watching your intake.
Is this dessert suitable for kids?
Definitely! Kids love the colorful layers and the fun of building their own cups. It’s a healthy treat that they can enjoy without any guilt!
How can I make this recipe gluten-free?
To make your yogurt fruit dessert cups gluten-free, simply choose gluten-free granola or skip the granola altogether. You can also add seeds for a crunchy topping!
Final Thoughts
Creating these yogurt fruit dessert cups is more than just whipping up a quick treat; it’s about bringing joy to your kitchen and your family. Each layer tells a story, from the creamy yogurt to the vibrant fruits, making every bite a delightful experience. Whether you’re enjoying them as a snack or serving them at a gathering, these cups are sure to impress. Plus, they’re a fantastic way to sneak in some healthy ingredients without sacrificing flavor. So, roll up your sleeves, get creative, and let the smiles unfold with every delicious spoonful!
PrintYogurt fruit dessert cups that delight your taste buds!

Yogurt fruit dessert cups are a delicious and healthy treat that combines creamy yogurt with fresh fruits, perfect for satisfying your sweet cravings.
- Prep Time: 10 minutes
- Cook Time: 0 minutes
- Total Time: 10 minutes
- Yield: 4 servings 1x
- Category: Dessert
- Method: No-bake
- Cuisine: American
- Diet: Vegetarian
Ingredients
- 2 cups of yogurt (plain or flavored)
- 1 cup of mixed fresh fruits (berries, bananas, kiwi, etc.)
- 2 tablespoons of honey or maple syrup (optional)
- 1/4 cup of granola or nuts for topping
Instructions
- In a bowl, mix the yogurt with honey or maple syrup if desired.
- Layer the yogurt in dessert cups or bowls.
- Add a layer of mixed fresh fruits on top of the yogurt.
- Repeat the layers until the cups are filled.
- Top with granola or nuts for added crunch.
- Serve immediately or refrigerate for a short time before serving.
Notes
- Feel free to use any fruits you like or have on hand.
- This dessert can be made ahead of time for a quick snack.
- For a vegan option, use plant-based yogurt.
Nutrition
- Serving Size: 1 cup
- Calories: 150
- Sugar: 10g
- Sodium: 50mg
- Fat: 3g
- Saturated Fat: 1g
- Unsaturated Fat: 2g
- Trans Fat: 0g
- Carbohydrates: 25g
- Fiber: 3g
- Protein: 6g
- Cholesterol: 5mg