Grandma’s Mud Hen Bars: A Delicious Family Treat!
Introduction to Grandma’s Mud Hen Bars
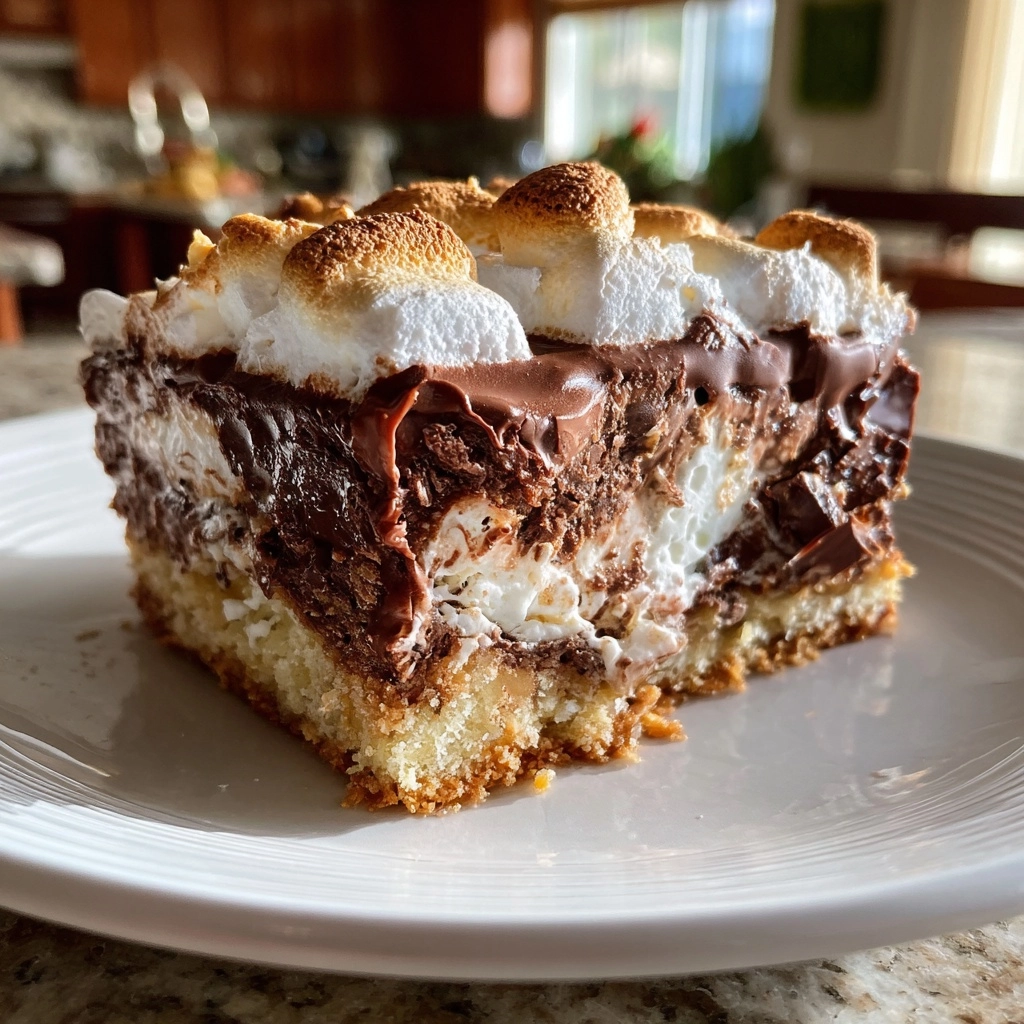
There’s something magical about Grandma’s Mud Hen Bars that brings back warm memories of family gatherings and laughter. These delightful treats are not just a dessert; they’re a quick solution for busy days when you need to impress your loved ones. With rich chocolate flavors and a chewy texture, they’re perfect for satisfying sweet cravings. I love how easy they are to whip up, making them a go-to recipe in my kitchen. Trust me, once you try these bars, they’ll become a cherished favorite in your home too!
Why You’ll Love This Grandma’s Mud Hen Bars
Grandma’s Mud Hen Bars are a dream come true for busy moms and professionals alike. They come together in just 45 minutes, making them a perfect last-minute dessert for any occasion. The rich chocolate flavor paired with gooey marshmallows creates a taste sensation that will have everyone asking for seconds. Plus, they’re easy to store and freeze, so you can always have a sweet treat on hand for unexpected guests!
Ingredients for Grandma’s Mud Hen Bars
Gathering the right ingredients is the first step to creating these delicious Grandma’s Mud Hen Bars. Here’s what you’ll need:
- Butter: This adds richness and moisture, making the bars chewy and decadent.
- Sugar: A blend of granulated sugar sweetens the bars and helps achieve that perfect texture.
- Eggs: They bind the ingredients together and contribute to the bars’ structure.
- Vanilla extract: A splash of vanilla enhances the overall flavor, making it more aromatic.
- All-purpose flour: This is the base of the bars, providing stability and structure.
- Cocoa powder: The star ingredient that gives these bars their rich chocolate flavor.
- Baking powder: This leavening agent helps the bars rise slightly, creating a light texture.
- Salt: Just a pinch balances the sweetness and enhances the chocolate flavor.
- Chocolate chips: These add extra chocolatey goodness and a delightful melt-in-your-mouth experience.
- Marshmallows: They bring a chewy, gooey texture that makes these bars irresistible.
For those who want to experiment, consider using dark chocolate chips for a richer flavor or swapping in gluten-free flour for a gluten-free version. You can find all the exact measurements at the bottom of the article, ready for printing!
How to Make Grandma’s Mud Hen Bars
Making Grandma’s Mud Hen Bars is a delightful journey that fills your kitchen with the sweet aroma of chocolate. Follow these simple steps, and you’ll have a batch of these delicious bars ready in no time!
Step 1: Preheat the Oven
First things first, preheat your oven to 350°F (175°C). Preheating is crucial because it ensures even baking. If you skip this step, your bars might end up unevenly cooked, and nobody wants that!
Step 2: Cream Butter and Sugar
In a large bowl, cream together the butter and sugar until smooth. This step is essential for achieving that perfect texture. Creaming incorporates air into the mixture, making your bars light and fluffy. It’s like giving them a little love before they hit the oven!
Step 3: Add Eggs and Vanilla
Next, add the eggs one at a time, mixing well after each addition. Then, stir in the vanilla extract. Eggs are the glue that holds everything together, while vanilla adds a warm, inviting flavor. Trust me, it makes a world of difference!
Step 4: Combine Dry Ingredients
In another bowl, combine the flour, cocoa powder, baking powder, and salt. Mixing these dry ingredients separately helps ensure that the baking powder and salt are evenly distributed. This way, every bite of your Mud Hen Bars will be perfectly balanced!
Step 5: Mix Wet and Dry Ingredients
Now, gradually add the dry ingredients to the wet mixture. Mix until just combined. Be careful not to overmix; this can lead to tough bars. We want them chewy, not rubbery! A few flour streaks are okay.
Step 6: Fold in Chocolate Chips and Marshmallows
Gently fold in the chocolate chips and marshmallows. Folding is key here; it keeps the air in the batter, ensuring your bars remain light and fluffy. Plus, who doesn’t love a gooey marshmallow surprise in every bite?
Step 7: Spread Batter and Bake
Spread the batter into a greased baking pan, making sure it’s evenly distributed. Bake for 25-30 minutes or until a toothpick inserted in the center comes out clean. Keep an eye on them; every oven is different, and you want them just right!
Step 8: Cool and Cut
Once baked, allow the bars to cool in the pan for about 10 minutes. Then, transfer them to a wire rack to cool completely. This cooling process is important; it helps the bars set up nicely. When they’re cool, cut them into squares and get ready to enjoy!
Tips for Success
- Use room temperature butter for easier creaming with sugar.
- Don’t skip the cooling step; it helps the bars firm up.
- For extra flavor, try adding a pinch of espresso powder to the batter.
- Keep an eye on the baking time; ovens can vary.
- Store leftover bars in an airtight container to maintain freshness.
Equipment Needed
- Mixing bowls: Use any size, but a large bowl is best for creaming.
- Whisk or electric mixer: A whisk works, but an electric mixer saves time.
- Baking pan: A 9×13 inch pan is ideal; you can use a glass or metal one.
- Spatula: A rubber spatula helps fold in ingredients smoothly.
- Cooling rack: If you don’t have one, a plate works too!
Variations of Grandma’s Mud Hen Bars
- Nutty Delight: Add 1 cup of chopped nuts, like walnuts or pecans, for a crunchy texture.
- Peanut Butter Swirl: Swirl in 1/2 cup of creamy peanut butter before baking for a delicious twist.
- Gluten-Free Option: Substitute all-purpose flour with a gluten-free flour blend for a gluten-free treat.
- Mint Chocolate: Mix in 1 teaspoon of peppermint extract and use mint chocolate chips for a refreshing flavor.
- Fruit Fusion: Add 1 cup of dried fruits, like cherries or cranberries, for a fruity burst in every bite.
Serving Suggestions for Grandma’s Mud Hen Bars
- Pair with a scoop of vanilla ice cream for a delightful contrast.
- Serve with a drizzle of chocolate sauce for an extra indulgent treat.
- Enjoy alongside a cup of coffee or a glass of cold milk.
- For a festive touch, dust with powdered sugar before serving.
FAQs about Grandma’s Mud Hen Bars
As you embark on your baking adventure with Grandma’s Mud Hen Bars, you might have a few questions. Here are some common queries that can help you along the way!
Can I use a different type of chocolate?
Absolutely! You can swap in dark chocolate chips for a richer flavor. Milk chocolate works too, but it will be sweeter. Feel free to experiment!
How should I store the bars?
Store your Mud Hen Bars in an airtight container at room temperature for up to a week. If you want to keep them longer, they freeze beautifully for up to three months!
Can I make these bars ahead of time?
Yes! These bars are perfect for making ahead. Just bake them, cool completely, and store them in an airtight container. They’ll be ready to enjoy whenever you need a sweet treat!
What can I serve with Grandma’s Mud Hen Bars?
These bars pair wonderfully with a scoop of vanilla ice cream or a drizzle of chocolate sauce. A glass of cold milk or a warm cup of coffee makes for a delightful combination!
Can I add other mix-ins?
Definitely! Feel free to add nuts, dried fruits, or even a swirl of peanut butter for a fun twist. The possibilities are endless with these delicious bars!
Final Thoughts
Making Grandma’s Mud Hen Bars is more than just baking; it’s about creating sweet memories with your loved ones. The rich chocolate flavor and gooey marshmallows bring smiles to faces, making every bite a little piece of joy. Whether you’re whipping them up for a family gathering or a cozy night in, these bars are sure to impress. I love how they can be made quickly, yet taste like a labor of love. So, roll up your sleeves, gather your ingredients, and let the magic of Grandma’s Mud Hen Bars fill your home with warmth and happiness!
PrintGrandma’s Mud Hen Bars: A Delicious Family Treat!

Grandma’s Mud Hen Bars are a delightful dessert that combines rich chocolate flavors with a chewy texture, perfect for family gatherings.
- Prep Time: 15 minutes
- Cook Time: 30 minutes
- Total Time: 45 minutes
- Yield: 24 bars 1x
- Category: Dessert
- Method: Baking
- Cuisine: American
- Diet: Vegetarian
Ingredients
- 1 cup of butter
- 2 cups of sugar
- 4 large eggs
- 1 teaspoon of vanilla extract
- 2 cups of all-purpose flour
- 1 cup of cocoa powder
- 1 teaspoon of baking powder
- 1/2 teaspoon of salt
- 1 cup of chocolate chips
- 1 cup of marshmallows
Instructions
- Preheat the oven to 350°F (175°C).
- In a large bowl, cream together the butter and sugar until smooth.
- Add the eggs one at a time, mixing well after each addition.
- Stir in the vanilla extract.
- In another bowl, combine the flour, cocoa powder, baking powder, and salt.
- Gradually add the dry ingredients to the wet mixture, mixing until just combined.
- Fold in the chocolate chips and marshmallows.
- Spread the batter into a greased baking pan.
- Bake for 25-30 minutes or until a toothpick inserted in the center comes out clean.
- Allow to cool before cutting into bars.
Notes
- For a richer flavor, use dark chocolate chips.
- Store in an airtight container to keep them fresh.
- These bars can be frozen for up to 3 months.
Nutrition
- Serving Size: 1 bar
- Calories: 250
- Sugar: 20g
- Sodium: 150mg
- Fat: 12g
- Saturated Fat: 7g
- Unsaturated Fat: 3g
- Trans Fat: 0g
- Carbohydrates: 35g
- Fiber: 2g
- Protein: 3g
- Cholesterol: 50mg